Yamaha CLP-535 Owner's Manual - Page 56
Audio Recording to the USB Flash Memory
 |
View all Yamaha CLP-535 manuals
Add to My Manuals
Save this manual to your list of manuals |
Page 56 highlights
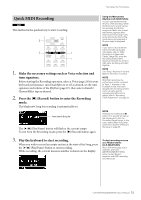
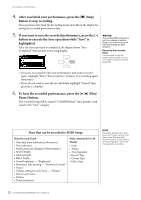
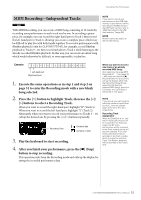
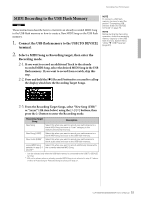
Recording Your Performance 3. Execute the Recording operation, then save the recorded performance. • When you want to record additionally to the currently selected MIDI Song, or record to the specified track to the blank MIDI Song: Execute steps 2 - 8 in "MIDI Recording-Independent Tracks" on page 53. • When you want to quick record to the blank MIDI Song: Execute steps 3 - 6 in "Quick MIDI Recording" on page 51. NOTICE Note that recording your performance to a Track containing data will erase the previously recorded data. NOTE The time signature and tempo cannot be changed when replacing the part of an existing MIDI Song. Audio Recording to the USB Flash Memory Audio These instructions describe how to record your performance as audio data. Note that an audio file to which your performance is to be recorded can be saved only on the USB flash memory. This is why you should prepare your USB flash memory device before starting the Recording operation. 1. Connect the USB flash memory to the USB [TO DEVICE] terminal. 2. Press and hold the [] (Record) button for a second to call up the display which lists the Recording Target Songs. 3. Use the [V]/[E] buttons to select "New Audio (USB)" then press the [>] button. 4. Execute steps 3 - 6 in "Quick MIDI Recording" (page 51). Unlike with MIDI Recording, the elapsed time is shown on the display while Audio Recording is being executed. NOTE To connect a USB flash memory, be sure to read the section "Connecting USB Devices (USB [TO DEVICE] terminal)" on page 70. NOTE Before starting the Recording operation, check the remaining memory capacity of the USB flash memory. System Menu: "Utility" "USB Properties" (page 92). NOTE With Audio recording, distorted sound may be produced if the Voice Volume is set to the value higher than the default setting. Make sure to set the Voice Volume to the default value or less before recording via the Voice Menu display: "Voice Edit" "Volume" (page 81). NOTE With Audio recording, audio signals via the [AUX IN] jack are also recorded. 56 CLP-585/575/545/535/565GP Owner's Manual
-
 1
1 -
2
-
3
-
4
-
5
-
6
-
7
-
8
-
9
-
10
-
11
-
12
-
13
-
14
-
15
-
16
-
17
-
18
-
19
-
20
-
21
-
22
-
23
-
24
-
25
-
26
-
27
-
28
-
29
-
30
-
31
-
32
-
33
-
34
-
35
-
36
-
37
-
38
-
39
-
40
-
41
-
42
-
43
-
44
-
45
-
46
-
47
-
48
-
49
-
50
-
 51
51 -
 52
52 -
 53
53 -
 54
54 -
 55
55 -
 56
56 -
 57
57 -
 58
58 -
 59
59 -
 60
60 -
 61
61 -
62
-
63
-
64
-
65
-
66
-
67
-
68
-
69
-
70
-
71
-
72
-
73
-
74
-
75
-
76
-
77
-
78
-
79
-
80
-
81
-
82
-
83
-
84
-
85
-
86
-
87
-
88
-
89
-
90
-
91
-
92
-
93
-
94
-
95
-
96
-
97
-
98
-
99
-
100
-
101
-
102
-
103
-
104
-
105
-
106
-
107
-
108
-
109
-
110
-
111
-
112
-
113
-
114
-
115
-
116
-
117
-
118
-
119
-
120
-
121
-
122
-
123
-
124
-
125
-
126
 |
 |