Yamaha CLP-535 Owner's Manual - Page 111
CLP-575 Assembly
 |
View all Yamaha CLP-535 manuals
Add to My Manuals
Save this manual to your list of manuals |
Page 111 highlights
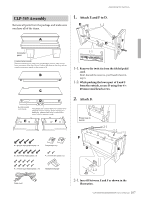
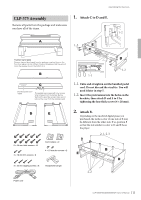
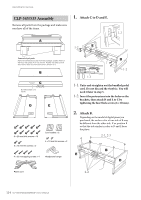
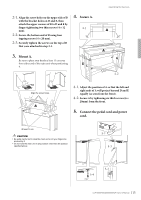
Assembling the Clavinova CLP-575 Assembly 1. Attach C to D and E. Remove all parts from the package and make sure you have all of the items. 1-2 A 1-2 E C Foamed styrol pads Remove foamed styrol pads from the package, position them on the floor, then place A on top of them. Position the pads so that they will not block the speaker box on the bottom of A. B C Bundled pedal cord inside The pedals are covered with vinyl covers when shipped from the factory. Before starting the assembly, please make sure to remove the cover from the damper pedal. D 1-2 1-1 1-1. Untie and straighten out the bundled pedal cord. Do not discard the vinyl tie. You will need it later in step 5. 1-2. Insert the protrusions into the holes on the brackets, then attach D and E to C by tightening the four thick screws (6 × 20 mm). D E 2. Attach B. Depending on the model of digital piano you purchased, the surface color of one side of B may be different from the other side. If so, position B so that the side similar in color to D and E faces the player. 2-1, 2-3 6 × 20 mm thick screws × 10 Cord holders × 2 4 × 10 mm thin screws × 2 E 4 × 12 mm thin screws × 2 4 × 20 mm tapping screws × 4 Headphone hanger 2-2 B D Power cord 111 CLP-585/575/545/535/565GP Owner's Manual
-
 1
1 -
2
-
3
-
4
-
5
-
6
-
7
-
8
-
9
-
10
-
11
-
12
-
13
-
14
-
15
-
16
-
17
-
18
-
19
-
20
-
21
-
22
-
23
-
24
-
25
-
26
-
27
-
28
-
29
-
30
-
31
-
32
-
33
-
34
-
35
-
36
-
37
-
38
-
39
-
40
-
41
-
42
-
43
-
44
-
45
-
46
-
47
-
48
-
49
-
50
-
51
-
52
-
53
-
54
-
55
-
56
-
57
-
58
-
59
-
60
-
61
-
62
-
63
-
64
-
65
-
66
-
67
-
68
-
69
-
70
-
71
-
72
-
73
-
74
-
75
-
76
-
77
-
78
-
79
-
80
-
81
-
82
-
83
-
84
-
85
-
86
-
87
-
88
-
89
-
90
-
91
-
92
-
93
-
94
-
95
-
96
-
97
-
98
-
99
-
100
-
101
-
102
-
103
-
104
-
105
-
 106
106 -
 107
107 -
 108
108 -
 109
109 -
 110
110 -
 111
111 -
 112
112 -
 113
113 -
 114
114 -
 115
115 -
 116
116 -
117
-
118
-
119
-
120
-
121
-
122
-
123
-
124
-
125
-
126
 |
 |
