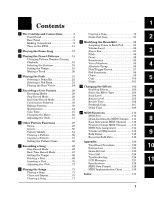
Yamaha RY20 Owner's Manual - Page 13
Enter Button, 1 and -1 Buttons, Cursor Buttons, Record Button and Record LED, Stop Button, Play - how to use
 |
View all Yamaha RY20 manuals
Add to My Manuals
Save this manual to your list of manuals |
Page 13 highlights
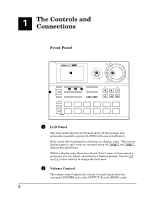
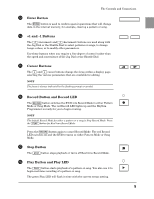
The Controls and Connections C Enter Button The [ENTER] button is used to confirm special operations that will change data in the internal memory, for example, clearing a pattern or song. ENTER D +1 and -1 Buttons The [ +1 ] (increment) and [ -1 ] (decrement) buttons are used along with the Jog Dial or the Shuttle Dial to select patterns or songs, to change tempo values, or to modify other parameters. Use these buttons when you require a fine degree of control rather than the speed and convenience of the Jog Dial or the Shuttle Dial. -1 +1 E Cursor Buttons The [ < ] and [ > ] cursor buttons change the focus within a display page, selecting the various parameters that are available for editing. NOTE The focus is always indicated by the flashing prompt or symbol. F Record Button and Record LED The [RECORD] button switches the RY20 into Record Mode in either Pattern Mode or Song Mode. The red Record LED lights up and the Rhythm Programmer is ready for you to begin creating. NOTE The default Record Mode for either a pattern or a song is Step Record Mode. Press the [ PLAY ] button for Real-time Record Mode. Press the [RECORD] button again to cancel Record Mode. The red Record LED switches off and the RY20 returns to either Pattern Mode or Song Mode. G Stop Button The [ STOP ] button stops playback or turns off Real-time Record Mode. H Play Button and Play LED The [ PLAY ] button starts playback of a pattern or song. You also use it to begin real-time recording of a pattern or song. The green Play LED will flash in time with the current tempo setting. 5
-
 1
1 -
2
-
3
-
4
-
5
-
6
-
7
-
 8
8 -
 9
9 -
 10
10 -
 11
11 -
 12
12 -
 13
13 -
 14
14 -
 15
15 -
 16
16 -
 17
17 -
 18
18 -
19
-
20
-
21
-
22
-
23
-
24
-
25
-
26
-
27
-
28
-
29
-
30
-
31
-
32
-
33
-
34
-
35
-
36
-
37
-
38
-
39
-
40
-
41
-
42
-
43
-
44
-
45
-
46
-
47
-
48
-
49
-
50
-
51
-
52
-
53
-
54
-
55
-
56
-
57
-
58
-
59
-
60
-
61
-
62
-
63
-
64
-
65
-
66
-
67
-
68
-
69
-
70
-
71
-
72
-
73
-
74
-
75
-
76
-
77
-
78
-
79
-
80
-
81
-
82
-
83
-
84
-
85
-
86
-
87
-
88
-
89
-
90
-
91
-
92
-
93
-
94
-
95
-
96
-
97
-
98
-
99
-
100
-
101
-
102
-
103
-
104
-
105
-
106
-
107
-
108
-
109
-
110
-
111
-
112
-
113
-
114
-
115
-
116
-
117
-
118
-
119
-
120
-
121
-
122
-
123
-
124
-
125
-
126
-
127
-
128
-
129
-
130
-
131
-
132
-
133
-
134
-
135
-
136
-
137
-
138
-
139
-
140
 |
 |
