Yamaha RY20 Owner's Manual - Page 95
Stereo Pan
 |
View all Yamaha RY20 manuals
Add to My Manuals
Save this manual to your list of manuals |
Page 95 highlights
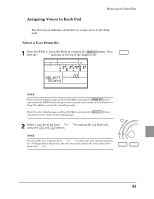
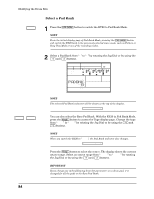
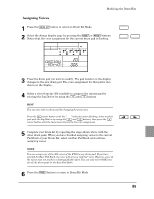
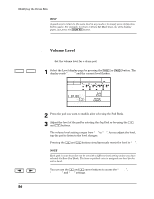
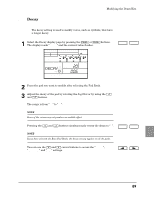
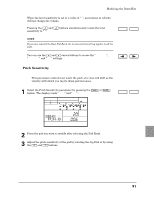
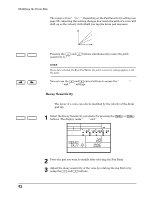
s Stereo Pan Modifying the Drum Kits Define the stereo pan for a drum pad. 1 Select the Pan display page by pressing the [PAGE+] or [PAGE-] buttons . The display reads "PAN" and the current pan setting flashes. PATTERN OTHERS HH SD BD DRUM KIT PAD BANK A CHASE MAIN A DRUM KIT PAD PAGE - PAGE + 2 Press the pad you want to modify after selecting the Pad Bank. 3 Set the pan for the selected pad by rotating the Jog Dial or by using the [ +1 ] and [ -1 ] buttons. The pan setting can be "OFF" or range from "-7" (extreme left) to "+7" (extreme right). A setting of "+7" results in the output of the selected voice coming from the right channel only, while a setting of "-7" pans fully left. A setting of "0" is stereo centre. NOTE Even though a voice is panned fully to one channel, you may still hear that voice in the other channel due to the effects processing performed by the built-in DSP. All drum voices have a pre-assigned pan. Selecting "OFF" uses that value. Pressing the [ +1 ] and [ -1 ] buttons simultaneously resets the pan to the "OFF" setting. -1 +1 NOTE Each pad in your drum kit can be set with a different pan setting unless you have selected the Bass Pad Bank. The bass or pitched voice is assigned one pan for the entire bank. You can use the [ < ] and [ > ] cursor buttons to access the "PAN", "DRUM KIT" and "PAD" settings. 87
-
 1
1 -
2
-
3
-
4
-
5
-
6
-
7
-
8
-
9
-
10
-
11
-
12
-
13
-
14
-
15
-
16
-
17
-
18
-
19
-
20
-
21
-
22
-
23
-
24
-
25
-
26
-
27
-
28
-
29
-
30
-
31
-
32
-
33
-
34
-
35
-
36
-
37
-
38
-
39
-
40
-
41
-
42
-
43
-
44
-
45
-
46
-
47
-
48
-
49
-
50
-
51
-
52
-
53
-
54
-
55
-
56
-
57
-
58
-
59
-
60
-
61
-
62
-
63
-
64
-
65
-
66
-
67
-
68
-
69
-
70
-
71
-
72
-
73
-
74
-
75
-
76
-
77
-
78
-
79
-
80
-
81
-
82
-
83
-
84
-
85
-
86
-
87
-
88
-
89
-
 90
90 -
 91
91 -
 92
92 -
 93
93 -
 94
94 -
 95
95 -
 96
96 -
 97
97 -
 98
98 -
 99
99 -
 100
100 -
101
-
102
-
103
-
104
-
105
-
106
-
107
-
108
-
109
-
110
-
111
-
112
-
113
-
114
-
115
-
116
-
117
-
118
-
119
-
120
-
121
-
122
-
123
-
124
-
125
-
126
-
127
-
128
-
129
-
130
-
131
-
132
-
133
-
134
-
135
-
136
-
137
-
138
-
139
-
140
 |
 |
