Yamaha RY20 Owner's Manual - Page 19
Turn on the RY20 - instructions
 |
View all Yamaha RY20 manuals
Add to My Manuals
Save this manual to your list of manuals |
Page 19 highlights
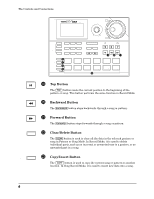
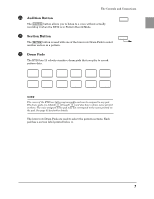
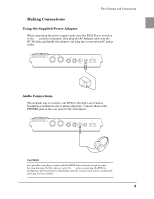
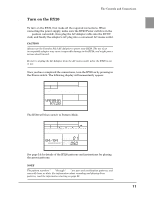
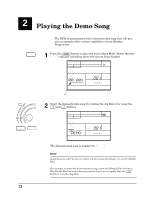
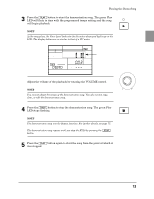
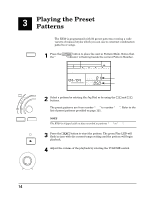
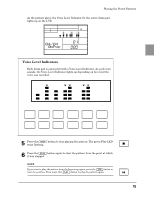
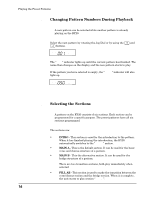
The Controls and Connections s Turn on the RY20 To turn on the RY20, first make all the required connections. When connecting the power supply, make sure the RY20 Power switch is in the OFF position (extended), then plug the AC Adaptor cable into the DC IN Jack, and finally the adaptor's AC plug into a convenient AC mains outlet. CAUTION Always use the Yamaha PA-3 AC Adaptor to power your RY20. The use of an incompatible adaptor may cause irreparable damage to the RY20, and might pose a serious shock hazard. Be sure to unplug the AC Adaptor from the AC mains outlet when the RY20 is not in use. Once you have completed the connections, turn the RY20 on by pressing in the Power switch. The following display will momentarily appear: OTHERS HH SD BD PAD BANK The RY20 will then switch to Pattern Mode. PATTERN OTHERS HH SD BD PAD BANK A CHASE MAIN A MEASURE PATTERN EMPTY See page 14 for details of the RY20 patterns and instructions for playing the preset patterns. NOTE The pattern numbers "050" through "149" are user and combination patterns, and currently have no data. For information about recording and playing these patterns, read the information starting on page 28. 11
-
 1
1 -
2
-
3
-
4
-
5
-
6
-
7
-
8
-
9
-
10
-
11
-
12
-
13
-
 14
14 -
 15
15 -
 16
16 -
 17
17 -
 18
18 -
 19
19 -
 20
20 -
 21
21 -
 22
22 -
 23
23 -
 24
24 -
25
-
26
-
27
-
28
-
29
-
30
-
31
-
32
-
33
-
34
-
35
-
36
-
37
-
38
-
39
-
40
-
41
-
42
-
43
-
44
-
45
-
46
-
47
-
48
-
49
-
50
-
51
-
52
-
53
-
54
-
55
-
56
-
57
-
58
-
59
-
60
-
61
-
62
-
63
-
64
-
65
-
66
-
67
-
68
-
69
-
70
-
71
-
72
-
73
-
74
-
75
-
76
-
77
-
78
-
79
-
80
-
81
-
82
-
83
-
84
-
85
-
86
-
87
-
88
-
89
-
90
-
91
-
92
-
93
-
94
-
95
-
96
-
97
-
98
-
99
-
100
-
101
-
102
-
103
-
104
-
105
-
106
-
107
-
108
-
109
-
110
-
111
-
112
-
113
-
114
-
115
-
116
-
117
-
118
-
119
-
120
-
121
-
122
-
123
-
124
-
125
-
126
-
127
-
128
-
129
-
130
-
131
-
132
-
133
-
134
-
135
-
136
-
137
-
138
-
139
-
140
 |
 |
