Yamaha RY20 Owner's Manual - Page 37
Step Record Mode
 |
View all Yamaha RY20 manuals
Add to My Manuals
Save this manual to your list of manuals |
Page 37 highlights
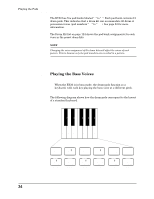
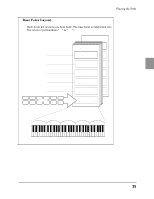
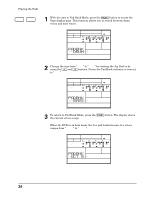
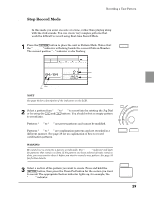
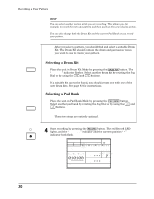
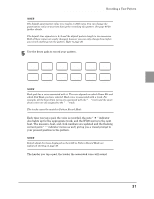
s Step Record Mode Recording a User Pattern In this mode you enter one note at a time, rather than playing along with the click sounds. You can create very complex patterns that would be difficult to record using Real-time Record Mode. 1 Press the [PATTERN] button to place the unit in Pattern Mode. Notice that the "PATTERN" indicator is flashing beside the current Pattern Number. The current position " " indicator is also flashing. PATTERN OTHERS HH SD BD PAD BANK A CHASE MAIN A MEASURE PATTERN EMPTY Pattern Name Current Time Signature Measure Number Pattern Number NOTE See page 40 for a description of the indicators on the LCD. 2 Select a pattern from "050" to "099" to record into by rotating the Jog Dial or by using the [ +1 ] and [ -1 ] buttons. You should select an empty pattern to record into. Patterns "000" to "049" are preset patterns and cannot be modified. Patterns "100" to "149" are combination patterns and are recorded in a different manner. See page 38 for an explanation of how to record combination patterns. WARNING Be careful not to overwrite a pattern accidentally. The "EMPTY" indicator will light for patterns that contain no data. If the pattern you have selected already contains data, you may want to clear it before you start to record a new pattern. See page 55 for further details. 3 Select a section of the pattern you want to create. Press and hold the [SECTION] button, then press the Drum Pad button for the section you want to record. The appropriate Section indicator lights up, for example, the "INTRO" indicator. PATTERN + -1 +1 SECTION 6 BD INTRO 29
-
 1
1 -
2
-
3
-
4
-
5
-
6
-
7
-
8
-
9
-
10
-
11
-
12
-
13
-
14
-
15
-
16
-
17
-
18
-
19
-
20
-
21
-
22
-
23
-
24
-
25
-
26
-
27
-
28
-
29
-
30
-
31
-
 32
32 -
 33
33 -
 34
34 -
 35
35 -
 36
36 -
 37
37 -
 38
38 -
 39
39 -
 40
40 -
 41
41 -
 42
42 -
43
-
44
-
45
-
46
-
47
-
48
-
49
-
50
-
51
-
52
-
53
-
54
-
55
-
56
-
57
-
58
-
59
-
60
-
61
-
62
-
63
-
64
-
65
-
66
-
67
-
68
-
69
-
70
-
71
-
72
-
73
-
74
-
75
-
76
-
77
-
78
-
79
-
80
-
81
-
82
-
83
-
84
-
85
-
86
-
87
-
88
-
89
-
90
-
91
-
92
-
93
-
94
-
95
-
96
-
97
-
98
-
99
-
100
-
101
-
102
-
103
-
104
-
105
-
106
-
107
-
108
-
109
-
110
-
111
-
112
-
113
-
114
-
115
-
116
-
117
-
118
-
119
-
120
-
121
-
122
-
123
-
124
-
125
-
126
-
127
-
128
-
129
-
130
-
131
-
132
-
133
-
134
-
135
-
136
-
137
-
138
-
139
-
140
 |
 |
