Yamaha RY20 Owner's Manual - Page 48
LCD Panel
 |
View all Yamaha RY20 manuals
Add to My Manuals
Save this manual to your list of manuals |
Page 48 highlights
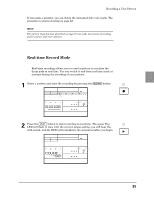
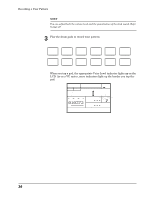
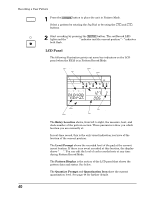
Recording a User Pattern PATTERN 1 Press the [PATTERN] button to place the unit in Pattern Mode. Select a pattern by rotating the Jog Dial or by using the [ +1 ] and [ -1 ] buttons. 2 Start recording by pressing the [RECORD] button. The red Record LED lights and the "QUANTIZE" indicator and the current position " " indicator both flash. LCD Panel The following illustration points out some key indicators on the LCD panel when the RY20 is in Pattern Record Mode. Entry Location Level Prompt Pattern Display Quantize Prompt PATTERN PAD BANK A OTHERS HH SD BD MEAS BEAT CLOCK LEVEL CHASE QUANTIZE PAD MAIN A Section Indicator Voice Name Quantization Icon Pad Number Prompt The Entry Location shows, from left to right, the measure, beat, and clock number of the pattern section. These parameters show you which location you are currently at. In real-time record, this is the only visual indication you have of the location of the current position. The Level Prompt shows the recorded level of the pad at the current insert location. If there is no event recorded at this location, the display shows "---". You can edit the level of each recorded note at any time during Pattern Record Mode. The Pattern Display is the section of the LCD panel that shows the pattern data and status. See below. The Quantize Prompt and Quantization Icon show the current quantization level. See page 44 for further details. 40
-
 1
1 -
2
-
3
-
4
-
5
-
6
-
7
-
8
-
9
-
10
-
11
-
12
-
13
-
14
-
15
-
16
-
17
-
18
-
19
-
20
-
21
-
22
-
23
-
24
-
25
-
26
-
27
-
28
-
29
-
30
-
31
-
32
-
33
-
34
-
35
-
36
-
37
-
38
-
39
-
40
-
41
-
42
-
 43
43 -
 44
44 -
 45
45 -
 46
46 -
 47
47 -
 48
48 -
 49
49 -
 50
50 -
 51
51 -
 52
52 -
 53
53 -
54
-
55
-
56
-
57
-
58
-
59
-
60
-
61
-
62
-
63
-
64
-
65
-
66
-
67
-
68
-
69
-
70
-
71
-
72
-
73
-
74
-
75
-
76
-
77
-
78
-
79
-
80
-
81
-
82
-
83
-
84
-
85
-
86
-
87
-
88
-
89
-
90
-
91
-
92
-
93
-
94
-
95
-
96
-
97
-
98
-
99
-
100
-
101
-
102
-
103
-
104
-
105
-
106
-
107
-
108
-
109
-
110
-
111
-
112
-
113
-
114
-
115
-
116
-
117
-
118
-
119
-
120
-
121
-
122
-
123
-
124
-
125
-
126
-
127
-
128
-
129
-
130
-
131
-
132
-
133
-
134
-
135
-
136
-
137
-
138
-
139
-
140
 |
 |
