3Com 3107c User Guide
3Com 3107c - NBX Wireless VoIP Phone Manual
 |
UPC - 662705491592
View all 3Com 3107c manuals
Add to My Manuals
Save this manual to your list of manuals |
3Com 3107c manual content summary:
- 3Com 3107c | User Guide - Page 1
NBX® Cordless Telephone Guide NBX Networked Telephony Solutions System Release 5.0 Part Number 900-0215-01 Published April 2005 http://www.3com.com/ - 3Com 3107c | User Guide - Page 2
delivered to you in conjunction with guide. Unless otherwise indicated, 3Com registered trademarks are registered in the United States and may or may not be registered in other countries. 3Com, the 3Com logo, and NBX are registered trademarks of 3Com Corporation. NetSet and pcXset are trademarks of - 3Com 3107c | User Guide - Page 3
the First Time 13 The NBX NetSet Utility 15 Starting the NBX NetSet Utility 16 Navigation and Shortcut Icons in the NBX NetSet Utility 16 Quick Reference Guides 17 2 3COM 3106C AND 3107C CORDLESS TELEPHONES Telephone Buttons and Controls 20 3Com 3106C 20 3Com 3107C 23 Programmable Access Buttons 25 - 3Com 3107c | User Guide - Page 4
4 Changing Your Name Announcement and Personal Greetings 36 Listening to NBX Messages 37 Message Indicators 37 Listening from Your Computer 37 Listening from Your 3Com Cordless Telephone 38 Listening from Any Internal 3Com Telephone 38 Listening from an External Location 38 Managing Your Messages 39 - 3Com 3107c | User Guide - Page 5
Conference Calls 63 5 PERSONALIZING YOUR TELEPHONE Guidelines About Features on 3Com Telephones 65 Ringer Tones 66 Speed Dials 66 Personal Speed Dials 66 of Your Telephone 75 Telephone Locking 75 Call Permissions 76 Class of Service Override 76 Using a Headset 77 6 GETTING MORE FROM YOUR TELEPHONE - 3Com 3107c | User Guide - Page 6
Distribution 84 Hunt Groups 87 Calling Groups 89 Group Membership 89 Call Park 90 Paging 91 Paging the System 92 Paging Zones 92 Configurable Operators Applications 101 7 FEATURE CODES Feature Codes with 3Com Telephones 103 3Com Cordless Telephone 103 NBX Tones 104 Using Feature Codes 106 A - 3Com 3107c | User Guide - Page 7
Pack (3Com 3107C) 122 Low Battery Indicator 122 Cleaning the Battery and Charging Unit Contacts 123 Moving Your Telephone 123 Swapping Telephones 123 Cleaning Your Telephone 123 Important Safety Instructions 124 Battery Precautions 125 Electrical and EMI Precautions 126 Troubleshooting Problems 128 - 3Com 3107c | User Guide - Page 8
8 - 3Com 3107c | User Guide - Page 9
follow the instructions in the release notes. Table 1 shows where to look for specific information in this guide. Table 1 Where to Find Information If you are looking for information about How to get started with your new telephone The 3Com 3106C and 3107C Cordless Telephones NBX Voice Messaging - 3Com 3107c | User Guide - Page 10
3Com Telephone or an analog telephone connected to the NBX system through an ATC card or the single-port ATA device. Table 3 lists icons that are used throughout this guide. Table 3 Icons Icon Type Description Information note Information that describes important features or instructions - 3Com 3107c | User Guide - Page 11
full potential of the system. The NBX Resource Pack CD contains many guides to the NBX products and their related 3Com applications. When you log in to the NBX NetSet utility as a user, you can view the PDF versions of the NBX Telephone Guides and NBX Feature Codes Guide by clicking the icons at the - 3Com 3107c | User Guide - Page 12
12 ABOUT THIS GUIDE - 3Com 3107c | User Guide - Page 13
announcement and personal greeting. This chapter covers these topics: ■ Setting Up Your Password and Voice Mail for the First Time ■ The NBX NetSet Utility ■ Quick Reference Guides Setting Up Your Password and Voice Mail for the First Time The procedure by which you set up your password and voice - 3Com 3107c | User Guide - Page 14
1: GETTING STARTED Table 4 Setting Your NBX NetSet Utility and NBX Messaging Password Feature NBX Phones Password - Set Initially If your system uses NBX Messaging, follow the NBX voice prompts to set your NBX password (which is the same for the NBX NetSet utility and voice messaging) OR use - 3Com 3107c | User Guide - Page 15
utility. See Chapter 3 for voice messaging features. If your NBX system uses a messaging application other than NBX Messaging, off-site notification and other voice messaging features are available through your messaging application. See the application's documentation rather than using this Guide. - 3Com 3107c | User Guide - Page 16
navigate to the following features: Table 5 Navigation Icons Icon Action Where You Go Back ■ For the User goes to the main NBX NetSet utility login dialog box ■ For the Administrator goes to the NBX NetSet utility main menu window Help Help for the fields and procedures related to the screen - 3Com 3107c | User Guide - Page 17
features: One-Touch Speed Dials (not available on 3Com 3100 Entry Telephone) Off-Site Notification Telephone Guides (including this guide) NBX Feature Codes Guide Quick Reference Guides To open and print a copy of the Quick Reference Guides for the most frequently used features on your telephone - 3Com 3107c | User Guide - Page 18
18 CHAPTER 1: GETTING STARTED - 3Com 3107c | User Guide - Page 19
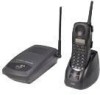
Buttons and Controls ■ Programmable Access Buttons ■ Status Lights for System Appearance Buttons ■ Base Unit Controls and Functions ■ Using the Handset ■ Using the Optional Headset The 3Com 3106C and 3107C Cordless Telephones (3C10406C and 3C10407C) do not support speaker phone operation. - 3Com 3107c | User Guide - Page 20
20 CHAPTER 2: 3COM 3106C AND 3107C CORDLESS TELEPHONES Telephone Buttons and Controls 3Com 3106C Figure 1 shows the buttons and controls on the 3Com 3106C Cordless Telephone. For many operations, the 3Com 3106C makes a sound when you press a button. Figure 1 3Com 3106C Cordless Telephone 1 15 2 - 3Com 3107c | User Guide - Page 21
(MSG) ■ The phone is on for placing calls (Talk). This icon flashes during call transfers. ■ The handset ringer is off (Off) ■ The handset battery needs recharging (Low) when an outgoing call is ringing or when you are using the NBX Messaging system. Blinks to indicate an incoming call or that you - 3Com 3107c | User Guide - Page 22
3COM 3106C AND 3107C CORDLESS TELEPHONES 13 Personal Speed Dial button - See Chapter 5. This button can also be assigned other functions, such as Bridged Extensions. Ask your NBX Volume later in this chapter. 16 Ringer ON/OFF and MUTE switch - Turns the handset ringer on and off. When the ringer is - 3Com 3107c | User Guide - Page 23
2 shows the buttons and controls on the 3Com 3107C Cordless Telephone. For many operations, the 3Com 3107C makes a sound when you press a button. Figure 2 3Com 3107C Cordless Telephone 9 1 10 2 11 12 3 13 4 14 15 5 6 16 7 17 8 1 Ringer ON/OFF switch - Turns the handset ringer on and - 3Com 3107c | User Guide - Page 24
24 CHAPTER 2: 3COM 3106C AND 3107C CORDLESS TELEPHONES 4 Talk button - Turns the phone on to place or answer calls. Also acts line. Lights steadily when an outgoing call is ringing or when you are using the NBX Messaging system. Blinks to indicate an incoming call or that you have placed a call - 3Com 3107c | User Guide - Page 25
buttons on the 3Com Cordless Telephones. By default, the functions assigned to these buttons are set by your NBX administrator. You One-Touch Speed Dials screen. Click the Help button on the screen for detailed instructions. Figure 3 Access Buttons 1 2 3 4 Access buttons have these default - 3Com 3107c | User Guide - Page 26
26 CHAPTER 2: 3COM 3106C AND 3107C CORDLESS TELEPHONES 3 Personal Speed Dial button - See Chapter 5. This button can also be assigned other functions, such as Bridged Extensions. Ask your NBX Administrator for more information, and see Chapter 6 for information about Bridged Extensions. 4 Message - 3Com 3107c | User Guide - Page 27
Base Unit Controls and Functions 27 Base Unit Controls and Functions Figure 4 shows the controls and functions of the 3Com Cordless Telephone base unit. Figure 4 3Com Cordless Telephone Base Unit 2 3 1 1 Power status LED 2 DC Power Jack 3 RJ45 port for connecting to the LAN Using the Handset - 3Com 3107c | User Guide - Page 28
3106C AND 3107C CORDLESS TELEPHONES Handset Controls 3Com 3106C 3Com 3107C RING /VOL ON/OFF MUTE R/VOL MUTE ON OFF Earpiece Volume 1 Press the RING/VOL (3106C) button or the R/VOL (3107C) button on the side of the handset during a call to change the earpiece volume on the handset. The phone - 3Com 3107c | User Guide - Page 29
Tone and Volume 1 Press the RING/VOL (3106C) button or the R/VOL (3107C) button on the side of the handset when it is not being used for conversations (when it is in AutoStandby mode) to change the ringer tone and volume. The phone's display panel cycles through these possible settings: ■ Ring - 3Com 3107c | User Guide - Page 30
30 CHAPTER 2: 3COM 3106C AND 3107C CORDLESS TELEPHONES Or, depending on the condition, you may see one of the following display messages: LCD Display NO SERVICE or Connect to the phone port LINE IN USE NO SERVICE Condition Indicator No LAN connection or no power Error Tone to the base unit - 3Com 3107c | User Guide - Page 31
The System Appearance button for the call blinks and the display shows the calling phone's ID (if Caller ID is enabled). 2 To resume the call, press the jack and plug in the headset. No other settings are needed. The 3Com Cordless Telephone operates the same as when you use the handset, although you - 3Com 3107c | User Guide - Page 32
32 CHAPTER 2: 3COM 3106C AND 3107C CORDLESS TELEPHONES - 3Com 3107c | User Guide - Page 33
Messaging Components ■ Changing Your Password ■ Changing Your Name Announcement and Personal Greetings ■ Listening to NBX Messages ■ Replying to a Message ■ Forwarding a Message ■ Creating and Sending a Message ■ Using Voice Mail Group Lists ■ Marking a Message as Private or Urgent ■ Other Ways to - 3Com 3107c | User Guide - Page 34
those messages from any touch-tone telephone. If your system uses a messaging application other than NBX Messaging, use the documentation for your messaging application instead of the instructions in this chapter. Exception: Use the procedures in "Changing Your Password" regardless of your messaging - 3Com 3107c | User Guide - Page 35
utility password. ■ 3Com recommends that you use the same password for your voice messaging system and for the NBX NetSet utility. Security Tips ■ Change your password often. ■ Do not use passwords that can easily identify you, such as your phone extension or birth date. ■ Avoid simple passwords - 3Com 3107c | User Guide - Page 36
can also review, delete, or choose which to make active with the NBX NetSet utility. If appropriate, you may also want to change the greeting record it through the phone. If you forget your password, the administrator can set it to be your extension number. Then follow the instructions in Table 4 - 3Com 3107c | User Guide - Page 37
NBX Messaging, use the documentation for your messaging application instead of these instructions. Message Indicators To tell if you have messages in your mailbox: ■ On a 3Com 3106C or 3107C Cordless as a USB headset and an operating system that supports USB OR ■ A sound card, a third-party application such - 3Com 3107c | User Guide - Page 38
38 CHAPTER 3: NBX MESSAGING Listening from Your To listen to your messages from your 3Com Cordless Telephone: 3Com Cordless Telephone 1 Remove the handset from the charging unit. 2 Press the Msg (Message) button to access the mailbox. 3 At the prompt, type your password and press #. 4 - 3Com 3107c | User Guide - Page 39
Listening to NBX Messages 39 Managing Your Press these buttons to manage your messages: Messages Table 7 Managing Messages Button 1 2 3 4 5 6 7 8 9 # * Description Play or repeat the message. Create, send, or - 3Com 3107c | User Guide - Page 40
MESSAGING Replying to a Message You can send a reply to a voice mail message, provided that the NBX system has received the necessary caller ID information. If you receive a message that is marked Private, you can reply to the originator, but you cannot - 3Com 3107c | User Guide - Page 41
voice mail group list number. (See "Using Voice Mail Group Lists" later in this chapter.) ■ A site code plus extension (to send to a user on another NBX system in your organization). Example: neee or neeee (where n = one or more site code digits and e = the extension digits on the other system). For - 3Com 3107c | User Guide - Page 42
voice mail group list number. (See "Using Voice Mail Group Lists" later in this chapter.) ■ A site code plus extension (to send to a user on another NBX system in your organization). Example: neee or neeee (where n = one or more site code digits and e = the extension digits on the other system). For - 3Com 3107c | User Guide - Page 43
the group and click Membership. Creating Personal You can create your own Personal Voice Mail Group either through the Groups telephone or through the NBX NetSet utility. To create a personal voice mail list through the telephone: 1 Log in to your mailbox at your telephone or remotely. 2 Dial 9 for - 3Com 3107c | User Guide - Page 44
complete the list. Modifying or You can review your voice mail groups, add members, or delete a group Deleting Groups from the telephone or from the NBX NetSet utility. To review or modify a voice mail group from the telephone: 1 Log in to your mailbox at your telephone or remotely. 2 Dial 9 for - 3Com 3107c | User Guide - Page 45
or mailbox number of the recipient ■ A speed dial number. See "Speed Dials" in Chapter 5. ■ A site code plus extension (to send to a user on another NBX system). Example: neee or neeee (where n = one or more site code digits and e = the extension digits on the other system). For valid site codes for - 3Com 3107c | User Guide - Page 46
your changes. To delete a voice mail group from the NBX NetSet utility: 1 Log in Netset > NBX Messaging > Personal Group List. You see a list of and Sending a Message" earlier in this chapter. 2 In step 4 of those instructions, press 9. 3 To mark the message Urgent, press 1. To mark the message - 3Com 3107c | User Guide - Page 47
are a teacher, you can create a new personal greeting on the school's NBX system every day to explain homework assignments. Students call in to the greeting that they cannot leave messages in this voice mailbox. For instructions on changing the personal greeting, see "Changing Your Name Announcement - 3Com 3107c | User Guide - Page 48
phantom mailbox, you can retrieve, forward, and save messages in the same way that any other employee can but without a physical telephone connected to your NBX system. ■ If you are an employee who lives a long distance from your office and works from home, customers and others can leave messages in - 3Com 3107c | User Guide - Page 49
4 STANDARD FEATURES This chapter describes standard features of the 3Com Telephones. It covers these topics: ■ Answering a Call ■ Dialing a system uses a messaging application other than NBX Messaging, use the documentation for your messaging application instead of the instructions in this chapter. - 3Com 3107c | User Guide - Page 50
unanswered call on any telephone on the NBX system is forwarded to the call coverage point that you specify in NBX NetSet > User Information > Call Forward 3Com Telephone shows the name and extension of an internal caller. For an external caller, if your organization purchases Caller ID service - 3Com 3107c | User Guide - Page 51
manage the two lines. Table 8 Managing Multiple Calls on the 3Com Cordless Telephones Line A Active call Line B Ringing Active call On hold incoming call. Then press the blinking System Appearance button for the call on hold, to switch to it. If you have placed two calls on hold: ■ And you do not - 3Com 3107c | User Guide - Page 52
52 CHAPTER 4: STANDARD FEATURES Dialing a Call This section describes standard dialing features. An Internal Call 1 Remove the handset from the charging unit. 2 Press the Talk button. 3 Dial the person's 3-digit or 4-digit extension. 4 When you are finished, hang up the handset or press the Talk - 3Com 3107c | User Guide - Page 53
a specified number of rings if you have not specified another condition. ■ Call Forward No Answer - Forwards unanswered incoming calls to a call coverage point when your phone rings for a specified number of rings. ■ Call Forward Busy - Forwards incoming calls to a call coverage point when your - 3Com 3107c | User Guide - Page 54
you can set call forwarding using feature codes. Use the NBX NetSet™ utility to see your call forwarding settings. Your rings once before forwarding the call to your default call coverage point. On a 3Com Cordless Telephone: 1 Remove the handset from the charging unit. 2 Press Feature + 440 - 3Com 3107c | User Guide - Page 55
the extension that you want to forward calls to. 5 Press #. You can specify the number of rings before the call is forwarded by logging into NBX NetSet > User Information > Call Forward Override. To cancel Call Forward No Answer: 1 Remove the handset from the charging unit. 2 Press the Talk button - 3Com 3107c | User Guide - Page 56
Press Feature + 465 again. Setting Call Forward from the NBX NetSet Utility From the NBX NetSet utility, you can set default call forwarding or choose to forwarding. You choose from four destinations: voicemail box, a phone number, the automated attendant, or disconnection. You can override these - 3Com 3107c | User Guide - Page 57
the box. The number that you choose may be limited by your call permissions. To view your permissions, see NBX NetSet > User Information > Call Permissions. The check box below Forward to phone number specifies where you want to forward calls that are not answered at the internal extension that you - 3Com 3107c | User Guide - Page 58
ring on your extension and are immediately forwarded to the extension or external phone number you specify in the box. ■ If you select the next button Do Not Disturb. If they are enabled at the same time, the NBX system determines precedence, which call forwarding path is in effect, according to the - 3Com 3107c | User Guide - Page 59
. 2 Press the System Appearance button that is currently not being used. Typically the first two System Appearance buttons on the left of a 3Com Cordless Telephone are used for your extension. Your system administrator can verify the number and location of System Appearance buttons on your telephone - 3Com 3107c | User Guide - Page 60
to an outside line. To view your permissions, log in to NBX NetSet > User Information > Call Permissions. Your administrator can change your to complete the transfer. Hang up the handset. ■ If you are on a 3Com Cordless Telephone and the recipient does not want to take the call, retrieve it by - 3Com 3107c | User Guide - Page 61
up to four parties, including yourself. You must be using a telephone on the NBX system to establish the call. The other three parties can be any combination of internal and external parties. From a 3Com Cordless Telephone, follow these steps: 1 Dial a call, or receive a call from someone else. Two - 3Com 3107c | User Guide - Page 62
conference that party is cancelled. You cannot establish a conference call with an NBX user's voice mailbox. 4 Repeat steps 2 and 3 to conference in a the Attendant Console associated with your Cordless telephone to be a Conference Drop button. On a 3Com Cordless Telephone, or a telephone that does - 3Com 3107c | User Guide - Page 63
Establishing a Conference Call Using Feature Codes 63 More About Conference Calls ■ To place your part of a conference call on hold, press the Hold button. The other parties can talk among themselves, but they cannot hear you. Music on Hold does not play when a conference call is on hold. ■ To - 3Com 3107c | User Guide - Page 64
64 CHAPTER 4: STANDARD FEATURES - 3Com 3107c | User Guide - Page 65
Use of Your Telephone ■ Class of Service Override ■ Using a Headset For information on how to set up your NBX NetSet™ utility password for the first than NBX Messaging, use the documentation for your messaging application instead of these instructions. Guidelines About Features on 3Com Telephones - 3Com 3107c | User Guide - Page 66
PERSONALIZING YOUR TELEPHONE Ringer Tones To help you to distinguish the ring tone of your 3Com Cordless Telephone from the sound of other phones, use the handset controls described in Chapter 2. You can also use the NBX NetSet utility to turn this ring tone on or to choose Silent Ring to disable - 3Com 3107c | User Guide - Page 67
numbers 700 through 799) for numbers that are dialed frequently by many internal users. You can view the system-wide speed dial list through the NBX NetSet utility. You can ask the administrator to map a system-wide speed dial ID number to one of the Access buttons on your telephone. See - 3Com 3107c | User Guide - Page 68
" or follow these steps for the One-Touch screen. To add or change a One-Touch speed dial on an available Access button: 1 Log in to NBX NetSet > Speed Dials > One Touch. 2 Any box that has an asterisk in the margin beside it is available for a personal or system-wide speed dial - 3Com 3107c | User Guide - Page 69
Print. 8 Cut out the labels and put them in the label holders of your 3Com Telephone. 9 To save the edited LabelMaker, click the Save button at the top of you saved to your computer. If you download the LabelMaker from the NBX NetSet utility again, you get the default version, and the download might - 3Com 3107c | User Guide - Page 70
instead of these instructions. To configure off-site notification for your NBX voice mailbox: 1 In NBX NetSet > NBX Messaging > Off- Yes," your system administrator has enabled off-site notification for the NBX system and for the Class of Service group to which your telephone belongs. If "No," ask to - 3Com 3107c | User Guide - Page 71
8, 1, or 0. When you choose to be notified by voice mail, the NBX system calls the number that you enter in this field. When you answer the call for different Attempts. When you choose to be notified by e-mail message, the NBX system sends you an e-mail message for each voice mail message that you - 3Com 3107c | User Guide - Page 72
9 You do not need to configure every Attempt row. When you have configured all of the Attempt rows that you want, click OK. The NBX Messaging tab appears. 10 Test your off-site notification settings by leaving yourself a voice mail message. Additional Notes ■ You can use the same notification - 3Com 3107c | User Guide - Page 73
the prompts to log in and listen to messages, or log in to the NBX NetSet utility. ■ If you specify Pager or VoiceMail for the first attempt: Attempt you logged in to your voice mailbox through a telephone or through the NBX NetSet utility. Logging in restarts the cycle. Resetting the Off-Site - 3Com 3107c | User Guide - Page 74
Calls go to the call coverage point defined for Call Forward All in NBX NetSet > User Information > Call Forward Override. You can ask your administrator to map the Do Not Disturb feature to an available Access button on your 3Com Telephone, or you can use the Feature Code to enable and disable the - 3Com 3107c | User Guide - Page 75
Talk button. 3 Press Feature + 446. 4 Hang up. Your telephone is now in Do Not Disturb mode. The display panel on a 3Com Cordless Telephone shows DO NOT DISTURB when the phone is in AutoStandby mode. 5 To disable Do Not Disturb mode, repeat the above steps. The DO NOT DISTURB message disappears from - 3Com 3107c | User Guide - Page 76
. To view your current call permissions, log in to NBX NetSet > User Information > Call Permissions. Class of Service Override The Class of Service Override feature allows you to apply the features of your own 3Com Telephone temporarily to another 3Com Telephone on the same local network. Example - 3Com 3107c | User Guide - Page 77
NBX Messaging, use the documentation for your messaging application instead of these instructions. To activate the one-call-only Class of Service Override from any 3Com you place, receive, and end calls with the 3Com Cordless Telephone. To switch from a headset call to a handset call, remove the - 3Com 3107c | User Guide - Page 78
78 CHAPTER 5: PERSONALIZING YOUR TELEPHONE - 3Com 3107c | User Guide - Page 79
Automatic Call Distribution Groups, Hunt Groups, and Calling Groups ■ Call Park ■ Paging ■ Configurable Operators ■ Using Message Waiting Indicator to Telephone application other than NBX Messaging, use the documentation for your messaging application instead of the instructions in this chapter. - 3Com 3107c | User Guide - Page 80
send you an e-mail message when you have voice messages, the NBX system sends each voice mail message as a sound-file attachment to an account codes. To enter an account code for an outgoing external call: 1 Dial the phone number. You hear a feature tone if an account code is required. 2 Press the - 3Com 3107c | User Guide - Page 81
Codes feature during a call Caller ID Your administrator can set up your NBX system to allow for Internal and External Caller ID or can configure the your 3Com Telephone. External Caller ID provides the same information for external incoming calls if your organization subscribes to the service from - 3Com 3107c | User Guide - Page 82
the handset from the charging unit. 2 Press the Talk button. 3 Press Feature + 889. The display panel on your 3Com Cordless Telephone shows CLIR-ALL on. 4 Dial the number that you want to call. The NBX system does not send caller ID information on this call or any future calls until you disable this - 3Com 3107c | User Guide - Page 83
and can tell you which group you belong to. To view the list of Call Pickup groups of which you are a member: 1 Log in to NBX NetSet > User Information > Call Pickup. 2 Select the group number that you want to view from the Group List, and click Details to list the members - 3Com 3107c | User Guide - Page 84
, for example, as a help desk, a reservations counter, an information hotline, or a customer service center. If you do not answer, calls that come in to your telephone: ■ Through your in to a ACD group using your 3Com Telephone: 1 Remove the handset from the charging unit. 2 Press the Talk button. - 3Com 3107c | User Guide - Page 85
. 5 Press # and hang up. To log out of an ACD group using your 3Com Telephone: 1 Remove the handset from the charging unit. 2 Press the Talk button. 3 Close. Viewing ACD User Status The ACD Groups - Status display in the NBX NetSet utility shows each ACD group that you are a member of. Click each - 3Com 3107c | User Guide - Page 86
- Shows the number of calls that have been answered by this ACD group since NBX system startup. ■ Status - Shows whether you are currently logged in or out of Status Details The ACD Groups - Status Details display in the NBX NetSet utility shows more detailed information about the agents of this - 3Com 3107c | User Guide - Page 87
in a dynamic hunt group, you must log in to the group to be part of it. To log in to a dynamic hunt group using your 3Com Cordless Telephone: 1 Remove the handset from the charging unit. 2 Press the Talk button. - 3Com 3107c | User Guide - Page 88
use. 5 Press #. To log out of a dynamic hunt group using your 3Com Cordless Telephone: 1 Remove the handset from the charging unit. 2 Press the Talk button group. To log out of a dynamic hunt group using the NBX NetSet utility: 1 Log in to NBX NetSet > Hunt Groups. 2 Select the hunt group from which - 3Com 3107c | User Guide - Page 89
of all hunt groups of which you are a member: 1 Log in to NBX NetSet > Hunt Groups. 2 Click the Logout all button. Calling Groups One type call to ring simultaneously on all telephones in a group, for example, a customer service group. To log in to or out of a calling group, follow the steps - 3Com 3107c | User Guide - Page 90
xtn in use appears on the display panel on your 3Com Cordless Telephone, and the call rings back to your telephone. Try another Call Park extension. 3 To notify another user about the parked call: ■ Select a System Appearance button that is assigned for placing telephone calls, and dial the user - 3Com 3107c | User Guide - Page 91
from the charging unit and press the Talk button. 2 Dial the Call Park extension that was assigned to the call. Paging is the general term used to describe the act of broadcasting a voice message through audio speakers. 3Com Cordless Telephones do not have a speaker. You can broadcast pages to other - 3Com 3107c | User Guide - Page 92
over a public address system that has a paging amplifier and speaker system that is connected to your NBX system Internal Paging 621 Broadcast an announcement through the speakers on all 3Com Telephones with speakers on your system except those that have been set to Do Not Disturb. Simultaneous - 3Com 3107c | User Guide - Page 93
3Com Cordless Telephones, 3Com Entry Telephones, and analog telephones can initiate, but cannot receive, a zone page. For a complete list of devices supported by this feature, see the NBX Administrator's Guide voice mail message, which includes the instruction to press an access digit (0 or - 3Com 3107c | User Guide - Page 94
you must have external-to-external permissions in order for transfers to external phone numbers to complete successfully. If you or the administrator do not configure for System and Personal Operator: 1 Log on to NetSet > NBX Messaging > Personal Operators. The current System Operator and Personal - 3Com 3107c | User Guide - Page 95
as soon as possible. 3Com Cordless Telephones allow you to send and cancel MWI messages. The telephones do not support MWI message retrieval or are not enabled or that have reached their MWI message limit (30) ■ Remote NBX systems over external line ■ Calling Groups, Hunt Groups, or ACD Groups To - 3Com 3107c | User Guide - Page 96
MWI message. To cancel an MWI message: 1 Pick up the handset. 2 Press Feature + 413 or press the MWI Cancel button. The display panel on your 3Com Telephone shows Cancel MWI To:. The Feature Entry Tone plays. 3 Dial the extension to which you sent the MWI message that you want to cancel - 3Com 3107c | User Guide - Page 97
in your organization that are separated geographically but that are linked by a Wide Area Network (WAN) connection. Each site must have an NBX system. Typical configurations are described in the next sections. Using Unique Extensions In the sample network shown in Figure 7, everyone in the entire - 3Com 3107c | User Guide - Page 98
number at the local site (Chicago). Figure 8 Using Site Codes to Dial Remote Offices 1 NBX System in Chicago Extensions: 1000-3999 Site Code: 61 2 Wide Area Network (WAN) 3 NBX System in Atlanta Extensions: 1000-3999 Site Code: 62 4 NBX System in Dallas Extensions: 1000-3999 Site Code: 63 - 3Com 3107c | User Guide - Page 99
create bridged extensions to the 3Com Cordless Telephone's third and fourth Access buttons, if an NBX Attendant Console is associated with supports only pulse dialing while other lines are provided by a different telephone company that supports DTMF dialing. ■ Your organization's telephone service - 3Com 3107c | User Guide - Page 100
a Personal Speed Dial You can configure a personal speed dial in the NBX NetSet utility to dial a number in pulse dial mode and then to switch to DTMF. Use the left angle-bracket character ( - 3Com 3107c | User Guide - Page 101
applications are available on the NBX Resource Pack CD: ■ NBX Call Reports * ■ NBX TAPI Service Provider (NBXTSP) ■ NBX Desktop Call Assistant (formerly NBX TAPI Dialer) * ■ Complement Attendant Software * ■ Palm Dialer ■ pcXset Soft Telephone * ■ NBX Media Driver * Applications with a * have been - 3Com 3107c | User Guide - Page 102
102 CHAPTER 6: GETTING MORE FROM YOUR TELEPHONE SYSTEM - 3Com 3107c | User Guide - Page 103
Cordless Some of the features that are listed in Table 11 are already available in Telephone single-purpose buttons on 3Com Cordless Telephones, like Hold, Volume Control, and Message buttons. For all other NBX features, use the preprogrammed Feature button and the feature codes listed in Table 11 - 3Com 3107c | User Guide - Page 104
104 CHAPTER 7: FEATURE CODES NBX Tones As you use your 3Com Telephone to receive voice mail and use the feature codes on the NBX system, you hear these tones: ■ Dial Tone - When you lift the receiver to place a call or begin using one of the features, you hear the - 3Com 3107c | User Guide - Page 105
of the persistent features you have activated on your telephone, log in to NBX NetSet > User Information > Feature Settings. See "The NBX NetSet Utility" in Chapter 1 for information on how to log in to the NBX NetSet™ utility. Exception: If you have activated one or more persistent features and - 3Com 3107c | User Guide - Page 106
in Chapter 4 F + 444 + one of the Call Park extensions "Call Park"in Chapter 6 for your NBX system F + 455 + the extension of the ringing 's number F + 430 + telephone number + F + 430 "Class of Service Override" in Chapter 5 "Establishing a Conference Call Using Feature Codes" in Chapter 4 - 3Com 3107c | User Guide - Page 107
Notification Using the Telephone" in Chapter 5 If your NBX system is connected to a Central Office (CO) "Forwarding a Message"in Chapter 3 Set your phone so that internal calls automatically come through your 6 Not supported by 3Com Cordless Telephones. Not supported by 3Com Cordless Telephones. - 3Com 3107c | User Guide - Page 108
support display-screen scrolling, displays lists for you to scroll through and select. Speak (except 2101, 3101, 3106C, and 3107C) and listen without picking up the handset. "Speed Dials" in Chapter 5 "Speed Dials" in Chapter 5 "Transferring a Call" in Chapter 4 Displays the NBX - 3Com 3107c | User Guide - Page 109
the Handset Battery Pack ■ Charging an Optional Spare Battery Pack (3Com 3107C) ■ Low Battery Indicator ■ Cleaning the Battery and Charging Unit Contacts ■ Moving Your Telephone ■ Swapping Telephones ■ Cleaning Your Telephone ■ Important Safety Instructions ■ Troubleshooting Problems ■ Telephone - 3Com 3107c | User Guide - Page 110
recommendations: ■ If you are using three or fewer 3Com Cordless Telephones at your site and require maximum operating range, use 3Com 3107C units. ■ If you are using more than three 3Com Cordless Telephones at your site, use 3Com 3106C units. ■ For optimum performance, place base units at - 3Com 3107c | User Guide - Page 111
Kit Contents The 3Com Cordless Telephone kit includes: ■ Base unit with AC adapter ■ Charging unit with AC adapter ■ Rechargable handset battery pack ■ the telephones includes: ■ Spare handset battery pack ■ Headset Connecting the Telephone Cords The NBX system operates over the LAN, not through - 3Com 3107c | User Guide - Page 112
into the outlet, contact someone about replacing the outlet. You can place the handset in the charging unit with or without the beltclip attached. Figure 9 3Com 3106C Charging Unit 1 1 AC adapter - 3Com 3107c | User Guide - Page 113
the handset. Figure 10 3Com 3107C Charging Unit 2 1 1 AC adapter 2 Optional battery pack Installing on the Wall You can mount the 3Com Cordless Telephone base unit directly on Verify that the wall material is capable of supporting the weight of the base unit. ■ Use #10 screws with anchoring devices - 3Com 3107c | User Guide - Page 114
about 3/16 of an inch between the wall and screw heads for mounting the phone. 2 Plug the AC adapter into the base unit. 3 Place the AC adapter Plug the free end of the RJ45 cable into the LAN, as specified by your NBX Administrator. 7 Plug the AC adapter into a standard 120V AC wall outlet. 3/16 - 3Com 3107c | User Guide - Page 115
material is capable of supporting the weight of the charging unit. ■ Use #10 screws with anchoring devices suitable for the wall material. 1 Insert two mounting screws into the wall, with about 3/16 of an inch between the wall and screw heads for mounting the phone. 3Com 3106C 3Com 3107C 3/16 in - 3Com 3107c | User Guide - Page 116
116 APPENDIX A: TELEPHONE INSTALLATION AND MAINTENANCE 2 Connect the charging unit to the wall mount stand: 3Com 3106C 3Com 3107C 1 1 Pass the one end through the hole of the wall mount stand and plug it into the charging unit. Wrap the AC adapter cord Wrap - 3Com 3107c | User Guide - Page 117
3 Place the charging unit on the posts of the wall screws and push down until it is firmly seated. (1) indicates the strain relief on the 3Com 3107C. 3Com 3106C 3Com 3107C 1 3/16 in. 1-1/5 in. 3/16 in. 1-9/10 in. 4 Plug the AC adapter into a standard 120V AC wall outlet. - 3Com 3107c | User Guide - Page 118
A: TELEPHONE INSTALLATION AND MAINTENANCE Attaching the Beltclip to the Handset You can use the beltclip to attach the handset to your belt or pocket. 1 3Com 3106C only: Snap the cover tab out of the beltclip notch at the top of the handset. 2 Both telephones: Slide the beltclip into the tab - 3Com 3107c | User Guide - Page 119
Pack 119 Installing the Handset Battery Pack 3Com 3106C 1 To remove the battery cover, press the latch and slide the cover down and off of the handset. 2 Connect the battery pack connector. Be sure that the colored wires are connected correctly to the corresponding colored connectors inside the - 3Com 3107c | User Guide - Page 120
120 APPENDIX A: TELEPHONE INSTALLATION AND MAINTENANCE 3Com 3107C 1 Remove the battery cover by sliding it down until it comes off the handset. You may have to remove the old battery. 2 Slide the battery pack down into the handset. 3 To close the battery compartment cover, slide it up until it snaps - 3Com 3107c | User Guide - Page 121
pack must be fully charged before you use your 3Com Cordless Telephone for the first time. Charge the battery pack without interruption for 5 hours. 1 Place the handset in the front slot of the charging unit. 3Com 3106C 3Com 3107C 2 Verify that the CHARGE indicator is lit. If the CHARGE light - 3Com 3107c | User Guide - Page 122
INSTALLATION AND MAINTENANCE Charging an Optional Spare Battery Pack (3Com 3107C) The charging unit of the 3Com 3107C Cordless Telephone can charge an optional spare battery pack, with or without the handset being in place. 1 Slide the spare battery pack into the rear slot in the charging - 3Com 3107c | User Guide - Page 123
important to clean all charging contacts on the handset, spare battery pack (3Com 3107C), and charging unit about once a month. Use a pencil eraser or a soft dry cloth. Do not use any liquids or solvents. 3Com 3106C 3Com 3107C Moving Your Telephone Swapping Telephones Cleaning Your Telephone All - 3Com 3107c | User Guide - Page 124
including the following: ■ Read and understand all instructions. ■ Follow all warnings and instructions marked on the product. ■ Unplug this product ■ Unplug this product from the wall outlet and refer servicing to qualified service personnel under the following conditions: ■ When the power supply - 3Com 3107c | User Guide - Page 125
and limitations specified in the instruction manual provided for this product. ■ Observe proper polarity orientation between the battery pack and battery charger. ■ Charge the battery used in this equipment only in the supplied charger, and as specified in this Guide. Using another charger may - 3Com 3107c | User Guide - Page 126
detailed by this Operating Guide, could void your authority to operate this product. Range Your 3Com Cordless Telephone is designed to uninterrupted service. If you are having trouble with your telephone service, you must first disconnect your phone to determine if it is the cause of your problem. - 3Com 3107c | User Guide - Page 127
Instructions 127 Radio Interference Radio interference may occasionally cause buzzing and humming in your 3Com Cordless check to see what appliances may be causing the problem. In addition, we recommend that the Base your phone, you may be receiving radio signals from another 3Com Cordless Telephone - 3Com 3107c | User Guide - Page 128
128 APPENDIX A: TELEPHONE INSTALLATION AND MAINTENANCE Troubleshooting Problems Table 12 lists possible problems that you may encounter and the most likely solutions. Where possible, each solution refers to the section in this guide where you can find detailed information. Table 12 Possible - 3Com 3107c | User Guide - Page 129
Troubleshooting Problems 129 Table 12 Possible Problems (continued) Possible Problem Suggested Solutions My telephone is not forwarding my incoming calls to my voice mailbox. In NBX . ■ Check for a Low Battery warning. A warning tone sounds and there is a NO SERVICE message. ■ Move closer to - 3Com 3107c | User Guide - Page 130
battery pack Size 3Com 3106C: 2 in. W x 1 1/4 in. D x 5 1/2 in. H without antenna 3Com 3107C: 2 1/5 in. W x 1 2/3 in. D x 8 2/3 in. H with antenna Weight 3Com 3106C: Approx. 5.2 oz. with battery 3Com 3107C: Approx. 8.8 oz. with battery Battery 3Com 3106C: Capacity 750 mAh, 3.6 V 3Com 3107C - 3Com 3107c | User Guide - Page 131
LED 27 RJ45 LAN connection port 27 batteries charging 121, 122 charging, 3106C Cordless Telephone 112 charging, 3107C Cordless Telephone 113 cleaning charging unit contacts 123 installing, 3106C Cordless Telephone 119 installing, 3107C Cordless telephone 120 low power indicator 122 precautions - 3Com 3107c | User Guide - Page 132
mail messages 42 D dial tone, troubleshooting a 3Com Telephone 128 dialing calls other methods 52 redial 52 switching from pulse to tone 99 direct mail transfer feature code 107 overview 61 directed call pickup 83 display panel 3106C Cordless Telephone 20 3107C Cordless Telephone 23 Do Not Disturb - 3Com 3107c | User Guide - Page 133
switch 28 ringer tone and volume 29 transferring calls 31 using 29 headset jack, 3106C Cordless Telephone 20 jack, 3107C Cordless Telephone 24 using 31, 77 hold button, 3106C Cordless Telephone 21 button, 3107C Cordless Telephone 23 by parking 87 I icons in the NBX NetSet utility navigation 16 - 3Com 3107c | User Guide - Page 134
cancel (feature code) 107 waiting indicator-retrieve (feature code) 107 waiting indicators 37 waiting indicator-send (feature code) 107 Messaging, NBX 34 Microphone 3106C Cordless Telephone 21 3107C Cordless Telephone 24 monitor, whisper, barge-in (feature code) 107 moving telephones 123 Mute button - 3Com 3107c | User Guide - Page 135
3106C Cordless Telephone 22 ON/OFF switch, 3106C Cordless Telephone 22 ON/OFF switch, 3107C Cordless Telephone 23 tone, choosing 66 ringing Do Not Disturb 74 RJ11 jack caution, avoiding use with 3Com telephones 111 RJ45 jack caution, using instead of RJ11 111 Q 135 S safety instructions 124 battery - 3Com 3107c | User Guide - Page 136
from dialing 76 tone 3Com telephone and feature code 104 dialing 99 ringer, selection 66 transfer button (Xfer), 3106C Cordless Telephone 21 button (XFER), 3107C Cordless Telephone 24 calls 31, 60 feature code 108 troubleshooting introduction 109 list of possible problems 128 U unauthorized use of - 3Com 3107c | User Guide - Page 137
are too distracting, please check to see what appliances may be causing the problem. In addition, we recommend that the base not be plugged into a voices or distracting transmissions on your phone, you may be receiving radio signals from another cordless telephone or other source of interference - 3Com 3107c | User Guide - Page 138
-
 1
1 -
 2
2 -
 3
3 -
 4
4 -
 5
5 -
 6
6 -
 7
7 -
8
-
9
-
10
-
11
-
12
-
13
-
14
-
15
-
16
-
17
-
18
-
19
-
20
-
21
-
22
-
23
-
24
-
25
-
26
-
27
-
28
-
29
-
30
-
31
-
32
-
33
-
34
-
35
-
36
-
37
-
38
-
39
-
40
-
41
-
42
-
43
-
44
-
45
-
46
-
47
-
48
-
49
-
50
-
51
-
52
-
53
-
54
-
55
-
56
-
57
-
58
-
59
-
60
-
61
-
62
-
63
-
64
-
65
-
66
-
67
-
68
-
69
-
70
-
71
-
72
-
73
-
74
-
75
-
76
-
77
-
78
-
79
-
80
-
81
-
82
-
83
-
84
-
85
-
86
-
87
-
88
-
89
-
90
-
91
-
92
-
93
-
94
-
95
-
96
-
97
-
98
-
99
-
100
-
101
-
102
-
103
-
104
-
105
-
106
-
107
-
108
-
109
-
110
-
111
-
112
-
113
-
114
-
115
-
116
-
117
-
118
-
119
-
120
-
121
-
122
-
123
-
124
-
125
-
126
-
127
-
128
-
129
-
130
-
131
-
132
-
133
-
134
-
135
-
136
-
137
-
138
 |
 |

Part Number 900-0215-01
Published April 2005
NBX
®
Cordless Telephone
Guide
NBX Networked Telephony Solutions
System Release 5.0