Brother International HL 1270N Network Users Manual - English - Page 86
Card Address., Printer Ports, Close, Shared, Not Shared, Finish
 |
UPC - 012502526001
View all Brother International HL 1270N manuals
Add to My Manuals
Save this manual to your list of manuals |
Page 86 highlights
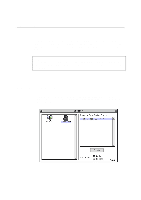
7. The selected print server address will then appear in the smaller box under Card Address. 8. Type in any desired name for the port (the name must not be the name of an existing port or DOS device, such as LPT1) and click OK then on the Printer Ports screen, click Close. 9. The name you selected in the above step will appear as a checked port in the list of available ports. Click Next. 10. Select the correct driver click Next. 11. Give a name to the printer. If desired, select the printer as the default. 12. Select Shared or Not Shared. If shared, specify the share name and operating systems that will be printing to it. 13. Select whether or not you want a test page, and then select Finish. 8-4
-
 1
1 -
2
-
3
-
4
-
5
-
6
-
7
-
8
-
9
-
10
-
11
-
12
-
13
-
14
-
15
-
16
-
17
-
18
-
19
-
20
-
21
-
22
-
23
-
24
-
25
-
26
-
27
-
28
-
29
-
30
-
31
-
32
-
33
-
34
-
35
-
36
-
37
-
38
-
39
-
40
-
41
-
42
-
43
-
44
-
45
-
46
-
47
-
48
-
49
-
50
-
51
-
52
-
53
-
54
-
55
-
56
-
57
-
58
-
59
-
60
-
61
-
62
-
63
-
64
-
65
-
66
-
67
-
68
-
69
-
70
-
71
-
72
-
73
-
74
-
75
-
76
-
77
-
78
-
79
-
80
-
 81
81 -
 82
82 -
 83
83 -
 84
84 -
 85
85 -
 86
86 -
 87
87 -
 88
88 -
 89
89 -
 90
90 -
 91
91 -
92
-
93
-
94
-
95
-
96
-
97
-
98
-
99
-
100
-
101
-
102
-
103
-
104
-
105
-
106
-
107
-
108
-
109
-
110
-
111
-
112
-
113
-
114
-
115
-
116
-
117
-
118
-
119
-
120
-
121
-
122
 |
 |

8-4
7.
The selected print server address will then appear in the smaller box under
Card Address.
8.
Type in any desired name for the port (the name must not be the name of an
existing port or DOS device, such as LPT1) and click
OK
then on the
Printer Ports
screen, click
Close
.
9.
The name you selected in the above step will appear as a checked port in
the list of available ports. Click
Next
.
10.
Select the correct driver click
Next
.
11.
Give a name to the printer. If desired, select the printer as the default.
12.
Select
Shared
or
Not Shared
. If shared, specify the share name and
operating systems that will be printing to it.
13.
Select whether or not you want a test page, and then select
Finish
.