Brother International HL 2700CN Users Manual - English - Page 92
Brother International HL 2700CN - Color Laser Printer Manual
 |
UPC - 840356824994
View all Brother International HL 2700CN manuals
Add to My Manuals
Save this manual to your list of manuals |
Page 92 highlights
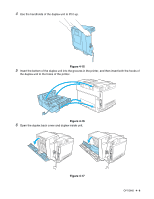
6 Fit the two stopper fittings on the right and left hand sides of the lower tray unit. Figure 4-5 7 Cover the gap on the right hand side with the right-hand side cover by first inserting the hook at the back. Cover the gap on the left hand side with the left-hand side cover by first inserting the hook at the back. Close both of the side covers by putting the notch over the hook of the lower tray unit. Figure 4-6 8 To level the printer, adjust the feet of the lower tray unit at the front and back on the right-hand side. Turn the feet to move them up or down until they touch the work surface and the tray unit is level. Turn the lock screw on each foot to secure it. Figure 4-7 Do not put transparencies, labels or envelopes in the paper tray of the optional lower tray unit. This might cause paper jams. OPTIONS 4 - 4
-
 1
1 -
2
-
3
-
4
-
5
-
6
-
7
-
8
-
9
-
10
-
11
-
12
-
13
-
14
-
15
-
16
-
17
-
18
-
19
-
20
-
21
-
22
-
23
-
24
-
25
-
26
-
27
-
28
-
29
-
30
-
31
-
32
-
33
-
34
-
35
-
36
-
37
-
38
-
39
-
40
-
41
-
42
-
43
-
44
-
45
-
46
-
47
-
48
-
49
-
50
-
51
-
52
-
53
-
54
-
55
-
56
-
57
-
58
-
59
-
60
-
61
-
62
-
63
-
64
-
65
-
66
-
67
-
68
-
69
-
70
-
71
-
72
-
73
-
74
-
75
-
76
-
77
-
78
-
79
-
80
-
81
-
82
-
83
-
84
-
85
-
86
-
 87
87 -
 88
88 -
 89
89 -
 90
90 -
 91
91 -
 92
92 -
 93
93 -
 94
94 -
 95
95 -
 96
96 -
 97
97 -
98
-
99
-
100
-
101
-
102
-
103
-
104
-
105
-
106
-
107
-
108
-
109
-
110
-
111
-
112
-
113
-
114
-
115
-
116
-
117
-
118
-
119
-
120
-
121
-
122
-
123
-
124
-
125
-
126
-
127
-
128
-
129
-
130
-
131
-
132
-
133
-
134
-
135
-
136
-
137
-
138
-
139
-
140
-
141
-
142
-
143
-
144
-
145
-
146
-
147
-
148
-
149
-
150
-
151
-
152
-
153
-
154
-
155
-
156
-
157
-
158
-
159
-
160
-
161
-
162
 |
 |
