Brother International HL-7050N Network Users Manual - English - Page 125
Using the printer control panel to allocate an IP address (printers with LCD panels only)
 |
UPC - 012502603375
View all Brother International HL-7050N manuals
Add to My Manuals
Save this manual to your list of manuals |
Page 125 highlights
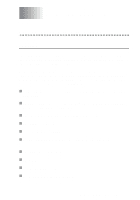
These configuration methods are described in the following paragraphs. The IP address you assign to the print server must be on the same logical network as your host computers. If it is not, you must properly configure the subnet mask and the router (gateway). Using the printer control panel to allocate an IP address (printers with LCD panels only) Refer to the Quick Setup Guide for details on how to configure IP address information using the printer control panel. By using the control panel on the printer, you can program the IP address details at the same time that other printer parameters are configured. Changing the IP Address using the BRAdmin application Start the BRAdmin application (from Windows® 95/98/Me, NT4.0, Windows® 2000/XP). The BRAdmin application can use the IPX/SPX or TCP/IP protocols to communicate with the Brother print server. As the default IP address of Brother print servers is 192.0.0.192, the print server will probably be incompatible with the IP address numbering scheme on your network. If you are not using DHCP, BOOTP or RARP, you will want to change the IP address. There are two ways that you can do this from within BRAdmin. n Use the IPX/SPX protocol. n Use the TCP/IP protocol and let BRAdmin find the Brother print server as an unconfigured device. 12 - 2 TCP/IP CONFIGURATION
-
 1
1 -
2
-
3
-
4
-
5
-
6
-
7
-
8
-
9
-
10
-
11
-
12
-
13
-
14
-
15
-
16
-
17
-
18
-
19
-
20
-
21
-
22
-
23
-
24
-
25
-
26
-
27
-
28
-
29
-
30
-
31
-
32
-
33
-
34
-
35
-
36
-
37
-
38
-
39
-
40
-
41
-
42
-
43
-
44
-
45
-
46
-
47
-
48
-
49
-
50
-
51
-
52
-
53
-
54
-
55
-
56
-
57
-
58
-
59
-
60
-
61
-
62
-
63
-
64
-
65
-
66
-
67
-
68
-
69
-
70
-
71
-
72
-
73
-
74
-
75
-
76
-
77
-
78
-
79
-
80
-
81
-
82
-
83
-
84
-
85
-
86
-
87
-
88
-
89
-
90
-
91
-
92
-
93
-
94
-
95
-
96
-
97
-
98
-
99
-
100
-
101
-
102
-
103
-
104
-
105
-
106
-
107
-
108
-
109
-
110
-
111
-
112
-
113
-
114
-
115
-
116
-
117
-
118
-
119
-
 120
120 -
 121
121 -
 122
122 -
 123
123 -
 124
124 -
 125
125 -
 126
126 -
 127
127 -
 128
128 -
 129
129 -
 130
130 -
131
-
132
-
133
-
134
-
135
-
136
-
137
-
138
-
139
-
140
-
141
-
142
-
143
-
144
-
145
-
146
-
147
-
148
-
149
-
150
-
151
-
152
-
153
-
154
-
155
-
156
-
157
-
158
-
159
-
160
-
161
-
162
-
163
-
164
 |
 |