Brother International HL-7050N Network Users Manual - English - Page 97
How to Select the Print Server (AppleTalk/EtherTalk), 9 APPLETALK ETHERTALK TCP/IP PRINTING
 |
UPC - 012502603375
View all Brother International HL-7050N manuals
Add to My Manuals
Save this manual to your list of manuals |
Page 97 highlights
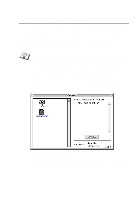
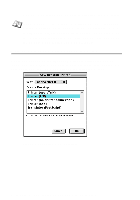
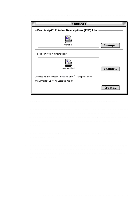
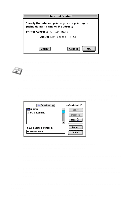
How to Select the Print Server (AppleTalk/EtherTalk) After installing the PPD, use the following steps to select the printer driver: 1 Turn the power of the printer ON. 2 Open the Applications folder. 3 Open the Utilities folder. 4 Open the Print Center Icon. 5 Click the Add Printer button. 6 Select AppleTalk. 7 Select BRN_XXXXXX_P1_AT and click the Add button. For AppleTalk connections, the printer's AppleTalk service name is BRN_XXXXXX_P1_AT, where XXXXXX is the last six digits of the Ethernet address. Printing the configuration page will allow you to confirm the MAC address. Please refer to the Quick Setup Guide for information on how to print the configuration page. 8 From the Printer Model pull-down list select your model. 9 Click Add and the printer will be available from the Printer List. 7 - 9 APPLETALK (ETHERTALK) TCP/IP PRINTING
-
 1
1 -
2
-
3
-
4
-
5
-
6
-
7
-
8
-
9
-
10
-
11
-
12
-
13
-
14
-
15
-
16
-
17
-
18
-
19
-
20
-
21
-
22
-
23
-
24
-
25
-
26
-
27
-
28
-
29
-
30
-
31
-
32
-
33
-
34
-
35
-
36
-
37
-
38
-
39
-
40
-
41
-
42
-
43
-
44
-
45
-
46
-
47
-
48
-
49
-
50
-
51
-
52
-
53
-
54
-
55
-
56
-
57
-
58
-
59
-
60
-
61
-
62
-
63
-
64
-
65
-
66
-
67
-
68
-
69
-
70
-
71
-
72
-
73
-
74
-
75
-
76
-
77
-
78
-
79
-
80
-
81
-
82
-
83
-
84
-
85
-
86
-
87
-
88
-
89
-
90
-
91
-
 92
92 -
 93
93 -
 94
94 -
 95
95 -
 96
96 -
 97
97 -
 98
98 -
 99
99 -
 100
100 -
 101
101 -
 102
102 -
103
-
104
-
105
-
106
-
107
-
108
-
109
-
110
-
111
-
112
-
113
-
114
-
115
-
116
-
117
-
118
-
119
-
120
-
121
-
122
-
123
-
124
-
125
-
126
-
127
-
128
-
129
-
130
-
131
-
132
-
133
-
134
-
135
-
136
-
137
-
138
-
139
-
140
-
141
-
142
-
143
-
144
-
145
-
146
-
147
-
148
-
149
-
150
-
151
-
152
-
153
-
154
-
155
-
156
-
157
-
158
-
159
-
160
-
161
-
162
-
163
-
164
 |
 |