Brother International IntelliFax-1860C Users Manual - English - Page 48
Delayed Faxing (Black & White only), Delayed Batch Transmission (Black & White only), Checking
 |
View all Brother International IntelliFax-1860C manuals
Add to My Manuals
Save this manual to your list of manuals |
Page 48 highlights
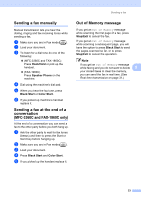
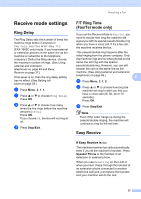
Chapter 5 Delayed Faxing (Black & White only) 5 During the day you can store up to 50 faxes in the memory to be sent within 24-hours. These faxes will be sent at the time of day you enter in step d. a Make sure you are in Fax mode . b Load your document. c Press Menu, 2, 2, 3. 3.Delayed Fax d Do one of the following: „ Press OK to accept the displayed time. „ Enter the time you want the fax to be sent (in 24-hour format). (For example, enter 19:45 for 7:45 PM.) Press OK. 1.Doc 2.Memory e Do one of the following: „ Press 1 to leave the document in the ADF. „ Press 2 to scan the document into the memory. Note The number of pages you can scan into the memory depends on the amount of data that is printed on each page. Delayed Batch Transmission (Black & White only) 5 Before sending the delayed faxes, your machine will help you economize by sorting all the faxes in the memory by destination and scheduled time. All delayed faxes that are scheduled to be sent at the same time to the same fax number will be sent as one fax to save transmission time. a Make sure you are in Fax mode . b Press Menu, 2, 2, 4. c Press a or b to choose On (or Off). Press OK. d Press Stop/Exit. Checking and canceling waiting jobs 5 You can check which jobs are still waiting in the memory to be sent and cancel a job. (If there are no jobs, the LCD shows No Jobs Waiting.) a Press Menu, 2, 6. Any waiting jobs appear on the LCD. b Press a or b to scroll through the jobs and choose the job you want to cancel. Press OK. c Do one of the following: „ Press 1 to cancel the selected job. „ Press 2 to exit without canceling. d When you have finished, press Stop/Exit. 32
-
 1
1 -
2
-
3
-
4
-
5
-
6
-
7
-
8
-
9
-
10
-
11
-
12
-
13
-
14
-
15
-
16
-
17
-
18
-
19
-
20
-
21
-
22
-
23
-
24
-
25
-
26
-
27
-
28
-
29
-
30
-
31
-
32
-
33
-
34
-
35
-
36
-
37
-
38
-
39
-
40
-
41
-
42
-
 43
43 -
 44
44 -
 45
45 -
 46
46 -
 47
47 -
 48
48 -
 49
49 -
 50
50 -
 51
51 -
 52
52 -
 53
53 -
54
-
55
-
56
-
57
-
58
-
59
-
60
-
61
-
62
-
63
-
64
-
65
-
66
-
67
-
68
-
69
-
70
-
71
-
72
-
73
-
74
-
75
-
76
-
77
-
78
-
79
-
80
-
81
-
82
-
83
-
84
-
85
-
86
-
87
-
88
-
89
-
90
-
91
-
92
-
93
-
94
-
95
-
96
-
97
-
98
-
99
-
100
-
101
-
102
-
103
-
104
-
105
-
106
-
107
-
108
-
109
-
110
-
111
-
112
-
113
-
114
-
115
-
116
-
117
-
118
-
119
-
120
-
121
-
122
-
123
-
124
-
125
-
126
-
127
-
128
-
129
-
130
-
131
-
132
-
133
-
134
-
135
-
136
-
137
-
138
-
139
-
140
-
141
-
142
-
143
-
144
-
145
-
146
-
147
-
148
-
149
-
150
-
151
-
152
-
153
-
154
-
155
-
156
 |
 |
