Brother International MFC-9340CDW Users Manual - English - Page 165
Setup Receive, Memory Receive, Print Density, Fax Rx Stamp, sided, Setup Send, Batch TX, Cover
 |
View all Brother International MFC-9340CDW manuals
Add to My Manuals
Save this manual to your list of manuals |
Page 165 highlights
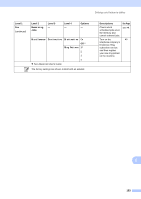
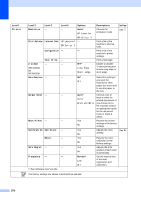
Settings and features tables Level 1 Fax (continued) Level 2 Level 3 Level 4 Setup Receive Memory Receive - (continued) (Backup Print) Print Density - Options Descriptions Off* Fax Forward Paging Fax Storage PC Fax Receive Set the machine to forward fax messages, to call your pager or cell phone, to store incoming faxes in the memory (so you can retrieve them while you are away from your machine), or to send faxes to your computer. If you chose Fax Forward or PC-Fax Receive, you can turn on the Backup Print safety feature. Make printouts darker or lighter. * See Page See . Fax Rx Stamp - On Off* Print the received time and date on the top of the received faxes. 2-sided - (MFC-9330CDW and MFC-9340CDW) On Off* Print received faxes on both sides of the paper. Setup Send Batch TX - On Off* Combine delayed faxes going to the same fax number at the same time of day into one transmission. Coverpage Setting Print Sample - Print a sample of the fax cover page. You can fill in information and fax it with your document. Coverpage - Message See Advanced User's Guide. Set up your own comments for the fax cover page. C The factory settings are shown in Bold with an asterisk. 151
-
 1
1 -
2
-
3
-
4
-
5
-
6
-
7
-
8
-
9
-
10
-
11
-
12
-
13
-
14
-
15
-
16
-
17
-
18
-
19
-
20
-
21
-
22
-
23
-
24
-
25
-
26
-
27
-
28
-
29
-
30
-
31
-
32
-
33
-
34
-
35
-
36
-
37
-
38
-
39
-
40
-
41
-
42
-
43
-
44
-
45
-
46
-
47
-
48
-
49
-
50
-
51
-
52
-
53
-
54
-
55
-
56
-
57
-
58
-
59
-
60
-
61
-
62
-
63
-
64
-
65
-
66
-
67
-
68
-
69
-
70
-
71
-
72
-
73
-
74
-
75
-
76
-
77
-
78
-
79
-
80
-
81
-
82
-
83
-
84
-
85
-
86
-
87
-
88
-
89
-
90
-
91
-
92
-
93
-
94
-
95
-
96
-
97
-
98
-
99
-
100
-
101
-
102
-
103
-
104
-
105
-
106
-
107
-
108
-
109
-
110
-
111
-
112
-
113
-
114
-
115
-
116
-
117
-
118
-
119
-
120
-
121
-
122
-
123
-
124
-
125
-
126
-
127
-
128
-
129
-
130
-
131
-
132
-
133
-
134
-
135
-
136
-
137
-
138
-
139
-
140
-
141
-
142
-
143
-
144
-
145
-
146
-
147
-
148
-
149
-
150
-
151
-
152
-
153
-
154
-
155
-
156
-
157
-
158
-
159
-
 160
160 -
 161
161 -
 162
162 -
 163
163 -
 164
164 -
 165
165 -
 166
166 -
 167
167 -
 168
168 -
 169
169 -
 170
170 -
171
-
172
-
173
-
174
-
175
-
176
-
177
-
178
-
179
-
180
-
181
-
182
-
183
-
184
-
185
-
186
-
187
-
188
-
189
-
190
-
191
-
192
-
193
-
194
-
195
-
196
-
197
-
198
-
199
-
200
-
201
-
202
-
203
-
204
-
205
-
206
-
207
-
208
-
209
-
210
-
211
-
212
-
213
-
214
-
215
-
216
-
217
-
218
-
219
-
220
-
221
-
222
-
223
-
224
-
225
-
226
 |
 |
