Brother International MFC-J4410DW Users Manual Basic - English - Page 52
Stop faxing, Setting scanner glass size for faxing, Faxing from the ADF, Faxing from the scanner glass
 |
View all Brother International MFC-J4410DW manuals
Add to My Manuals
Save this manual to your list of manuals |
Page 52 highlights
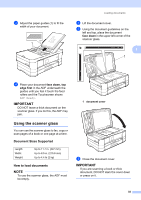
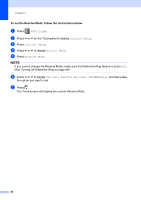
Chapter 4 d Enter the fax number. Using the dial pad Using (Address) Address Book Using (History) Outgoing Incoming e Press Fax Start. Faxing from the ADF 4 The machine starts scanning and sending the document. Faxing from the scanner glass 4 If you choose Black in the Color Setting (default setting), the machine starts scanning the first page. Go to step f. If you choose Color in the Color Setting, the Touchscreen asks if you want to send a color fax. Press Color Fax to confirm. The machine starts dialing and sending the document. f When the Touchscreen asks you Next Page?, do one of the following: To send a single page, press No (Send). The machine starts sending the document. To send more than one page, press Yes and go to step g. g Place the next page on the scanner glass. Press OK. The machine starts scanning the page. (Repeat steps f and g for each additional page.) Stop faxing 4 To stop faxing, press . Setting scanner glass size for faxing 4 When documents are A4 size, you need to set the Scan Size to A4. If you do not, the bottom portion of the faxes will be missing. a Load your document. b Press (Fax). c Press Options. d Press s or t on the Touchpanel to display Glass Scan Size. e Press Glass Scan Size. f Press A4 (or Letter). g Press OK. h Enter the fax number. i Press Fax Start. NOTE • You can save the setting you use most often by setting it as the default setting. (See Advanced User's Guide: Setting your changes as the new default.) • This setting is only available for sending documents from the scanner glass. 38
-
 1
1 -
2
-
3
-
4
-
5
-
6
-
7
-
8
-
9
-
10
-
11
-
12
-
13
-
14
-
15
-
16
-
17
-
18
-
19
-
20
-
21
-
22
-
23
-
24
-
25
-
26
-
27
-
28
-
29
-
30
-
31
-
32
-
33
-
34
-
35
-
36
-
37
-
38
-
39
-
40
-
41
-
42
-
43
-
44
-
45
-
46
-
 47
47 -
 48
48 -
 49
49 -
 50
50 -
 51
51 -
 52
52 -
 53
53 -
 54
54 -
 55
55 -
 56
56 -
 57
57 -
58
-
59
-
60
-
61
-
62
-
63
-
64
-
65
-
66
-
67
-
68
-
69
-
70
-
71
-
72
-
73
-
74
-
75
-
76
-
77
-
78
-
79
-
80
-
81
-
82
-
83
-
84
-
85
-
86
-
87
-
88
-
89
-
90
-
91
-
92
-
93
-
94
-
95
-
96
-
97
-
98
-
99
-
100
-
101
-
102
-
103
-
104
-
105
-
106
-
107
-
108
-
109
-
110
-
111
-
112
-
113
-
114
-
115
-
116
-
117
-
118
-
119
-
120
-
121
-
122
-
123
-
124
-
125
-
126
-
127
-
128
-
129
-
130
-
131
-
132
-
133
-
134
-
135
-
136
-
137
-
138
-
139
-
140
-
141
-
142
-
143
-
144
-
145
-
146
-
147
-
148
-
149
-
150
-
151
-
152
-
153
-
154
-
155
-
156
-
157
-
158
-
159
-
160
-
161
-
162
-
163
-
164
-
165
-
166
-
167
-
168
-
169
-
170
-
171
-
172
-
173
-
174
-
175
-
176
-
177
-
178
-
179
-
180
-
181
-
182
-
183
 |
 |