Canon LV-8225 LV-7290 User's Manual - Page 21
Basic Operation, Turning On the Projector
 |
View all Canon LV-8225 manuals
Add to My Manuals
Save this manual to your list of manuals |
Page 21 highlights
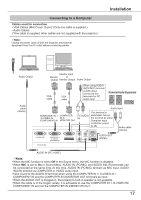
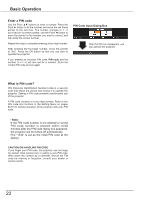
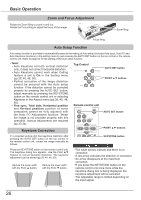
Basic Operation Turning On the Projector 1 Complete peripheral connections (with a computer, VCR, etc.) before turning on the projector. 2 Connect the projector's AC power cord into an AC outlet. The POWER indicator lights red.��O���p��e��n� the lens cap. 3 Press the POWER button on the top control or on the remote control unit. The POWER indicator lights green and the cooling fans start to operate. The preparation display appears on the screen and the countdown starts. 4 After the countdown, the input source that was selected the last time and the Lamp mode status icon (p. 59) appear on the screen. 5 If there is no signal input when start on the projector, or the current signal is missed while operating the projector, the VIDEO/PC selection window will be displayed on the screen, please move the pointer to input source desired by pressing the Point ▲▼ buttons and press the OK button. And then follow the input signal guidance window to correct the signal and connection. 16 The preparation display will disappear after 30 seconds. Selected Input Source and Lamp mode Lamp mode status (See page 59 for Lamp mode status.) Note: The Filter warning and Lamp replacement icons may appear on the screen depending on the usage state of the projector. PC Selection If the projector is locked with a PIN code, PIN code input dialog box will appear. Enter the PIN code as instructed on the next page. Guidance for PC Input Note: • When the Logo select function is set to Off, the logo will not be shown on the screen (p.53). • When Countdown off or Off is selected in the Display function, the preparation display will not be shown on the screen (p.53). • When the Auto input function is set to On 2, the input signal will be searched automatically (p.52). • When Off is selected in the Display function, the VIDEO/PC selection window and the input signal guidance window are not shown on the screen (p.53). Video Selection Guidance for Video Input 21
-
 1
1 -
2
-
3
-
4
-
5
-
6
-
7
-
8
-
9
-
10
-
11
-
12
-
13
-
14
-
15
-
 16
16 -
 17
17 -
 18
18 -
 19
19 -
 20
20 -
 21
21 -
 22
22 -
 23
23 -
 24
24 -
 25
25 -
 26
26 -
27
-
28
-
29
-
30
-
31
-
32
-
33
-
34
-
35
-
36
-
37
-
38
-
39
-
40
-
41
-
42
-
43
-
44
-
45
-
46
-
47
-
48
-
49
-
50
-
51
-
52
-
53
-
54
-
55
-
56
-
57
-
58
-
59
-
60
-
61
-
62
-
63
-
64
-
65
-
66
-
67
-
68
-
69
-
70
-
71
-
72
-
73
-
74
-
75
-
76
-
77
-
78
-
79
-
80
-
81
-
82
-
83
 |
 |