Canon imagePROGRAF iPF760 Basic Guide - Page 25
Install the ink tanks, ing quality.
 |
View all Canon imagePROGRAF iPF760 manuals
Add to My Manuals
Save this manual to your list of manuals |
Page 25 highlights
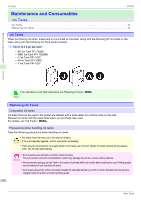
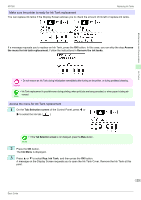
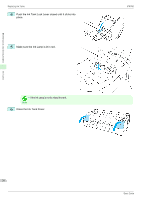
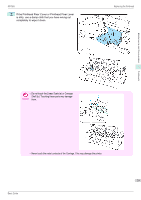
Maintenance and Consumables iPF760 Install the ink tanks 1 Before opening the pouch, gently agitate the Ink Tank once or twice. Agitate the ink in the Ink Tank by slowly rotating the Ink Tank upside-down and right side up repeatedly. Replacing Ink Tanks • Do not remove and agitate ink tanks that have already been installed in the printer. Ink may leak out. Caution • If you do not agitate the Ink Tank, the ink may settle, which may affect printing quality. Important 2 Open the pouch and remove the Ink Tank. Ink Tanks • Never touch the ink holes or electrical contacts. This may cause stains, damage the Ink Tank, and affect print- Caution ing quality. 3 Press the OK button and insert the Ink Tank into the holder facing as shown, with the ink holes down. • Ink tanks cannot be loaded in the holder if the color or orientation is incorrect. If the Ink Tank does not fit in the holder, do not force it into the holder. Make sure the color of the Ink Tank 25 Important Lock Lever matches the color of the Ink Tank and check the orientation of the Ink Tank before reloading it. Basic Guide
-
 1
1 -
2
-
3
-
4
-
5
-
6
-
7
-
8
-
9
-
10
-
11
-
12
-
13
-
14
-
15
-
16
-
17
-
18
-
19
-
 20
20 -
 21
21 -
 22
22 -
 23
23 -
 24
24 -
 25
25 -
 26
26 -
 27
27 -
 28
28 -
 29
29 -
 30
30 -
31
-
32
-
33
-
34
-
35
-
36
-
37
-
38
-
39
-
40
-
41
-
42
-
43
-
44
-
45
-
46
-
47
-
48
-
49
-
50
-
51
-
52
-
53
-
54
-
55
-
56
-
57
-
58
-
59
-
60
-
61
-
62
-
63
-
64
-
65
-
66
-
67
-
68
-
69
-
70
-
71
-
72
-
73
-
74
-
75
-
76
-
77
-
78
-
79
-
80
-
81
-
82
-
83
-
84
-
85
-
86
-
87
-
88
-
89
-
90
-
91
-
92
-
93
-
94
-
95
-
96
-
97
-
98
-
99
-
100
-
101
-
102
-
103
-
104
-
105
-
106
-
107
-
108
-
109
-
110
-
111
-
112
-
113
-
114
-
115
-
116
-
117
-
118
-
119
-
120
-
121
-
122
-
123
-
124
-
125
-
126
-
127
-
128
-
129
-
130
-
131
-
132
 |
 |
