D-Link DSN-6410 User Manual for DSN-6410 - Page 90
Create snapshot volume
 |
View all D-Link DSN-6410 manuals
Add to My Manuals
Save this manual to your list of manuals |
Page 90 highlights
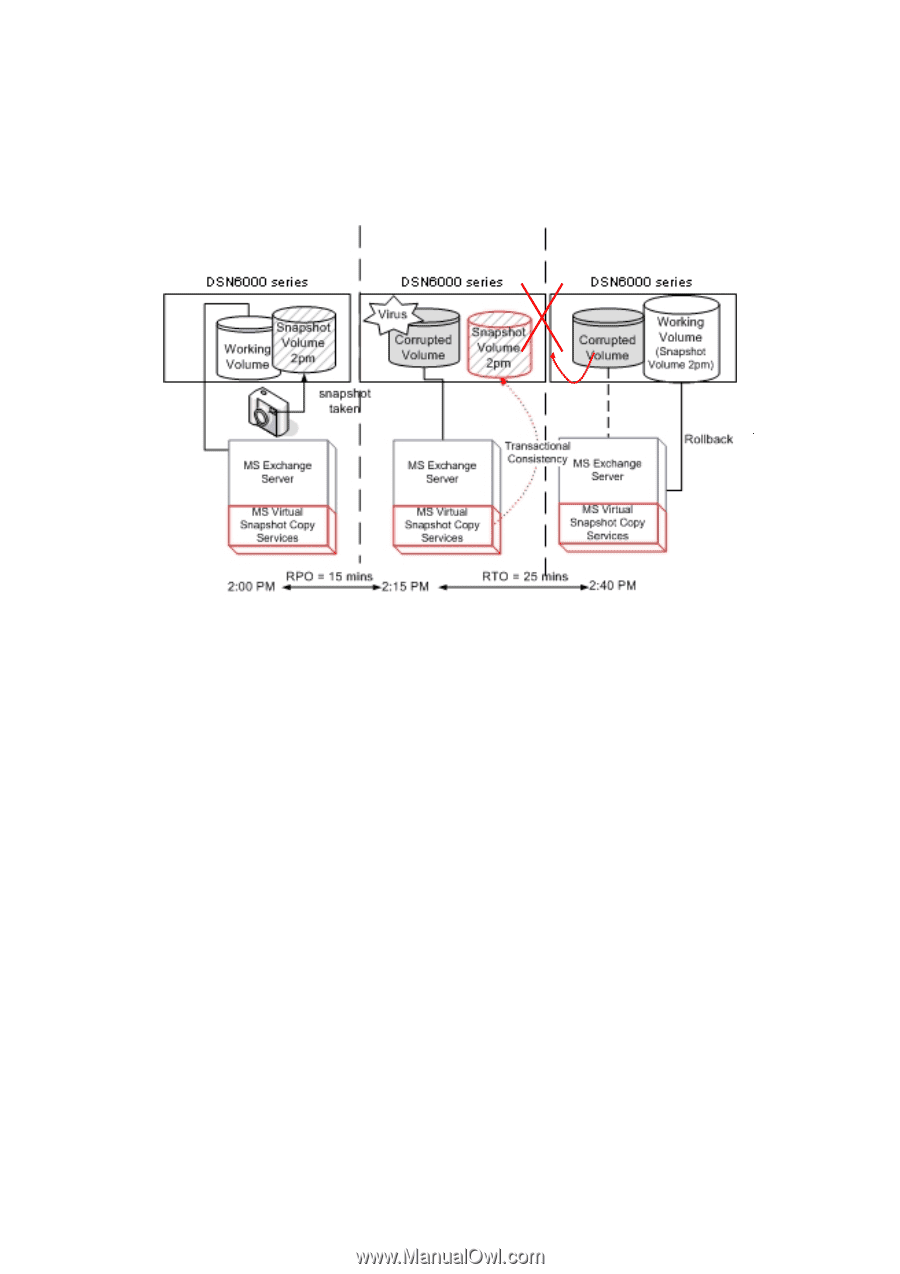
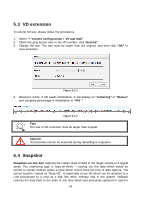
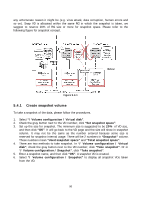
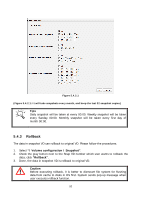
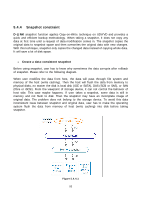
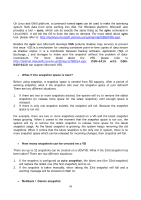
any unfortunate reason it might be (e.g. virus attack, data corruption, human errors and so on). Snap VD is allocated within the same RG in which the snapshot is taken, we suggest to reserve 20% of RG size or more for snapshot space. Please refer to the following figure for snapshot concept. Figure 5.4.1 5.4.1 Create snapshot volume To take a snapshot of the data, please follow the procedures. 1. Select "/ Volume configuration / Virtual disk". 2. Check the gray button next to the VD number; click "Set snapshot space". 3. Set up the size for snapshot. The minimum size is suggested to be 20% of VD size, and then click "OK". It will go back to the VD page and the size will show in snapshot column. It may not be the same as the number entered because some size is reserved for snapshot internal usage. There will be 2 numbers in "Snapshot" column. These numbers mean "Used snapshot space" and "Total snapshot space". 4. There are two methods to take snapshot. In "/ Volume configuration / Virtual disk", check the gray button next to the VD number; click "Take snapshot". Or in "/ Volume configuration / Snapshot", click "Take snapshot". 5. Enter a snapshot name, and then click "OK". A snapshot VD is created. 6. Select "/ Volume configuration / Snapshot" to display all snapshot VDs taken from the VD. 90
-
 1
1 -
2
-
3
-
4
-
5
-
6
-
7
-
8
-
9
-
10
-
11
-
12
-
13
-
14
-
15
-
16
-
17
-
18
-
19
-
20
-
21
-
22
-
23
-
24
-
25
-
26
-
27
-
28
-
29
-
30
-
31
-
32
-
33
-
34
-
35
-
36
-
37
-
38
-
39
-
40
-
41
-
42
-
43
-
44
-
45
-
46
-
47
-
48
-
49
-
50
-
51
-
52
-
53
-
54
-
55
-
56
-
57
-
58
-
59
-
60
-
61
-
62
-
63
-
64
-
65
-
66
-
67
-
68
-
69
-
70
-
71
-
72
-
73
-
74
-
75
-
76
-
77
-
78
-
79
-
80
-
81
-
82
-
83
-
84
-
 85
85 -
 86
86 -
 87
87 -
 88
88 -
 89
89 -
 90
90 -
 91
91 -
 92
92 -
 93
93 -
 94
94 -
 95
95 -
96
-
97
-
98
-
99
-
100
-
101
-
102
-
103
-
104
-
105
-
106
-
107
-
108
-
109
-
110
-
111
-
112
-
113
-
114
-
115
-
116
-
117
-
118
-
119
-
120
-
121
-
122
-
123
-
124
-
125
-
126
-
127
-
128
-
129
-
130
-
131
-
132
-
133
-
134
-
135
-
136
-
137
-
138
-
139
-
140
-
141
-
142
-
143
-
144
-
145
-
146
 |
 |