D-Link DSN-6410 User Manual for DSN-6410 - Page 91
Auto snapshot
 |
View all D-Link DSN-6410 manuals
Add to My Manuals
Save this manual to your list of manuals |
Page 91 highlights
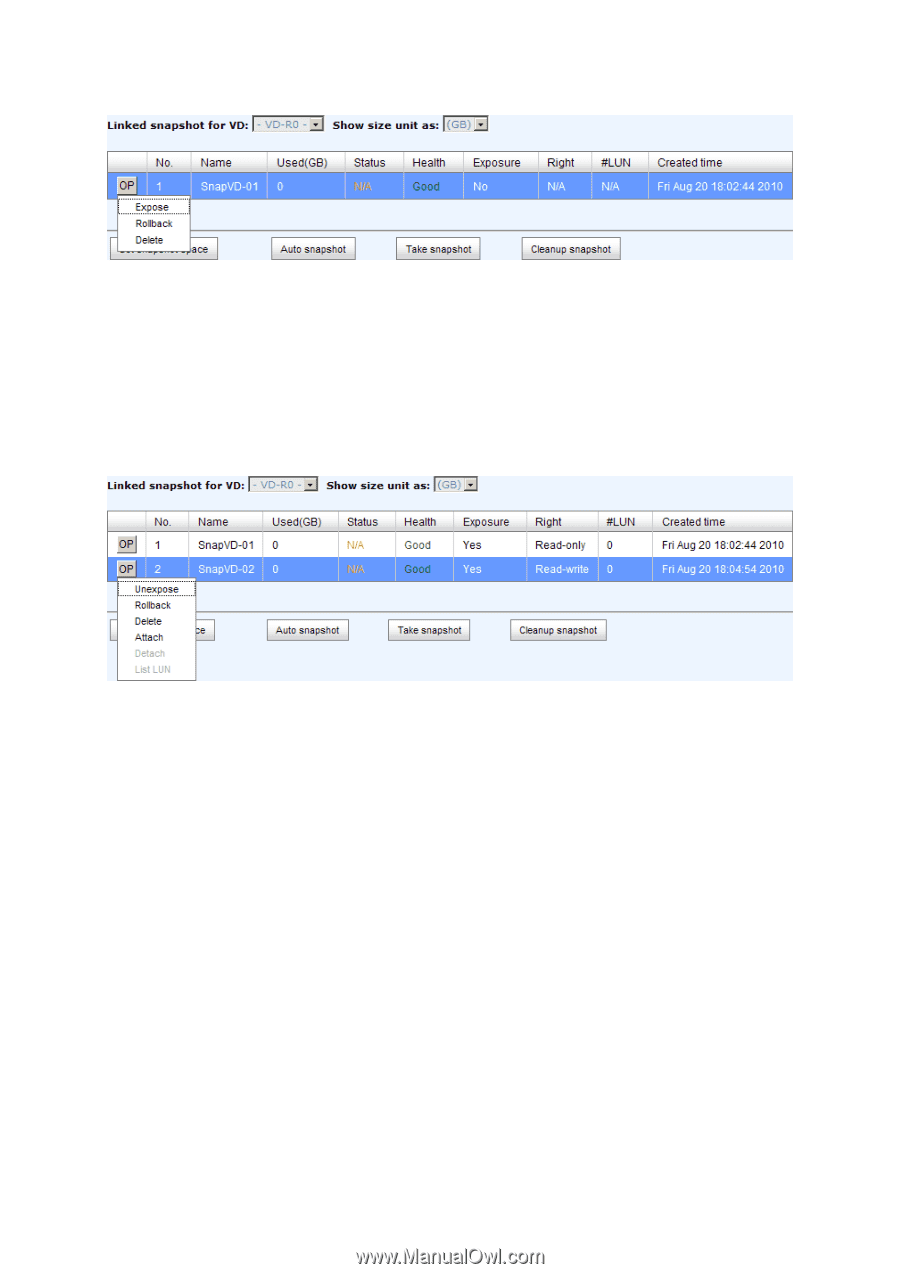
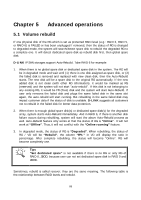
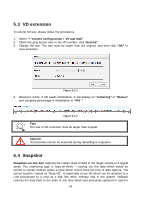
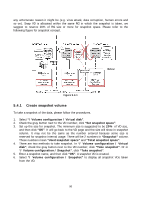
Figure 5.4.1.1 7. Check the gray button next to the Snapshot VD number; click "Expose". Enter a capacity for snapshot VD. If size is zero, the exposed snapshot VD is read only. Otherwise, the exposed snapshot VD can be read / written, and the size is the maximum capacity for writing. 8. Attach a LUN to the snapshot VD. Please refer to the previous chapter for attaching a LUN. 9. Done. It can be used as a disk. Figure 5.4.1.2 (Figure 5.4.1.2: This is the snapshot list of "VD-01". There are two snapshots. Snapshot VD "SnapVD-01" is exposed as read-only, "SnapVD-02" is exposed as read-write.) 1. There are two methods to clean all snapshots. In "/ Volume configuration / Virtual disk", check the gray button next to the VD number; click "Cleanup snapshot". Or in "/ Volume configuration / Snapshot", click "Cleanup". 2. "Cleanup snapshot" will delete all snapshots of the VD and release snapshot space. 5.4.2 Auto snapshot The snapshot copies can be taken manually or by schedule such as hourly or daily. Please follow the procedures. 1. There are two methods to set auto snapshot. In "/ Volume configuration / Virtual disk", check the gray button next to the VD number; click "Auto snapshot". Or in "/ Volume configuration / Snapshot", click "Auto snapshot". 2. The auto snapshot can be set monthly, weekly, daily, or hourly. 3. Done. It will take snapshots automatically. 91
-
 1
1 -
2
-
3
-
4
-
5
-
6
-
7
-
8
-
9
-
10
-
11
-
12
-
13
-
14
-
15
-
16
-
17
-
18
-
19
-
20
-
21
-
22
-
23
-
24
-
25
-
26
-
27
-
28
-
29
-
30
-
31
-
32
-
33
-
34
-
35
-
36
-
37
-
38
-
39
-
40
-
41
-
42
-
43
-
44
-
45
-
46
-
47
-
48
-
49
-
50
-
51
-
52
-
53
-
54
-
55
-
56
-
57
-
58
-
59
-
60
-
61
-
62
-
63
-
64
-
65
-
66
-
67
-
68
-
69
-
70
-
71
-
72
-
73
-
74
-
75
-
76
-
77
-
78
-
79
-
80
-
81
-
82
-
83
-
84
-
85
-
 86
86 -
 87
87 -
 88
88 -
 89
89 -
 90
90 -
 91
91 -
 92
92 -
 93
93 -
 94
94 -
 95
95 -
 96
96 -
97
-
98
-
99
-
100
-
101
-
102
-
103
-
104
-
105
-
106
-
107
-
108
-
109
-
110
-
111
-
112
-
113
-
114
-
115
-
116
-
117
-
118
-
119
-
120
-
121
-
122
-
123
-
124
-
125
-
126
-
127
-
128
-
129
-
130
-
131
-
132
-
133
-
134
-
135
-
136
-
137
-
138
-
139
-
140
-
141
-
142
-
143
-
144
-
145
-
146
 |
 |