Dell PowerEdge 4100 Service Manual - Page 51
Hard-Disk Drives
 |
View all Dell PowerEdge 4100 manuals
Add to My Manuals
Save this manual to your list of manuals |
Page 51 highlights
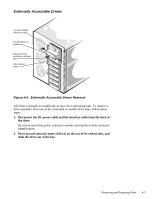
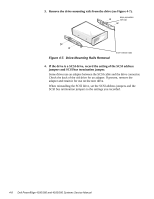
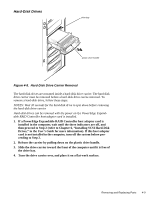
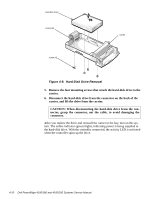
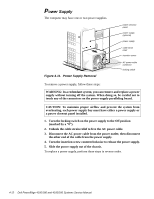
Hard-Disk Drives drive bay plastic drive handle Figure 4-8. Hard-Disk Drive Carrier Removal The hard-disk drives are mounted inside a hard-disk drive carrier. The hard-disk drive carrier must be removed before a hard-disk drive can be removed. To remove a hard-disk drive, follow these steps: NOTES: Wait 20 seconds for the hard-disk drive to spin down before removing the hard-disk drive carrier. Hard-disk drives can be removed with the power on if a PowerEdge Expandable RAID Controller host adapter card is installed. 1. If a PowerEdge Expandable RAID Controller host adapter card is installed in the computer, wait until the three indicators are off, and then proceed to Step 2 (refer to Chapter 6, "Installing SCSI Hard-Disk Drives," in the User's Guide for more information). If this host adapter card is not installed in the computer, turn off the system before proceeding to Step 2. 2. Release the carrier by pulling down on the plastic drive handle. 3. Slide the drive carrier toward the front of the computer until it is free of the drive bay. 4. Turn the drive carrier over, and place it on a flat work surface. Removing and Replacing Parts 4-9
-
 1
1 -
2
-
3
-
4
-
5
-
6
-
7
-
8
-
9
-
10
-
11
-
12
-
13
-
14
-
15
-
16
-
17
-
18
-
19
-
20
-
21
-
22
-
23
-
24
-
25
-
26
-
27
-
28
-
29
-
30
-
31
-
32
-
33
-
34
-
35
-
36
-
37
-
38
-
39
-
40
-
41
-
42
-
43
-
44
-
45
-
 46
46 -
 47
47 -
 48
48 -
 49
49 -
 50
50 -
 51
51 -
 52
52 -
 53
53 -
 54
54 -
 55
55 -
 56
56 -
57
-
58
-
59
-
60
-
61
-
62
-
63
-
64
-
65
-
66
-
67
-
68
-
69
-
70
-
71
-
72
-
73
-
74
-
75
-
76
-
77
-
78
-
79
-
80
-
81
-
82
 |
 |
