Dell PowerEdge 4100 Service Manual - Page 65
System Battery
 |
View all Dell PowerEdge 4100 manuals
Add to My Manuals
Save this manual to your list of manuals |
Page 65 highlights
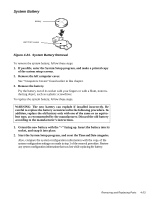
System Battery battery BATTERY socket Figure 4-24. System Battery Removal To remove the system battery, follow these steps: 1. If possible, enter the System Setup program, and make a printed copy of the system setup screens. 2. Remove the left computer cover. See "Computers Covers" found earlier in this chapter. 3. Remove the battery. Pry the battery out of its socket with your fingers or with a blunt, nonconducting object, such as a plastic screwdriver. To replace the system battery, follow these steps. WARNING: The new battery can explode if installed incorrectly. Be careful to replace the battery as instructed in the following procedure. In addition, replace the old battery only with one of the same or an equivalent type, as recommended by the manufacturer. Discard the old battery according to the manufacturer's instructions. 1. Orient the new battery with the "+" facing up. Insert the battery into its socket, and snap it into place. 2. Start the System Setup program, and reset the Time and Date categories. Also, compare the system configuration information with the copy of the system configuration settings you made in step 1 of the removal procedure. Restore any system configuration information that was lost while replacing the battery. Removing and Replacing Parts 4-23
-
 1
1 -
2
-
3
-
4
-
5
-
6
-
7
-
8
-
9
-
10
-
11
-
12
-
13
-
14
-
15
-
16
-
17
-
18
-
19
-
20
-
21
-
22
-
23
-
24
-
25
-
26
-
27
-
28
-
29
-
30
-
31
-
32
-
33
-
34
-
35
-
36
-
37
-
38
-
39
-
40
-
41
-
42
-
43
-
44
-
45
-
46
-
47
-
48
-
49
-
50
-
51
-
52
-
53
-
54
-
55
-
56
-
57
-
58
-
59
-
 60
60 -
 61
61 -
 62
62 -
 63
63 -
 64
64 -
 65
65 -
 66
66 -
 67
67 -
 68
68 -
 69
69 -
 70
70 -
71
-
72
-
73
-
74
-
75
-
76
-
77
-
78
-
79
-
80
-
81
-
82
 |
 |
