Dell PowerEdge 4100 Service Manual - Page 66
System Board
 |
View all Dell PowerEdge 4100 manuals
Add to My Manuals
Save this manual to your list of manuals |
Page 66 highlights
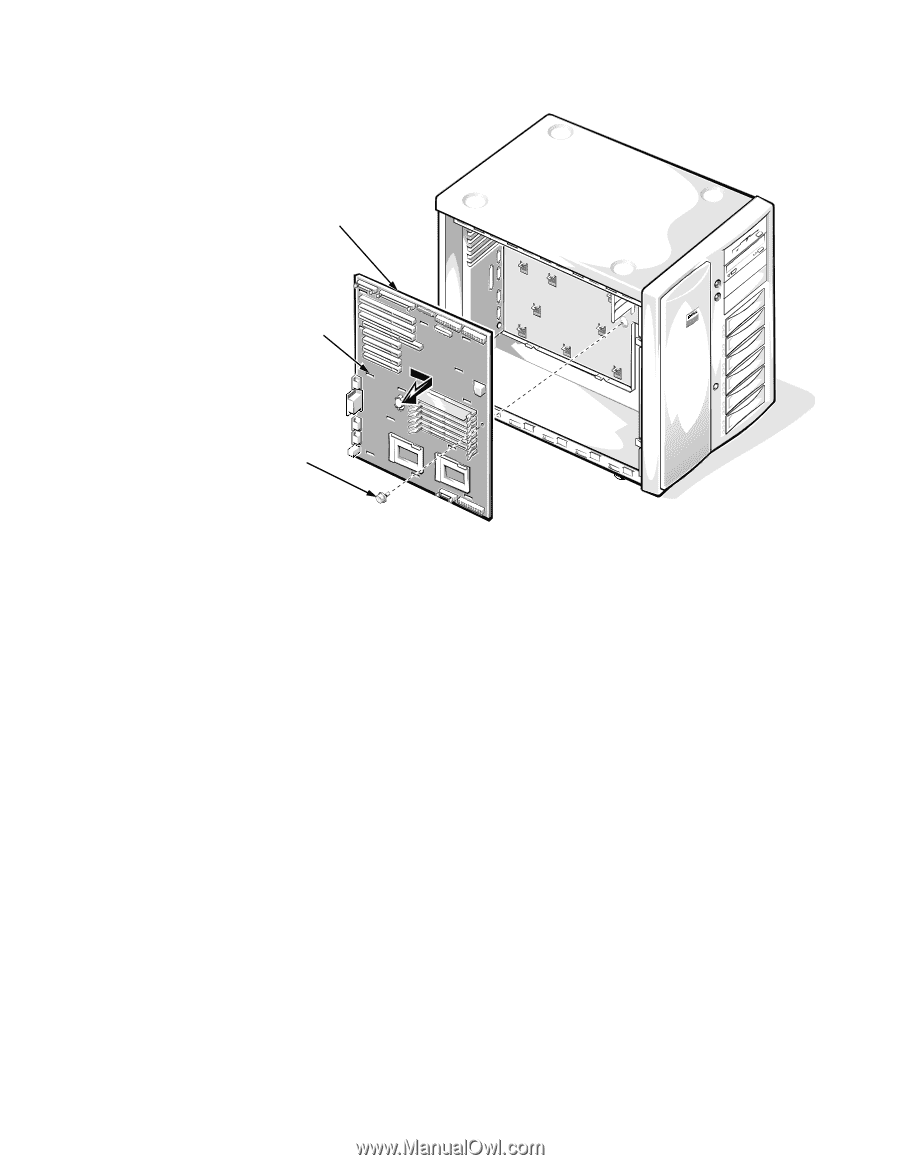
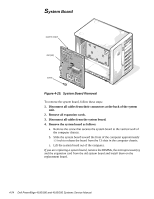
System Board system board slot (13) screw Figure 4-25. System Board Removal To remove the system board, follow these steps: 1. Disconnect all cables from their connectors at the back of the system unit. 2. Remove all expansion cards. 3. Disconnect all cables from the system board. 4. Remove the system board as follows: a. Remove the screw that secures the system board to the vertical wall of the computer chassis. b. Slide the system board toward the front of the computer approximately 1/2 inch to release the board from the 13 slots in the computer chassis. c. Lift the system board out of the computer. If you are replacing a system board, remove the DIMMs, the microprocessor(s), and the expansion card from the old system board and install them on the replacement board. 4-24 Dell PowerEdge 4100/180 and 4100/200 Systems Service Manual
-
 1
1 -
2
-
3
-
4
-
5
-
6
-
7
-
8
-
9
-
10
-
11
-
12
-
13
-
14
-
15
-
16
-
17
-
18
-
19
-
20
-
21
-
22
-
23
-
24
-
25
-
26
-
27
-
28
-
29
-
30
-
31
-
32
-
33
-
34
-
35
-
36
-
37
-
38
-
39
-
40
-
41
-
42
-
43
-
44
-
45
-
46
-
47
-
48
-
49
-
50
-
51
-
52
-
53
-
54
-
55
-
56
-
57
-
58
-
59
-
60
-
 61
61 -
 62
62 -
 63
63 -
 64
64 -
 65
65 -
 66
66 -
 67
67 -
 68
68 -
 69
69 -
 70
70 -
 71
71 -
72
-
73
-
74
-
75
-
76
-
77
-
78
-
79
-
80
-
81
-
82
 |
 |