Dell PowerEdge 4100 Service Manual - Page 63
Microprocessor Securing Clip, Removing a Microprocessor
 |
View all Dell PowerEdge 4100 manuals
Add to My Manuals
Save this manual to your list of manuals |
Page 63 highlights
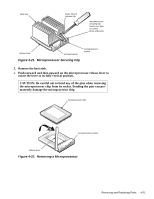
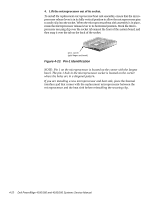
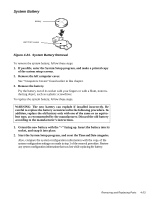
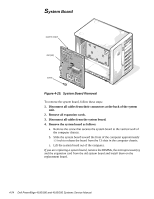
heat sink press here to release clip microprocessor securing clip hooks over tabs on socket (front and back) release lever microprocessor microprocessor socket Figure 4-21. Microprocessor Securing Clip 2. Remove the heat sink. 3. Push outward and then upward on the microprocessor release lever to rotate the lever to its fully vertical position. CAUTION: Be careful not to bend any of the pins when removing the microprocessor chip from its socket. Bending the pins can permanently damage the microprocessor chip. microprocessor chip microprocessor socket release lever Figure 4-22. Removing a Microprocessor Removing and Replacing Parts 4-21
-
 1
1 -
2
-
3
-
4
-
5
-
6
-
7
-
8
-
9
-
10
-
11
-
12
-
13
-
14
-
15
-
16
-
17
-
18
-
19
-
20
-
21
-
22
-
23
-
24
-
25
-
26
-
27
-
28
-
29
-
30
-
31
-
32
-
33
-
34
-
35
-
36
-
37
-
38
-
39
-
40
-
41
-
42
-
43
-
44
-
45
-
46
-
47
-
48
-
49
-
50
-
51
-
52
-
53
-
54
-
55
-
56
-
57
-
 58
58 -
 59
59 -
 60
60 -
 61
61 -
 62
62 -
 63
63 -
 64
64 -
 65
65 -
 66
66 -
 67
67 -
 68
68 -
69
-
70
-
71
-
72
-
73
-
74
-
75
-
76
-
77
-
78
-
79
-
80
-
81
-
82
 |
 |

Removing and Replacing Parts
4-21
Figure 4-21.
Microprocessor Securing Clip
2.
Remove the heat sink.
3.
Push outward and then upward on the microprocessor release lever to
rotate the lever to its fully vertical position.
Figure 4-22.
Removing a Microprocessor
CAUTION: Be careful not to bend any of the pins when removing
the microprocessor chip from its socket. Bending the pins can per-
manently damage the microprocessor chip.
microprocessor
securing clip
hooks over tabs
on socket
(front and back)
microprocessor
heat sink
release lever
microprocessor
socket
press here to
release clip
microprocessor chip
microprocessor socket
release lever