Dell PowerEdge T30 Owners Manual - Page 29
Updating the BIOS
 |
View all Dell PowerEdge T30 manuals
Add to My Manuals
Save this manual to your list of manuals |
Page 29 highlights
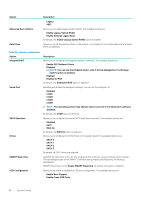
Option Asset Tag SERR Messages BIOS Downgrade Data Wipe Table 34. System Logs Option BIOS events Description Allows you to create a system asset tag if an asset tag is not already set. This option is not set by default. Allows you to control the SERR message mechanism. This option is not set by default. Some graphics cards require that the SERR message mechanism be disabled. Allows you to control the flashing of the system firmware to previous revisions. By default, this option is enabled. Allows you to securely erase data from all internal storage devices. By default, this option is enabled. Description Displays the system event log and allows you to clear the log by enabling the Clear Log option. Updating the BIOS Prerequisites Dell recommends you to update your BIOS (System Setup), when replacing the system board. Steps 1. Restart the system. 2. Go to Dell.com/support. 3. Enter the Service Tag or Express Service Code and click Submit. NOTE: To locate the Service Tag, click Where is my Service Tag? NOTE: If you cannot find your Service Tag, click Detect My Product. Proceed with the instructions on screen. 4. If you are unable to locate or find the Service Tag, click the product category of your system. 5. Choose the Product Type from the list. 6. Select your system model and the product support page of your system appears. 7. Click Get drivers and click View All Drivers. The Drivers and Downloads page opens. 8. On the Drivers and Downloads screen, under the Operating System drop-down list, select BIOS. 9. Identify the latest BIOS file and click Download File. You can also analyze the drivers that need an update. To do this for your product, click Analyze System for Updates and follow the instructions on the screen. 10. Select your preferred download method in the Please select your download method below window, click Download File. The File Download window appears. 11. Click Save to save the file on your system. 12. Click Run to install the updated BIOS settings on your system. Follow the instructions on the screen. Next steps NOTE: Dell recommends not to update the BIOS version for more than 3 revisions. For example, if you want to update the BIOS from 1.0 to 7.0, then install version 4.0 first and then install version 7.0. Related reference Locating service tag of your system System Setup 29
-
 1
1 -
2
-
3
-
4
-
5
-
6
-
7
-
8
-
9
-
10
-
11
-
12
-
13
-
14
-
15
-
16
-
17
-
18
-
19
-
20
-
21
-
22
-
23
-
 24
24 -
 25
25 -
 26
26 -
 27
27 -
 28
28 -
 29
29 -
 30
30 -
 31
31 -
 32
32 -
 33
33 -
 34
34 -
35
-
36
-
37
-
38
-
39
-
40
-
41
-
42
-
43
-
44
-
45
-
46
-
47
-
48
-
49
-
50
-
51
-
52
-
53
-
54
-
55
-
56
-
57
-
58
-
59
-
60
-
61
-
62
-
63
-
64
-
65
-
66
-
67
-
68
-
69
-
70
-
71
-
72
-
73
-
74
-
75
-
76
-
77
-
78
-
79
-
80
-
81
-
82
-
83
-
84
-
85
-
86
-
87
-
88
-
89
-
90
-
91
-
92
-
93
-
94
-
95
-
96
-
97
-
98
-
99
-
100
-
101
-
102
-
103
 |
 |