Dell PowerEdge T30 Owners Manual - Page 84
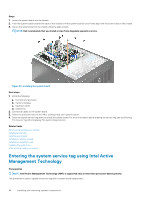
Entering the system service tag using Intel Active Management Technology
 |
View all Dell PowerEdge T30 manuals
Add to My Manuals
Save this manual to your list of manuals |
Page 84 highlights
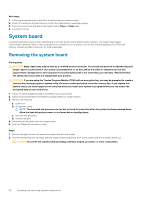
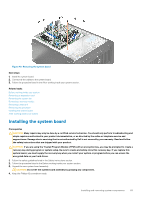
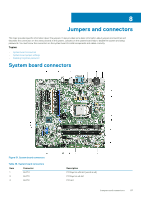
Steps 1. Lower the system board into the chassis. 2. Push the system board towards the back of the chassis until the system board's screw holes align with the screw holes on the chassis. 3. Secure the system board to the chassis using the eight screws. NOTE: Dell recommends that you install screws from diagonally opposite corners. Figure 50. Installing the system board Next steps 1. Install the following: a. heat sink and processor b. memory modules c. expansion cards d. system fan 2. Connect all cables to the system board. 3. Follow the procedure listed in the After working inside your system section. 4. Enter the system service tag after you install the system board. For more information about entering the service tag, see the Entering The Service Tag After Replacing The System Board section. Related tasks Before working inside your system Installing a heat sink Installing a processor Installing a memory module Installing an expansion card Installing the system fan After working inside your system Entering the system service tag using Intel Active Management Technology Prerequisites NOTE: Intel Active Management Technology (AMT) is supported only on Intel Xeon processor-based systems. This procedure is used to update the service tag after a system board replacement. 84 Installing and removing system components
-
 1
1 -
2
-
3
-
4
-
5
-
6
-
7
-
8
-
9
-
10
-
11
-
12
-
13
-
14
-
15
-
16
-
17
-
18
-
19
-
20
-
21
-
22
-
23
-
24
-
25
-
26
-
27
-
28
-
29
-
30
-
31
-
32
-
33
-
34
-
35
-
36
-
37
-
38
-
39
-
40
-
41
-
42
-
43
-
44
-
45
-
46
-
47
-
48
-
49
-
50
-
51
-
52
-
53
-
54
-
55
-
56
-
57
-
58
-
59
-
60
-
61
-
62
-
63
-
64
-
65
-
66
-
67
-
68
-
69
-
70
-
71
-
72
-
73
-
74
-
75
-
76
-
77
-
78
-
 79
79 -
 80
80 -
 81
81 -
 82
82 -
 83
83 -
 84
84 -
 85
85 -
 86
86 -
 87
87 -
 88
88 -
 89
89 -
90
-
91
-
92
-
93
-
94
-
95
-
96
-
97
-
98
-
99
-
100
-
101
-
102
-
103
 |
 |
