Dell PowerEdge T30 Owners Manual - Page 75
Processors and heat sinks, Removing a heat sink
 |
View all Dell PowerEdge T30 manuals
Add to My Manuals
Save this manual to your list of manuals |
Page 75 highlights
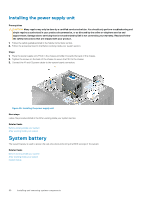
Processors and heat sinks Use the following procedures when: • Removing and installing a heat sink • Installing an additional processor • Replacing a processor Removing a heat sink Prerequisites CAUTION: Never remove the heat sink from a processor unless you intend to remove the processor. The heat sink is necessary to maintain proper thermal conditions. WARNING: The heat sink is hot to touch. Allow the heat sink to cool for some time after powering down the system. 1. Follow the safety guidelines listed in the Safety instructions section. 2. Follow the procedure listed in the Before working inside your system section. 3. Disconnect the CPU fan cable connected to the system board. 4. Keep the Phillips #2 screwdriver ready. Steps 1. Loosen one of the screws that secure the heat sink to the system board. Allow some time (approximately 30 seconds) for the heat sink to loosen from the processor. 2. Remove the screw diagonally opposite to the screw that you first removed. 3. Repeat step 1 and 2 for removing the remaining two screws. 4. Lift the heat sink out of the system. Figure 41. Removing a heat sink Next steps 1. Replace the processor and heat sink. 2. Follow the procedure listed in the After working inside your system section. Related tasks Before working inside your system Removing the processor Installing a processor Installing a heat sink After working inside your system Installing and removing system components 75
-
 1
1 -
2
-
3
-
4
-
5
-
6
-
7
-
8
-
9
-
10
-
11
-
12
-
13
-
14
-
15
-
16
-
17
-
18
-
19
-
20
-
21
-
22
-
23
-
24
-
25
-
26
-
27
-
28
-
29
-
30
-
31
-
32
-
33
-
34
-
35
-
36
-
37
-
38
-
39
-
40
-
41
-
42
-
43
-
44
-
45
-
46
-
47
-
48
-
49
-
50
-
51
-
52
-
53
-
54
-
55
-
56
-
57
-
58
-
59
-
60
-
61
-
62
-
63
-
64
-
65
-
66
-
67
-
68
-
69
-
 70
70 -
 71
71 -
 72
72 -
 73
73 -
 74
74 -
 75
75 -
 76
76 -
 77
77 -
 78
78 -
 79
79 -
 80
80 -
81
-
82
-
83
-
84
-
85
-
86
-
87
-
88
-
89
-
90
-
91
-
92
-
93
-
94
-
95
-
96
-
97
-
98
-
99
-
100
-
101
-
102
-
103
 |
 |
