Dell TL2000 User Guide - Page 119
Con Set Access PIN, Link Local IPv6 address
 |
View all Dell TL2000 manuals
Add to My Manuals
Save this manual to your list of manuals |
Page 119 highlights
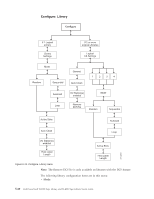
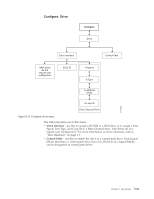
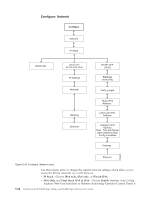
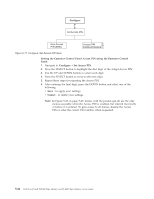
assigned IPv6 IP addresses are desired. To view the assigned IPv6 addresses after enabling Stateless Auto Config Address, do the following: - Operator Control Panel (IPv6 Only): Monitor → Library → Network If you choose Dual Stack IPv4 & IPv6, you must be prepared to enter both IPv4 and IPv6 IP addresses. v DHCP - (Dynamic Host Configuration Protocol) If this is enabled, your library host will negotiate the connection with the library. If DHCP is disabled, the following information is necessary to establish the remote access. v IP Address - the IP address of the library v Netmask - the Network Mask address of the library v IP Stack - the IP Stack manages static IP addresses v Stateless autoconfig - allows IPv6 hosts to be configured automatically when connected to a routed IPv6 network v Prefix length - the length of the IP address prefix v Static IPv6 address - a static IPv6 address that has been assigned to the library v Link Local IPv6 address - an IPv6 address having link-only scope that can be used to reach neighboring nodes attached to the same link v Assigned IPv6 address - an IPv6 address assigned by a router v Gateway - the Gateway address of the library v Ethernet - the current speed setting of the ethernet interface v DNS Server 1 - the first DNS server address v DNS Server 2 - the second DNS server address Note: If a host and domain name are entered instead of an address, the IPv4 or IPv6 address will be resolved from the DNS using that name. That address will be stored in the library rather than the name. Therefore, if the address changes, the name or a new address will have to be entered. Configure: Set Access PIN Use this menu item to enable/disable, set or change the Access PIN (personal identification number) which is used to restrict access to the Control, Configure, and Service menus. Note: Record the Access PIN and store this in a secure location for future reference. Library configuration files, saved with the Save Library Config menu, do not include the Access PIN. The Operator Control Panel (OCP) pin is turned off by default, but it is strongly recommended to be enabled if your environment requires unit security. Enabling the OCP pin feature prevents the unit settings from being tampered with. Users will be allowed to review the library status and manipulate media without entering the OCP pin. If a unit administrator needs to make a configuration change in the unit, the OCP will ask for the 4-digit code in order to allow access to make changes. Once all the changes are completed the pin access will expire after 5 minutes of inactivity in the OCP (there is no log-out function in the library for this feature). A library reboot is recommended after making configuration changes to the library. Chapter 5. Operations 5-25
-
 1
1 -
2
-
3
-
4
-
5
-
6
-
7
-
8
-
9
-
10
-
11
-
12
-
13
-
14
-
15
-
16
-
17
-
18
-
19
-
20
-
21
-
22
-
23
-
24
-
25
-
26
-
27
-
28
-
29
-
30
-
31
-
32
-
33
-
34
-
35
-
36
-
37
-
38
-
39
-
40
-
41
-
42
-
43
-
44
-
45
-
46
-
47
-
48
-
49
-
50
-
51
-
52
-
53
-
54
-
55
-
56
-
57
-
58
-
59
-
60
-
61
-
62
-
63
-
64
-
65
-
66
-
67
-
68
-
69
-
70
-
71
-
72
-
73
-
74
-
75
-
76
-
77
-
78
-
79
-
80
-
81
-
82
-
83
-
84
-
85
-
86
-
87
-
88
-
89
-
90
-
91
-
92
-
93
-
94
-
95
-
96
-
97
-
98
-
99
-
100
-
101
-
102
-
103
-
104
-
105
-
106
-
107
-
108
-
109
-
110
-
111
-
112
-
113
-
 114
114 -
 115
115 -
 116
116 -
 117
117 -
 118
118 -
 119
119 -
 120
120 -
 121
121 -
 122
122 -
 123
123 -
 124
124 -
125
-
126
-
127
-
128
-
129
-
130
-
131
-
132
-
133
-
134
-
135
-
136
-
137
-
138
-
139
-
140
-
141
-
142
-
143
-
144
-
145
-
146
-
147
-
148
-
149
-
150
-
151
-
152
-
153
-
154
-
155
-
156
-
157
-
158
-
159
-
160
-
161
-
162
-
163
-
164
-
165
-
166
-
167
-
168
-
169
-
170
-
171
-
172
-
173
-
174
-
175
-
176
-
177
-
178
-
179
-
180
-
181
-
182
-
183
-
184
-
185
-
186
-
187
-
188
-
189
-
190
-
191
-
192
-
193
-
194
-
195
-
196
-
197
-
198
-
199
-
200
-
201
-
202
-
203
-
204
-
205
-
206
-
207
-
208
-
209
-
210
-
211
-
212
-
213
-
214
-
215
-
216
-
217
-
218
-
219
-
220
-
221
-
222
-
223
-
224
-
225
-
226
-
227
-
228
-
229
-
230
-
231
-
232
-
233
-
234
-
235
-
236
-
237
-
238
-
239
-
240
-
241
-
242
-
243
-
244
-
245
-
246
-
247
-
248
-
249
-
250
-
251
-
252
-
253
-
254
-
255
-
256
-
257
-
258
-
259
-
260
-
261
-
262
-
263
-
264
-
265
-
266
-
267
-
268
-
269
-
270
-
271
-
272
-
273
-
274
-
275
-
276
-
277
 |
 |