Dell TL2000 User Guide - Page 93
Inserting the Cleaning Cartridge, Con gt;Library Settings->Auto Clean: Enabled - media attention
 |
View all Dell TL2000 manuals
Add to My Manuals
Save this manual to your list of manuals |
Page 93 highlights
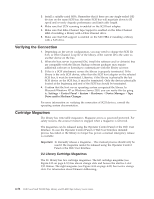
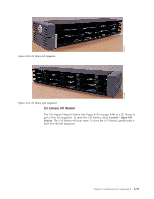
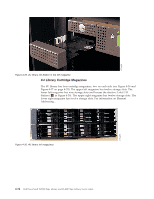
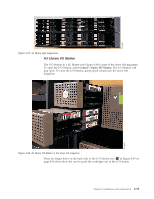
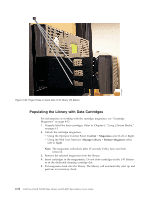
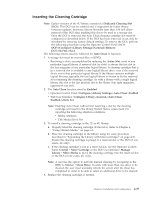
Inserting the Cleaning Cartridge Note: Earlier versions of the 4U library contained a Dedicated Cleaning Slot (DCS). This DCS can be retained and is supported by future library firmware updates. However, library firmware later than 3.90 will allow removal of the DCS, thus enabling this slot to be used as a storage slot. Once the DCS is removed, the Auto Clean cleaning cartridge slot must be configured as described below. If the DCS has been removed, it can only be reinstated by restoring factory default settings. To remove the DCS, perform the following procedure using the Operator Control Panel (OCP): OCP->Configure->Library Settings->General->Remove DCS->No/Yes->Save. The following criteria must be followed for Auto Clean to function: 1. A storage slot must be reserved (Res or RSVD). v Reserving a slot is accomplished by reducing the Active Slot count in any particular logical library. A reserved slot (or slots) is always the last slot in the last magazine of any particular logical library. A cleaning cartridge that is in a reserved slot is available to any logical library drive even if the reserved slot is not in that particular logical library. If the library contains multiple logical libraries, typically, the last logical library is chosen to be the reserved slot containing the cleaning cartridge. As with a library with a single logical library, this slot is the last physical slot in the library (top right magazine, uppermost rear slot). 2. The Auto Clean function must be Enabled. v Operator Control Panel: Configure->Library Settings->Auto Clean: Enabled v Web User Interface: Configure Library->General->Auto Clean Enabled->check box Note: Enabling Auto Clean without first reserving a slot for the cleaning cartridge will result in the library System Status screen (web UI) reporting the following attention conditions: v Media Attention v Chk Media/Rsvd Slot 3. To install a cleaning cartridge in the 2U or 4U library: a. Properly label the cleaning cartridge (CLNxxxLx). Refer to Chapter 6, "Using Ultrium Media," on page 6-1. b. Place the cleaning cartridge in the library using the same procedure described in "Populating the Library with Data Cartridges" on page 4-36. Ensure the cleaning cartridge is placed in a reserved slot or the DCS (if one exists, 4U only). c. If the cleaning cartridge is not in a reserved slot, use the Operator Control Panel: Control → Move Cartridge or the Web User Interface: Manage Library → Move Media to move the cleaning cartridge into the reserved slot or the DCS (if one exists, 4U only). Note: A user has the option to perform manual cleaning by navigating in the RMU to Service → Clean Drive. In units with more than one drive to be cleaned, the user must manually refresh the screen after the clean has completed in order to be able to select an additional drive to be cleaned. 4. Replace the cleaning cartridge, if needed. Chapter 4. Installation and Configuration 4-37
-
 1
1 -
2
-
3
-
4
-
5
-
6
-
7
-
8
-
9
-
10
-
11
-
12
-
13
-
14
-
15
-
16
-
17
-
18
-
19
-
20
-
21
-
22
-
23
-
24
-
25
-
26
-
27
-
28
-
29
-
30
-
31
-
32
-
33
-
34
-
35
-
36
-
37
-
38
-
39
-
40
-
41
-
42
-
43
-
44
-
45
-
46
-
47
-
48
-
49
-
50
-
51
-
52
-
53
-
54
-
55
-
56
-
57
-
58
-
59
-
60
-
61
-
62
-
63
-
64
-
65
-
66
-
67
-
68
-
69
-
70
-
71
-
72
-
73
-
74
-
75
-
76
-
77
-
78
-
79
-
80
-
81
-
82
-
83
-
84
-
85
-
86
-
87
-
 88
88 -
 89
89 -
 90
90 -
 91
91 -
 92
92 -
 93
93 -
 94
94 -
 95
95 -
 96
96 -
 97
97 -
 98
98 -
99
-
100
-
101
-
102
-
103
-
104
-
105
-
106
-
107
-
108
-
109
-
110
-
111
-
112
-
113
-
114
-
115
-
116
-
117
-
118
-
119
-
120
-
121
-
122
-
123
-
124
-
125
-
126
-
127
-
128
-
129
-
130
-
131
-
132
-
133
-
134
-
135
-
136
-
137
-
138
-
139
-
140
-
141
-
142
-
143
-
144
-
145
-
146
-
147
-
148
-
149
-
150
-
151
-
152
-
153
-
154
-
155
-
156
-
157
-
158
-
159
-
160
-
161
-
162
-
163
-
164
-
165
-
166
-
167
-
168
-
169
-
170
-
171
-
172
-
173
-
174
-
175
-
176
-
177
-
178
-
179
-
180
-
181
-
182
-
183
-
184
-
185
-
186
-
187
-
188
-
189
-
190
-
191
-
192
-
193
-
194
-
195
-
196
-
197
-
198
-
199
-
200
-
201
-
202
-
203
-
204
-
205
-
206
-
207
-
208
-
209
-
210
-
211
-
212
-
213
-
214
-
215
-
216
-
217
-
218
-
219
-
220
-
221
-
222
-
223
-
224
-
225
-
226
-
227
-
228
-
229
-
230
-
231
-
232
-
233
-
234
-
235
-
236
-
237
-
238
-
239
-
240
-
241
-
242
-
243
-
244
-
245
-
246
-
247
-
248
-
249
-
250
-
251
-
252
-
253
-
254
-
255
-
256
-
257
-
258
-
259
-
260
-
261
-
262
-
263
-
264
-
265
-
266
-
267
-
268
-
269
-
270
-
271
-
272
-
273
-
274
-
275
-
276
-
277
 |
 |