Dell TL2000 User Guide - Page 213
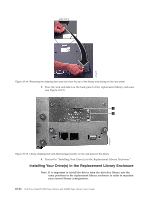
Replacing Cartridge Magazines, Replacing the Library Enclosure
 |
View all Dell TL2000 manuals
Add to My Manuals
Save this manual to your list of manuals |
Page 213 highlights
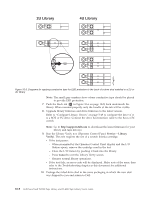
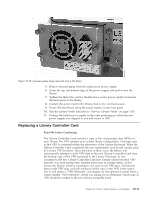
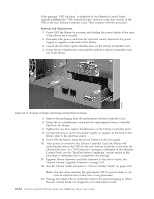
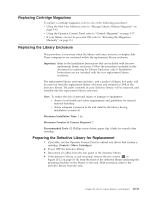
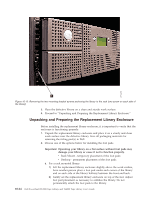
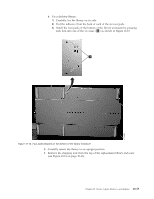
Replacing Cartridge Magazines To replace a cartridge magazine, refer to one of the following procedures: v Using the Web User Interface, refer to "Manage Library: Release Magazine" on page 5-43. v Using the Operator Control Panel, refer to "Control: Magazine" on page 5-17. v If your library can not be powered ON, refer to "Releasing the Magazines Manually" on page 9-1. Replacing the Library Enclosure This procedure is necessary when the library enclosure, accessor, or display fails. These components are contained within the replacement library enclosure. Important: Refer to the Installation Instructions that are included with the new replacement library enclosure. Follow the procedures included in this document for replacing the Library Enclosure, only if Installation Instructions are not included with the new replacement library enclosure. The replacement library enclosure includes , and a packet of library foot pads. will be removed from the replacement library enclosure and returned to Dell in the defective library. The parts currently in your defective library will be removed, and installed into the replacement library enclosure. Note: To reduce the risk of personal injury or damage to equipment: v observe local health and safety requirements and guidelines for manual material handling v obtain adequate assistance to lift and stabilize the library during installation or removal Minimum Installation Time: 1 hr. Minimum Number of Persons Required: 2 Recommended Tools: #2 Phillips screw driver, paper clip, blank (or scratch) data cartridge Preparing the Defective Library for Replacement 1. If possible, use the Operator Control Panel to unload any drives that contain a cartridge (Control → Move Cartridges). 2. Power OFF the defective library. 3. Disconnect all cables from the rear panel of the defective library. 4. If the defective library is rack mounted, remove the two screws ( 1 in Figure 10-12 on page 10-14) from the front of the defective library anchoring the mounting brackets on the library to the rack. With assistance, remove the defective library from the rack. Chapter 10. Check, Adjust, Remove, and Replace 10-13
-
 1
1 -
2
-
3
-
4
-
5
-
6
-
7
-
8
-
9
-
10
-
11
-
12
-
13
-
14
-
15
-
16
-
17
-
18
-
19
-
20
-
21
-
22
-
23
-
24
-
25
-
26
-
27
-
28
-
29
-
30
-
31
-
32
-
33
-
34
-
35
-
36
-
37
-
38
-
39
-
40
-
41
-
42
-
43
-
44
-
45
-
46
-
47
-
48
-
49
-
50
-
51
-
52
-
53
-
54
-
55
-
56
-
57
-
58
-
59
-
60
-
61
-
62
-
63
-
64
-
65
-
66
-
67
-
68
-
69
-
70
-
71
-
72
-
73
-
74
-
75
-
76
-
77
-
78
-
79
-
80
-
81
-
82
-
83
-
84
-
85
-
86
-
87
-
88
-
89
-
90
-
91
-
92
-
93
-
94
-
95
-
96
-
97
-
98
-
99
-
100
-
101
-
102
-
103
-
104
-
105
-
106
-
107
-
108
-
109
-
110
-
111
-
112
-
113
-
114
-
115
-
116
-
117
-
118
-
119
-
120
-
121
-
122
-
123
-
124
-
125
-
126
-
127
-
128
-
129
-
130
-
131
-
132
-
133
-
134
-
135
-
136
-
137
-
138
-
139
-
140
-
141
-
142
-
143
-
144
-
145
-
146
-
147
-
148
-
149
-
150
-
151
-
152
-
153
-
154
-
155
-
156
-
157
-
158
-
159
-
160
-
161
-
162
-
163
-
164
-
165
-
166
-
167
-
168
-
169
-
170
-
171
-
172
-
173
-
174
-
175
-
176
-
177
-
178
-
179
-
180
-
181
-
182
-
183
-
184
-
185
-
186
-
187
-
188
-
189
-
190
-
191
-
192
-
193
-
194
-
195
-
196
-
197
-
198
-
199
-
200
-
201
-
202
-
203
-
204
-
205
-
206
-
207
-
 208
208 -
 209
209 -
 210
210 -
 211
211 -
 212
212 -
 213
213 -
 214
214 -
 215
215 -
 216
216 -
 217
217 -
 218
218 -
219
-
220
-
221
-
222
-
223
-
224
-
225
-
226
-
227
-
228
-
229
-
230
-
231
-
232
-
233
-
234
-
235
-
236
-
237
-
238
-
239
-
240
-
241
-
242
-
243
-
244
-
245
-
246
-
247
-
248
-
249
-
250
-
251
-
252
-
253
-
254
-
255
-
256
-
257
-
258
-
259
-
260
-
261
-
262
-
263
-
264
-
265
-
266
-
267
-
268
-
269
-
270
-
271
-
272
-
273
-
274
-
275
-
276
-
277
 |
 |