Dell TL2000 User Guide - Page 41
Login, Important, secure, Monitor, Library, Identity, IP Address, Network - default password
 |
View all Dell TL2000 manuals
Add to My Manuals
Save this manual to your list of manuals |
Page 41 highlights
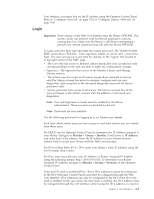
User Interface, you must first set the IP address using the Operator Control Panel. Refer to "Configure: Network" on page 5-23 or "Configure Library: Network" on page 5-45. Login Important: Some options of the Web User Interface take the library OFFLINE. This inactive mode can interfere with host-based application software, causing data loss. Make sure the library is idle before attempting to perform any remote operations that will take the library OFFLINE. To login, select the Role type and enter the correct password. The TL4000/TL2000 RMU screen shows Welcome : User, superuser, admin, or service after a successful login. The user can log out at any time by clicking on the "logout" text located in to top right corner of the RMU page. v The User only has access to Monitor Library menus.The User account has only viewing privileges to the unit, not able to make any configuration changes. v Superuser - The Superuser has access to the Monitor Library and Manage Library sections. v The Admin user has access to all menus except those restricted to Service only.The Admin account has access to monitor, configure and run unit diagnostics (only exception is the advanced diagnostics reserved for service personnel only). v Service personnel have access to all menus. The Service account has all the same privileges as the Admin account with the addition of advanced unit diagnostics. Note: User and Superuser accounts must be enabled by the library administrator. These accounts are disabled by default. Note: Passwords are case-sensitive. Use the following password for logging in as an Admin user: secure Each level affects which areas you have access to and what actions you can initiate from those areas. For DHCP, use the Operator Control Panel to determine the IP Address assigned to your library. Navigate to Monitor → Library → Identity. Scroll down to IP Address and make note of the address. Enter the IP Address in your internet browser address field to access your library with the Web User Interface. For IPv4 or Dual Stack IPv4 + IPv6, enter your library's static IP Address using the 0.0.0.0 format (four octets). For IPv6, enter your library's static IP Address or Router Assigned IP Address using the following format: http://[0:0:0:0:0:0:0:0]. To determine your Router Assigned IP Address, navigate to Monitor → Library → Network on the Operator Control Panel. If the dual IP stack is enabled (IPv4 + IPv6), IPv6 addresses cannot be configured in the OCP (Operator Control Panel) and must be configured through the Web User Interface. IPv6 addresses can only be configured in the OCP if the IPv6-only stack is enabled. In the case where the dual stack is enabled, the IPv6 address must be configured through the web interface (either using the IPv4 address or a known Chapter 2. User Interfaces 2-5
-
 1
1 -
2
-
3
-
4
-
5
-
6
-
7
-
8
-
9
-
10
-
11
-
12
-
13
-
14
-
15
-
16
-
17
-
18
-
19
-
20
-
21
-
22
-
23
-
24
-
25
-
26
-
27
-
28
-
29
-
30
-
31
-
32
-
33
-
34
-
35
-
 36
36 -
 37
37 -
 38
38 -
 39
39 -
 40
40 -
 41
41 -
 42
42 -
 43
43 -
 44
44 -
 45
45 -
 46
46 -
47
-
48
-
49
-
50
-
51
-
52
-
53
-
54
-
55
-
56
-
57
-
58
-
59
-
60
-
61
-
62
-
63
-
64
-
65
-
66
-
67
-
68
-
69
-
70
-
71
-
72
-
73
-
74
-
75
-
76
-
77
-
78
-
79
-
80
-
81
-
82
-
83
-
84
-
85
-
86
-
87
-
88
-
89
-
90
-
91
-
92
-
93
-
94
-
95
-
96
-
97
-
98
-
99
-
100
-
101
-
102
-
103
-
104
-
105
-
106
-
107
-
108
-
109
-
110
-
111
-
112
-
113
-
114
-
115
-
116
-
117
-
118
-
119
-
120
-
121
-
122
-
123
-
124
-
125
-
126
-
127
-
128
-
129
-
130
-
131
-
132
-
133
-
134
-
135
-
136
-
137
-
138
-
139
-
140
-
141
-
142
-
143
-
144
-
145
-
146
-
147
-
148
-
149
-
150
-
151
-
152
-
153
-
154
-
155
-
156
-
157
-
158
-
159
-
160
-
161
-
162
-
163
-
164
-
165
-
166
-
167
-
168
-
169
-
170
-
171
-
172
-
173
-
174
-
175
-
176
-
177
-
178
-
179
-
180
-
181
-
182
-
183
-
184
-
185
-
186
-
187
-
188
-
189
-
190
-
191
-
192
-
193
-
194
-
195
-
196
-
197
-
198
-
199
-
200
-
201
-
202
-
203
-
204
-
205
-
206
-
207
-
208
-
209
-
210
-
211
-
212
-
213
-
214
-
215
-
216
-
217
-
218
-
219
-
220
-
221
-
222
-
223
-
224
-
225
-
226
-
227
-
228
-
229
-
230
-
231
-
232
-
233
-
234
-
235
-
236
-
237
-
238
-
239
-
240
-
241
-
242
-
243
-
244
-
245
-
246
-
247
-
248
-
249
-
250
-
251
-
252
-
253
-
254
-
255
-
256
-
257
-
258
-
259
-
260
-
261
-
262
-
263
-
264
-
265
-
266
-
267
-
268
-
269
-
270
-
271
-
272
-
273
-
274
-
275
-
276
-
277
 |
 |