Dell TL2000 User Guide - Page 224
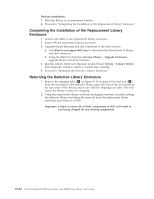
Completing the Installation of the Replacement Library Enclosure
 |
View all Dell TL2000 manuals
Add to My Manuals
Save this manual to your list of manuals |
Page 224 highlights
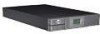
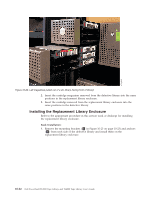
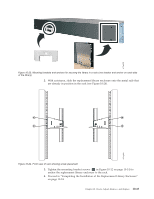
Desktop Installation: 1. Place the library in its permanent location. 2. Proceed to "Completing the Installation of the Replacement Library Enclosure." Completing the Installation of the Replacement Library Enclosure 1. Connect all cables to the replacement library enclosure. 2. Power ON the replacement library enclosure. 3. Upgrade library firmware and drive firmware to the latest version. a. Visit http://www.support.dell.com/ to download the latest levels of library and drive firmware. b. Using the Web User Interface (Service Library → Upgrade Firmware), upgrade library and drive firmware. 4. Run the Library Verify test (Operator Control Panel: Service → Library Verify). This diagnostic requires a blank or scratch data cartridge. 5. Proceed to "Returning the Defective Library Enclosure." Returning the Defective Library Enclosure 1. Remove the shipping label ( 2 in Figure 10-15 on page 10-16) and lock ( 1 ) from the rear panel of the defective library, place the lock in the slot located in the top center of the library, and secure with the shipping lock label. This will secure the library accessor for shipping. 2. Using the replacement library enclosure packaging materials, securely package the defective library (including the removed from the replacement library enclosure) and return it, to Dell. Important: Failure to return all of these components to Dell will result in you being charged for any missing components. 10-24 Dell PowerVault TL2000 Tape Library and TL4000 Tape Library User's Guide
-
 1
1 -
2
-
3
-
4
-
5
-
6
-
7
-
8
-
9
-
10
-
11
-
12
-
13
-
14
-
15
-
16
-
17
-
18
-
19
-
20
-
21
-
22
-
23
-
24
-
25
-
26
-
27
-
28
-
29
-
30
-
31
-
32
-
33
-
34
-
35
-
36
-
37
-
38
-
39
-
40
-
41
-
42
-
43
-
44
-
45
-
46
-
47
-
48
-
49
-
50
-
51
-
52
-
53
-
54
-
55
-
56
-
57
-
58
-
59
-
60
-
61
-
62
-
63
-
64
-
65
-
66
-
67
-
68
-
69
-
70
-
71
-
72
-
73
-
74
-
75
-
76
-
77
-
78
-
79
-
80
-
81
-
82
-
83
-
84
-
85
-
86
-
87
-
88
-
89
-
90
-
91
-
92
-
93
-
94
-
95
-
96
-
97
-
98
-
99
-
100
-
101
-
102
-
103
-
104
-
105
-
106
-
107
-
108
-
109
-
110
-
111
-
112
-
113
-
114
-
115
-
116
-
117
-
118
-
119
-
120
-
121
-
122
-
123
-
124
-
125
-
126
-
127
-
128
-
129
-
130
-
131
-
132
-
133
-
134
-
135
-
136
-
137
-
138
-
139
-
140
-
141
-
142
-
143
-
144
-
145
-
146
-
147
-
148
-
149
-
150
-
151
-
152
-
153
-
154
-
155
-
156
-
157
-
158
-
159
-
160
-
161
-
162
-
163
-
164
-
165
-
166
-
167
-
168
-
169
-
170
-
171
-
172
-
173
-
174
-
175
-
176
-
177
-
178
-
179
-
180
-
181
-
182
-
183
-
184
-
185
-
186
-
187
-
188
-
189
-
190
-
191
-
192
-
193
-
194
-
195
-
196
-
197
-
198
-
199
-
200
-
201
-
202
-
203
-
204
-
205
-
206
-
207
-
208
-
209
-
210
-
211
-
212
-
213
-
214
-
215
-
216
-
217
-
218
-
 219
219 -
 220
220 -
 221
221 -
 222
222 -
 223
223 -
 224
224 -
 225
225 -
 226
226 -
 227
227 -
 228
228 -
 229
229 -
230
-
231
-
232
-
233
-
234
-
235
-
236
-
237
-
238
-
239
-
240
-
241
-
242
-
243
-
244
-
245
-
246
-
247
-
248
-
249
-
250
-
251
-
252
-
253
-
254
-
255
-
256
-
257
-
258
-
259
-
260
-
261
-
262
-
263
-
264
-
265
-
266
-
267
-
268
-
269
-
270
-
271
-
272
-
273
-
274
-
275
-
276
-
277
 |
 |