Dell TL2000 User Guide - Page 138
Con Library Menu
 |
View all Dell TL2000 manuals
Add to My Manuals
Save this manual to your list of manuals |
Page 138 highlights
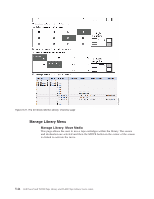
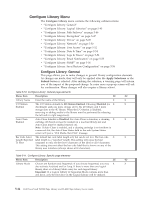
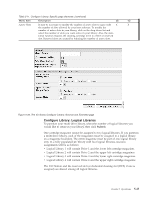
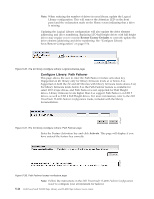
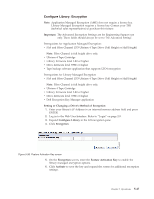
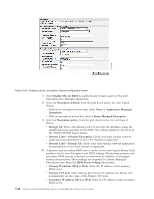
Configure Library Menu The Configure Library menu contains the following submenu items: v "Configure Library: General" v "Configure Library: Logical Libraries" on page 5-45 v "Configure Library: Path Failover" on page 5-46 v "Configure Library: Encryption" on page 5-47 v "Configure Library: Drives" on page 5-49 v "Configure Library: Network" on page 5-50 v "Configure Library: User Access" on page 5-52 v "Configure Library: Date & Time" on page 5-54 v "Configure Library: Logs & Traces" on page 5-54 v "Configure Library: Email Notification" on page 5-55 v "Configure Library: SNMP" on page 5-56 v "Configure Library: Save/Restore Configuration" on page 5-56 Configure Library: General This page allows you to make changes to general library configuration elements. As changes are made, they will only be applied after the Apply Selections or the Submit button is selected. After making the selection, a warning page will inform you of the impact of the proposed change. In some cases a pop-up screen will ask for confirmation. Many changes will also require a library reboot. Table 5-10. Configure Library: General page elements Menu Item Description 2U 4U Library Name Enter the name of the library. X X I/O Station The I/O Station defaults to I/O Station Enabled. Choosing Disabled (no X X Enabled checkmark) adds one more storage slot to the 2U library, and 3 more storage slots to the 4U library. When the I/O Station is disabled, removing or adding media to the library must be performed by releasing the left and/or right magazine(s). Auto Clean Auto Clean defaults to Disabled. For Auto Clean to function, a cleaning X X Enabled cartridge (CLNxxxLx) must be resident in a reserved library slot and Auto Clean must be enabled (turned on). Note: If Auto Clean is enabled, and a cleaning cartridge is not resident in a reserved slot, the Auto Clean Status field in the web System Status screen will post a "Chk Media/Rsvd Slot" message. Bar Code Label The default bar code label length is 8, but can be set to 6. The bar code X X Length Reported label length is a "reported" length. This setting will cause the host To Host computer to only see the first 6 characters of the label or all 8 characters. This setting does not affect the bar code label that is shown on any of the library user interfaces (always shows all 8 characters). Table 5-11. Configure Library: Specific page elements Menu Item Description 2U 4U Library Mode Choices are Random and Sequential. If you choose Sequential, you may X X also activate Autoload and/or Loop. If there is more than one logical library, there is a Library Mode entry for each logical library. Important: If a Logical Library in Sequential Mode contains more than one drive, only the first drive in the Logical Library will be utilized. 5-44 Dell PowerVault TL2000 Tape Library and TL4000 Tape Library User's Guide
-
 1
1 -
2
-
3
-
4
-
5
-
6
-
7
-
8
-
9
-
10
-
11
-
12
-
13
-
14
-
15
-
16
-
17
-
18
-
19
-
20
-
21
-
22
-
23
-
24
-
25
-
26
-
27
-
28
-
29
-
30
-
31
-
32
-
33
-
34
-
35
-
36
-
37
-
38
-
39
-
40
-
41
-
42
-
43
-
44
-
45
-
46
-
47
-
48
-
49
-
50
-
51
-
52
-
53
-
54
-
55
-
56
-
57
-
58
-
59
-
60
-
61
-
62
-
63
-
64
-
65
-
66
-
67
-
68
-
69
-
70
-
71
-
72
-
73
-
74
-
75
-
76
-
77
-
78
-
79
-
80
-
81
-
82
-
83
-
84
-
85
-
86
-
87
-
88
-
89
-
90
-
91
-
92
-
93
-
94
-
95
-
96
-
97
-
98
-
99
-
100
-
101
-
102
-
103
-
104
-
105
-
106
-
107
-
108
-
109
-
110
-
111
-
112
-
113
-
114
-
115
-
116
-
117
-
118
-
119
-
120
-
121
-
122
-
123
-
124
-
125
-
126
-
127
-
128
-
129
-
130
-
131
-
132
-
 133
133 -
 134
134 -
 135
135 -
 136
136 -
 137
137 -
 138
138 -
 139
139 -
 140
140 -
 141
141 -
 142
142 -
 143
143 -
144
-
145
-
146
-
147
-
148
-
149
-
150
-
151
-
152
-
153
-
154
-
155
-
156
-
157
-
158
-
159
-
160
-
161
-
162
-
163
-
164
-
165
-
166
-
167
-
168
-
169
-
170
-
171
-
172
-
173
-
174
-
175
-
176
-
177
-
178
-
179
-
180
-
181
-
182
-
183
-
184
-
185
-
186
-
187
-
188
-
189
-
190
-
191
-
192
-
193
-
194
-
195
-
196
-
197
-
198
-
199
-
200
-
201
-
202
-
203
-
204
-
205
-
206
-
207
-
208
-
209
-
210
-
211
-
212
-
213
-
214
-
215
-
216
-
217
-
218
-
219
-
220
-
221
-
222
-
223
-
224
-
225
-
226
-
227
-
228
-
229
-
230
-
231
-
232
-
233
-
234
-
235
-
236
-
237
-
238
-
239
-
240
-
241
-
242
-
243
-
244
-
245
-
246
-
247
-
248
-
249
-
250
-
251
-
252
-
253
-
254
-
255
-
256
-
257
-
258
-
259
-
260
-
261
-
262
-
263
-
264
-
265
-
266
-
267
-
268
-
269
-
270
-
271
-
272
-
273
-
274
-
275
-
276
-
277
 |
 |
