Dell TL2000 User Guide - Page 177
Procedures for Isolating CRU Problems, Isolating a Power Supply Problem - picker
 |
View all Dell TL2000 manuals
Add to My Manuals
Save this manual to your list of manuals |
Page 177 highlights
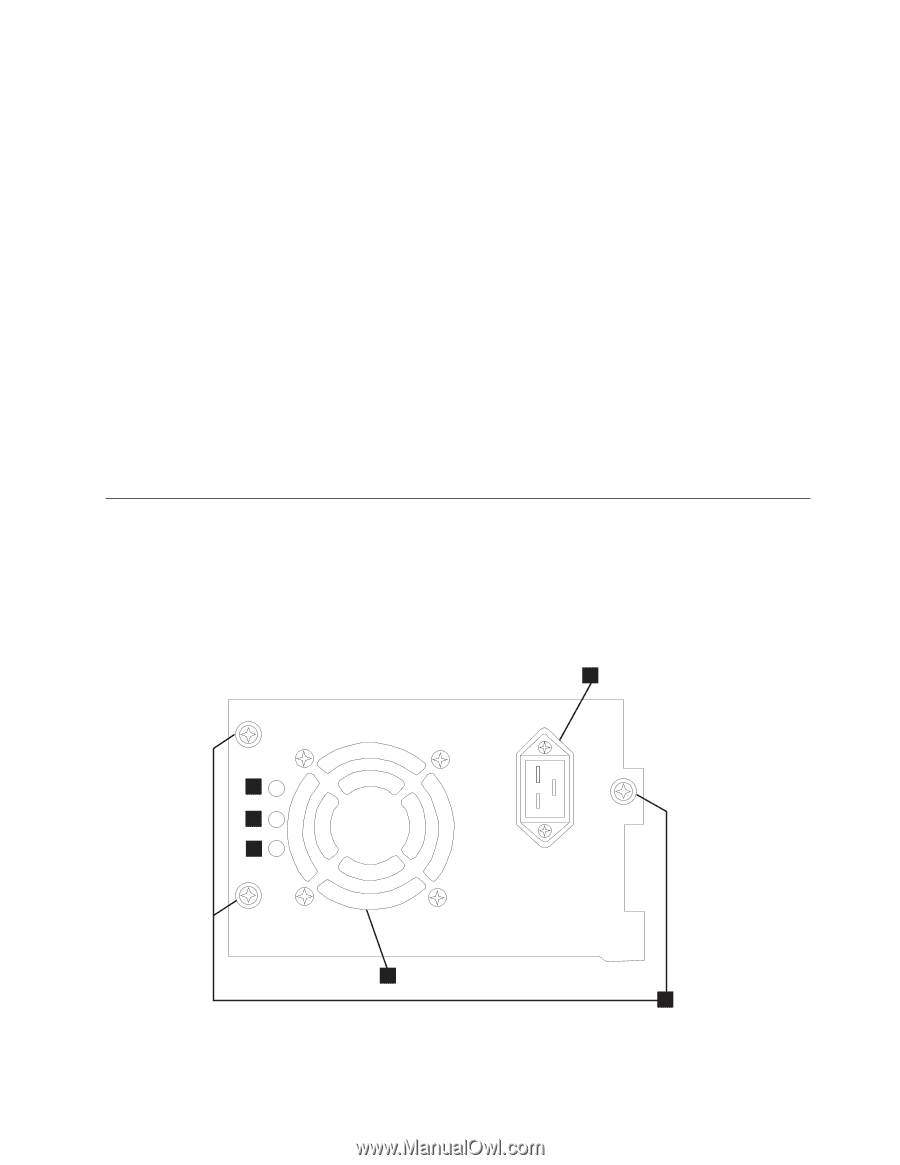
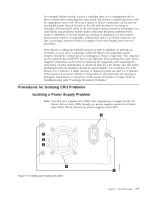
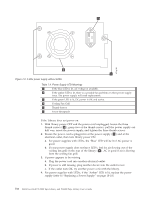
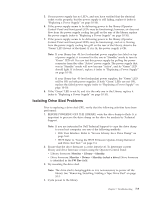
For example, failure to pick or place a cartridge from or to a designated cell or drive location after exhausting the retry count will result in a failed operation with the appropriate error code. However, failure to detect a particular cell location by sensing the prism fiducial located on the cell shelf because it is missing or damaged will eventually result in the cell location being located by the gripper, bar code reader and positional emitter pulse count after the prism detection retry count is exhausted. If several prisms are missing or damaged or if the accessor prism sensor/emitter is inoperable, initialization and/or inventory functions can take a prolonged amount of time to complete due to the lengthy retry recovery procedure. If the library is taking an extended amount of time to initialize, to perform an inventory or even move a cartridge within the library, the magazines prism integrity should be verified prior to exchanging a library component. This situation can be noted by the ACTIVITY line on the Operator Panel posting Recovery. Prism integrity verification can be done by releasing the magazines and inspecting the cell prisms. Normal initialization or inventory time for a 2U library once the picker mechanism starts its operation should be approximately 1 to 2 minutes. For a 4U library, 2 to 3 minutes. A single missing or damaged prism can add 1 to 2 minutes. If the accessor tray sensor/emitter is inoperable, or several prisms are missing or damaged, initialization or inventory could exceed 30 minutes or longer. Refer to Troubleshooting table "Cartridge Movement Problems". Procedures for Isolating CRU Problems Isolating a Power Supply Problem Note: Not all power supplies have LEDs. The original power supply for the 2U library did not have LEDs though any power supplies replaced will likely have LEDs. The 4U library has power supplies with LEDs. 6 1 2 3 a77ug136 4 Figure 7-1. A 250w power supply with LEDs 5 Chapter 7. Troubleshooting 7-7
-
 1
1 -
2
-
3
-
4
-
5
-
6
-
7
-
8
-
9
-
10
-
11
-
12
-
13
-
14
-
15
-
16
-
17
-
18
-
19
-
20
-
21
-
22
-
23
-
24
-
25
-
26
-
27
-
28
-
29
-
30
-
31
-
32
-
33
-
34
-
35
-
36
-
37
-
38
-
39
-
40
-
41
-
42
-
43
-
44
-
45
-
46
-
47
-
48
-
49
-
50
-
51
-
52
-
53
-
54
-
55
-
56
-
57
-
58
-
59
-
60
-
61
-
62
-
63
-
64
-
65
-
66
-
67
-
68
-
69
-
70
-
71
-
72
-
73
-
74
-
75
-
76
-
77
-
78
-
79
-
80
-
81
-
82
-
83
-
84
-
85
-
86
-
87
-
88
-
89
-
90
-
91
-
92
-
93
-
94
-
95
-
96
-
97
-
98
-
99
-
100
-
101
-
102
-
103
-
104
-
105
-
106
-
107
-
108
-
109
-
110
-
111
-
112
-
113
-
114
-
115
-
116
-
117
-
118
-
119
-
120
-
121
-
122
-
123
-
124
-
125
-
126
-
127
-
128
-
129
-
130
-
131
-
132
-
133
-
134
-
135
-
136
-
137
-
138
-
139
-
140
-
141
-
142
-
143
-
144
-
145
-
146
-
147
-
148
-
149
-
150
-
151
-
152
-
153
-
154
-
155
-
156
-
157
-
158
-
159
-
160
-
161
-
162
-
163
-
164
-
165
-
166
-
167
-
168
-
169
-
170
-
171
-
 172
172 -
 173
173 -
 174
174 -
 175
175 -
 176
176 -
 177
177 -
 178
178 -
 179
179 -
 180
180 -
 181
181 -
 182
182 -
183
-
184
-
185
-
186
-
187
-
188
-
189
-
190
-
191
-
192
-
193
-
194
-
195
-
196
-
197
-
198
-
199
-
200
-
201
-
202
-
203
-
204
-
205
-
206
-
207
-
208
-
209
-
210
-
211
-
212
-
213
-
214
-
215
-
216
-
217
-
218
-
219
-
220
-
221
-
222
-
223
-
224
-
225
-
226
-
227
-
228
-
229
-
230
-
231
-
232
-
233
-
234
-
235
-
236
-
237
-
238
-
239
-
240
-
241
-
242
-
243
-
244
-
245
-
246
-
247
-
248
-
249
-
250
-
251
-
252
-
253
-
254
-
255
-
256
-
257
-
258
-
259
-
260
-
261
-
262
-
263
-
264
-
265
-
266
-
267
-
268
-
269
-
270
-
271
-
272
-
273
-
274
-
275
-
276
-
277
 |
 |