Epson 1640XL User Manual - Page 20
Placing Your Original Document - transparency
 |
UPC - 010343833548
View all Epson 1640XL manuals
Add to My Manuals
Save this manual to your list of manuals |
Page 20 highlights
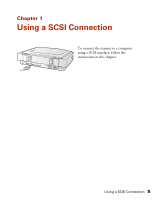
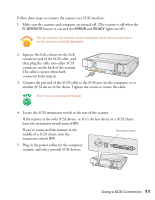
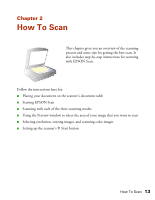
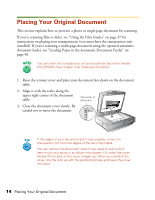
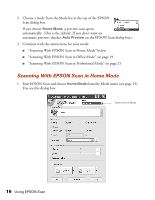
Placing Your Original Document This section explains how to position a photo or single-page document for scanning. If you're scanning film or slides, see "Using the Film Guides" on page 37 for instructions on placing your transparencies (you must have the transparency unit installed). If you're scanning a multi-page document using the optional automatic document feeder, see "Loading Paper in the Automatic Document Feeder" on page 48. You can order the transparency unit and automatic document feeder from EPSON. See Chapter 3 for ordering information. 1. Raise the scanner cover and place your document face down on the document table. 2. Align it with the scales along the upper right corner of the document table. Top corner of document 3. Close the document cover slowly. Be careful not to move the document. If the edges of your document don't scan properly, move it in one-quarter inch from the edges of the document table. You can remove the document cover if you need to scan a thick item-such as a photo in an album-that doesn't fit under the cover. Simply lift the back of the cover straight up. When you reattach the cover, line the rods up with the positioning holes and lower the cover into place. 14 Placing Your Original Document
-
 1
1 -
2
-
3
-
4
-
5
-
6
-
7
-
8
-
9
-
10
-
11
-
12
-
13
-
14
-
 15
15 -
 16
16 -
 17
17 -
 18
18 -
 19
19 -
 20
20 -
 21
21 -
 22
22 -
 23
23 -
 24
24 -
 25
25 -
26
-
27
-
28
-
29
-
30
-
31
-
32
-
33
-
34
-
35
-
36
-
37
-
38
-
39
-
40
-
41
-
42
-
43
-
44
-
45
-
46
-
47
-
48
-
49
-
50
-
51
-
52
-
53
-
54
-
55
-
56
-
57
-
58
-
59
-
60
-
61
-
62
-
63
-
64
-
65
-
66
-
67
-
68
-
69
-
70
-
71
-
72
-
73
-
74
-
75
-
76
-
77
-
78
-
79
-
80
-
81
-
82
-
83
-
84
-
85
-
86
-
87
-
88
-
89
-
90
-
91
-
92
-
93
-
94
-
95
-
96
 |
 |