Epson 1640XL User Manual - Page 28
Choose the Auto Exposure Type, Choose the Document Type - document feeder
 |
UPC - 010343833548
View all Epson 1640XL manuals
Add to My Manuals
Save this manual to your list of manuals |
Page 28 highlights
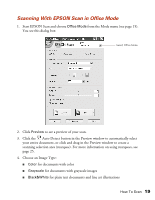
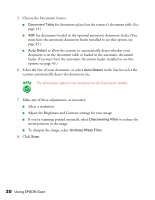
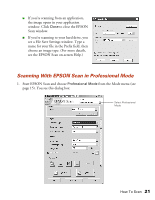
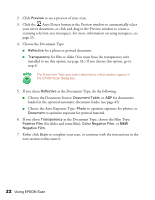
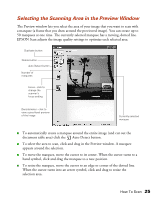
2. Click Preview to see a preview of your scan. 3. Click the Auto Detect button in the Preview window to automatically select your entire document, or click and drag in the Preview window to create a scanning selection area (marquee). For more information on using marquees, see page 25. 4. Choose the Document Type: ■ Reflective for a photo or printed document ■ Transparency for film or slides (You must have the transparency unit installed to see this option; see page 33.) If you choose this option, go to step 6. The Document Type you select determines which options appear in the EPSON Scan dialog box. 5. If you chose Reflective as the Document Type, do the following: ■ Choose the Document Source: Document Table, or ADF for documents loaded in the optional automatic document feeder (see page 45). ■ Choose the Auto Exposure Type: Photo to optimize exposure for photos, or Document to optimize exposure for printed material. 6. If you chose Transparency as the Document Type, choose the Film Type: Positive Film (for slides and some film), Color Negative Film, or B&W Negative Film. 7. Either click Scan to complete your scan, or continue with the instructions in the next section to fine-tune it. 22 Using EPSON Scan
-
 1
1 -
2
-
3
-
4
-
5
-
6
-
7
-
8
-
9
-
10
-
11
-
12
-
13
-
14
-
15
-
16
-
17
-
18
-
19
-
20
-
21
-
22
-
 23
23 -
 24
24 -
 25
25 -
 26
26 -
 27
27 -
 28
28 -
 29
29 -
 30
30 -
 31
31 -
 32
32 -
 33
33 -
34
-
35
-
36
-
37
-
38
-
39
-
40
-
41
-
42
-
43
-
44
-
45
-
46
-
47
-
48
-
49
-
50
-
51
-
52
-
53
-
54
-
55
-
56
-
57
-
58
-
59
-
60
-
61
-
62
-
63
-
64
-
65
-
66
-
67
-
68
-
69
-
70
-
71
-
72
-
73
-
74
-
75
-
76
-
77
-
78
-
79
-
80
-
81
-
82
-
83
-
84
-
85
-
86
-
87
-
88
-
89
-
90
-
91
-
92
-
93
-
94
-
95
-
96
 |
 |
