Epson 1640XL User Manual - Page 21
Using EPSON Scan, Starting Your Scan and Choosing a Mode - expression adobe
 |
UPC - 010343833548
View all Epson 1640XL manuals
Add to My Manuals
Save this manual to your list of manuals |
Page 21 highlights
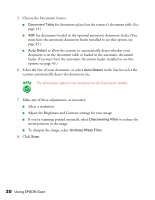
Using EPSON Scan EPSON Scan provides three scanning modes to give you progressive levels of control over your scanned image: ■ Home Mode: Makes scanning quick and easy. It includes a simple interface, automatic image adjustments, and preset configurations for various types of scans. ■ Office Mode: Includes a basic interface with practical scan settings designed for documents. Choose either this mode or Professional Mode to scan multi-page documents on the optional automatic document feeder (see page 45). You cannot use this mode to scan film or slides, and it is not recommended for photos. ■ Professional Mode: Lets you manually configure advanced image settings, including the histogram setting, tone, color depth, balance, saturation, brightness, and contrast. Starting Your Scan and Choosing a Mode You can use the import or acquire function of a TWAIN-compliant application such as Adobe Photoshop to scan images directly into your application. Or you can scan to your hard drive by starting EPSON Scan from the Windows Start menu, or the Macintosh Apple menu or Applications folder. You would then open the file in another application to print it or modify it for the screen or World Wide Web. Follow these steps to start EPSON Scan and choose a scanning mode: 1. Choose the Import (or Acquire) option in your application and choose EPSON Expression 1640XL, or open EPSON Scan as follows: ■ In Windows, click Start > Programs or All Programs > EPSON Scan > EPSON Scan. ■ In Mac® OS X, double-click the EPSON Scan icon in your Applications folder. ■ In Mac OS 8.6 to 9.x, click EPSON Scan in the Apple menu. If you have multiple scanners installed, you are prompted to choose your scanner. Click EPSON Expression 1640XL and click OK. How To Scan 15
-
 1
1 -
2
-
3
-
4
-
5
-
6
-
7
-
8
-
9
-
10
-
11
-
12
-
13
-
14
-
15
-
 16
16 -
 17
17 -
 18
18 -
 19
19 -
 20
20 -
 21
21 -
 22
22 -
 23
23 -
 24
24 -
 25
25 -
 26
26 -
27
-
28
-
29
-
30
-
31
-
32
-
33
-
34
-
35
-
36
-
37
-
38
-
39
-
40
-
41
-
42
-
43
-
44
-
45
-
46
-
47
-
48
-
49
-
50
-
51
-
52
-
53
-
54
-
55
-
56
-
57
-
58
-
59
-
60
-
61
-
62
-
63
-
64
-
65
-
66
-
67
-
68
-
69
-
70
-
71
-
72
-
73
-
74
-
75
-
76
-
77
-
78
-
79
-
80
-
81
-
82
-
83
-
84
-
85
-
86
-
87
-
88
-
89
-
90
-
91
-
92
-
93
-
94
-
95
-
96
 |
 |