Epson 1640XL User Manual - Page 75
The image doesn't scan, or you, the printed image looks garbled.
 |
UPC - 010343833548
View all Epson 1640XL manuals
Add to My Manuals
Save this manual to your list of manuals |
Page 75 highlights
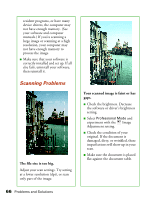
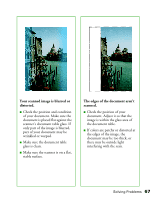
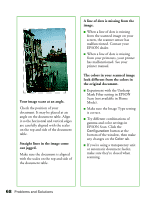
Moiré (cross-hatch) patterns appear in the image when you perform halftone scanning. ■ Make the image size slightly smaller. ■ In EPSON Scan, select the Descreening Filter checkbox in Home Mode or the Unsharp Mask Filter checkbox in Professional or Office Mode. ■ Use a transparent sheet between the document and the document table to defocus the image. ■ Reposition the document on the document table. Try positioning the document at a slight angle. The printed image is larger or smaller than the original. You can't judge the size of the printed image by what you see on your screen. The image size settings in your scanner software determine the size of the printed image. You can't print scanned images, or the printed image looks garbled. ■ Make sure your printer is securely connected to your computer and that you're using the correct cable. ■ Make sure the correct printer is selected in your printer software. The image doesn't scan, or you can only scan a few dots. ■ Make sure the document is face down on the document table. ■ If you're using an automatic document feeder, make sure the original document is inserted face up. You're using a transparency unit, and the colors of your negative film preview look strange. ■ Make sure you've selected the correct Document Type in EPSON Scan. ■ The scanner perceives the film guide's frame as white, which alters the exposure of the scanning area and makes the preview appear darker. To see the correct colors, do a zoom preview on an area toward the center of an image. ■ If you see light vertical lines on the scanned image, the TPU calibration area may contain dirt or dust. Clean the calibration area with a lint-free cloth. Solving Problems 69
-
 1
1 -
2
-
3
-
4
-
5
-
6
-
7
-
8
-
9
-
10
-
11
-
12
-
13
-
14
-
15
-
16
-
17
-
18
-
19
-
20
-
21
-
22
-
23
-
24
-
25
-
26
-
27
-
28
-
29
-
30
-
31
-
32
-
33
-
34
-
35
-
36
-
37
-
38
-
39
-
40
-
41
-
42
-
43
-
44
-
45
-
46
-
47
-
48
-
49
-
50
-
51
-
52
-
53
-
54
-
55
-
56
-
57
-
58
-
59
-
60
-
61
-
62
-
63
-
64
-
65
-
66
-
67
-
68
-
69
-
 70
70 -
 71
71 -
 72
72 -
 73
73 -
 74
74 -
 75
75 -
 76
76 -
 77
77 -
 78
78 -
 79
79 -
 80
80 -
81
-
82
-
83
-
84
-
85
-
86
-
87
-
88
-
89
-
90
-
91
-
92
-
93
-
94
-
95
-
96
 |
 |