Epson 3800 Service Manual - Page 123
Removing the SENSORS and SWITCHES
 |
UPC - 010343862081
View all Epson 3800 manuals
Add to My Manuals
Save this manual to your list of manuals |
Page 123 highlights
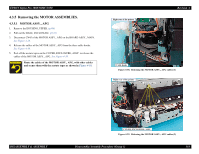
EPSON Stylus Pro 3800/3800C/3850 4.3.6 Removing the SENSORS and SWITCHES 4.3.6.1 LOCK, COVER, ASSY. 1. Perform step 1. to step 10. in "4.3.3.12 HOUSING, UPPER" (p106), and remove the HOUSING, UPPER from the main unit. 2. Release the two hooks that secure the LOCK, COVER, ASSY. with a precision screwdriver or similar tools to remove the LOCK, COVER, ASSY. Be sure to insert the two positioning holes of the LOCK, COVER, ASSY. over the guide pins of the HOUSING, UPPER. positioning points Left side of the printer Revision A HOUSING, UPPER hooks LOCK, COVER, ASSY LOCK, COVER, ASSY. Figure 4-45. Removing the LOCK, COVER, ASSY. DISASSEMBLY & ASSEMBLY Disassembly/Assembly Procedure (Group 1) 123
-
 1
1 -
2
-
3
-
4
-
5
-
6
-
7
-
8
-
9
-
10
-
11
-
12
-
13
-
14
-
15
-
16
-
17
-
18
-
19
-
20
-
21
-
22
-
23
-
24
-
25
-
26
-
27
-
28
-
29
-
30
-
31
-
32
-
33
-
34
-
35
-
36
-
37
-
38
-
39
-
40
-
41
-
42
-
43
-
44
-
45
-
46
-
47
-
48
-
49
-
50
-
51
-
52
-
53
-
54
-
55
-
56
-
57
-
58
-
59
-
60
-
61
-
62
-
63
-
64
-
65
-
66
-
67
-
68
-
69
-
70
-
71
-
72
-
73
-
74
-
75
-
76
-
77
-
78
-
79
-
80
-
81
-
82
-
83
-
84
-
85
-
86
-
87
-
88
-
89
-
90
-
91
-
92
-
93
-
94
-
95
-
96
-
97
-
98
-
99
-
100
-
101
-
102
-
103
-
104
-
105
-
106
-
107
-
108
-
109
-
110
-
111
-
112
-
113
-
114
-
115
-
116
-
117
-
 118
118 -
 119
119 -
 120
120 -
 121
121 -
 122
122 -
 123
123 -
 124
124 -
 125
125 -
 126
126 -
 127
127 -
 128
128 -
129
-
130
-
131
-
132
-
133
-
134
-
135
-
136
-
137
-
138
-
139
-
140
-
141
-
142
-
143
-
144
-
145
-
146
-
147
-
148
-
149
-
150
-
151
-
152
-
153
-
154
-
155
-
156
-
157
-
158
-
159
-
160
-
161
-
162
-
163
-
164
-
165
-
166
-
167
-
168
-
169
-
170
-
171
-
172
-
173
-
174
-
175
-
176
-
177
-
178
-
179
-
180
-
181
-
182
-
183
-
184
-
185
-
186
-
187
-
188
-
189
-
190
-
191
-
192
-
193
-
194
-
195
-
196
-
197
-
198
-
199
-
200
-
201
-
202
-
203
-
204
-
205
-
206
-
207
-
208
-
209
-
210
-
211
-
212
-
213
-
214
-
215
-
216
-
217
-
218
-
219
-
220
-
221
-
222
-
223
-
224
-
225
-
226
-
227
-
228
-
229
-
230
-
231
-
232
-
233
-
234
-
235
-
236
-
237
-
238
-
239
-
240
-
241
-
242
-
243
-
244
-
245
-
246
-
247
-
248
-
249
-
250
-
251
-
252
-
253
-
254
-
255
-
256
-
257
-
258
-
259
-
260
-
261
-
262
-
263
-
264
-
265
-
266
-
267
-
268
-
269
-
270
-
271
-
272
-
273
-
274
-
275
-
276
-
277
-
278
-
279
-
280
-
281
-
282
-
283
-
284
-
285
-
286
 |
 |

EPSON Stylus Pro 3800/3800C/3850
Revision A
DISASSEMBLY & ASSEMBLY
Disassembly/Assembly Procedure (Group 1)
123
4.3.6
Removing the SENSORS and SWITCHES
4.3.6.1
LOCK, COVER, ASSY.
1.
Perform step 1. to step 10. in
“4.3.3.12 HOUSING, UPPER” (p106)
, and remove
the HOUSING, UPPER from the main unit.
2.
Release the two hooks that secure the LOCK, COVER, ASSY. with a precision
screwdriver or similar tools to remove the LOCK, COVER, ASSY.
Figure 4-45.
Removing the LOCK, COVER, ASSY.
Be sure to insert the two positioning holes of the LOCK, COVER,
ASSY. over the guide pins of the HOUSING, UPPER.
LOCK, COVER, ASSY
positioning points
Left side of the printer
LOCK, COVER, ASSY.
HOUSING, UPPER
hooks