Epson 3800 Service Manual - Page 187
Shaft, Release, Assy.
 |
UPC - 010343862081
View all Epson 3800 manuals
Add to My Manuals
Save this manual to your list of manuals |
Page 187 highlights
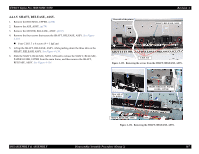
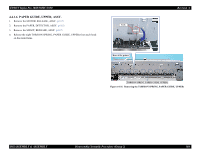
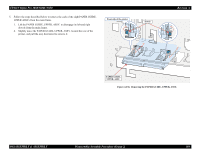
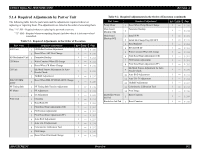
EPSON Stylus Pro 3800/3800C/3850 4.4.1.5 SHAFT, RELEASE, ASSY. 1. Remove the HOUSING, UPPER. (p106) 2. Remove the ASF, ASSY. (p179) 3. Remove the MOTOR, RELEASE, ASSY. (p167) 4. Remove the four screws that secure the SHAFT, RELEASE, ASSY. See Figure 4-133. „ Four C.B.S. 3 x 6 screws (9 ± 1 kgf.cm) 5. Lift up the SHAFT, RELEASE, ASSY. while pushing down the three tabs on the SHAFT, RELEASE ASSY. See Figure 4-134. 6. Slide the SHAFT, RELEASE, ASSY. leftward to release the SHAFT, RELEASE, PAPER GUIDE, UPPER from the main frame, and then remove the SHAFT, RELEASE, ASSY. See Figure 4-134. Rear side of the printer Revision A SHAFT, RELEASE, ASSY. C.B.S. 3x6 Figure 4-133. Removing the screws from the SHAFT, RELEASE, ASSY. DISASSEMBLY & ASSEMBLY Rear side of the printer SHAFT, RELEASE, PAPER GUIDE, UPPER SHAFT, RELEASE, ASSY. tabs Figure 4-134. Removing the SHAFT, RELEASE, ASSY. Disassembly/Assembly Procedure (Group 2) 187
-
 1
1 -
2
-
3
-
4
-
5
-
6
-
7
-
8
-
9
-
10
-
11
-
12
-
13
-
14
-
15
-
16
-
17
-
18
-
19
-
20
-
21
-
22
-
23
-
24
-
25
-
26
-
27
-
28
-
29
-
30
-
31
-
32
-
33
-
34
-
35
-
36
-
37
-
38
-
39
-
40
-
41
-
42
-
43
-
44
-
45
-
46
-
47
-
48
-
49
-
50
-
51
-
52
-
53
-
54
-
55
-
56
-
57
-
58
-
59
-
60
-
61
-
62
-
63
-
64
-
65
-
66
-
67
-
68
-
69
-
70
-
71
-
72
-
73
-
74
-
75
-
76
-
77
-
78
-
79
-
80
-
81
-
82
-
83
-
84
-
85
-
86
-
87
-
88
-
89
-
90
-
91
-
92
-
93
-
94
-
95
-
96
-
97
-
98
-
99
-
100
-
101
-
102
-
103
-
104
-
105
-
106
-
107
-
108
-
109
-
110
-
111
-
112
-
113
-
114
-
115
-
116
-
117
-
118
-
119
-
120
-
121
-
122
-
123
-
124
-
125
-
126
-
127
-
128
-
129
-
130
-
131
-
132
-
133
-
134
-
135
-
136
-
137
-
138
-
139
-
140
-
141
-
142
-
143
-
144
-
145
-
146
-
147
-
148
-
149
-
150
-
151
-
152
-
153
-
154
-
155
-
156
-
157
-
158
-
159
-
160
-
161
-
162
-
163
-
164
-
165
-
166
-
167
-
168
-
169
-
170
-
171
-
172
-
173
-
174
-
175
-
176
-
177
-
178
-
179
-
180
-
181
-
 182
182 -
 183
183 -
 184
184 -
 185
185 -
 186
186 -
 187
187 -
 188
188 -
 189
189 -
 190
190 -
 191
191 -
 192
192 -
193
-
194
-
195
-
196
-
197
-
198
-
199
-
200
-
201
-
202
-
203
-
204
-
205
-
206
-
207
-
208
-
209
-
210
-
211
-
212
-
213
-
214
-
215
-
216
-
217
-
218
-
219
-
220
-
221
-
222
-
223
-
224
-
225
-
226
-
227
-
228
-
229
-
230
-
231
-
232
-
233
-
234
-
235
-
236
-
237
-
238
-
239
-
240
-
241
-
242
-
243
-
244
-
245
-
246
-
247
-
248
-
249
-
250
-
251
-
252
-
253
-
254
-
255
-
256
-
257
-
258
-
259
-
260
-
261
-
262
-
263
-
264
-
265
-
266
-
267
-
268
-
269
-
270
-
271
-
272
-
273
-
274
-
275
-
276
-
277
-
278
-
279
-
280
-
281
-
282
-
283
-
284
-
285
-
286
 |
 |
