Epson 3800 Service Manual - Page 62
Preliminary Check, Troubleshooting Procedure - stylus pro troubleshooting
 |
UPC - 010343862081
View all Epson 3800 manuals
Add to My Manuals
Save this manual to your list of manuals |
Page 62 highlights
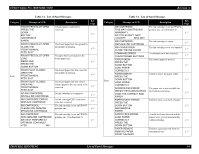
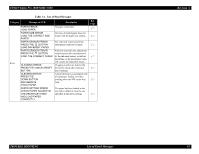
EPSON Stylus Pro 3800/3800C/3850 3.1 Overview This section explains the basic procedure for troubleshooting problems on the printer quickly and efficiently. 3.1.1 Preliminary Check Make sure to verify or perform the following basic items whenever servicing the printer. 1. There is no foreign material which interferes with the proper operation of the printer. 2. Print the status sheet, and check the information printed on the sheet to find out possible causes of the error; if the main units have reached their end of life, or if there is something wrong with the user-defined panel settings. 3. Both outside and inside of the printer are free of significant dirt. Clean it if significant dirt is observed. 4. None of the parts or components of the printer are missing, chipped or damaged. 5. All of the harnesses are free of damages and properly connected to their connectors. 6. The cams and gears in the printer mechanism are engaged correctly showing no signs of wear. 7. When smudges appear on printed pages, clean the rubber rollers in the printer mechanism if it solves the problem. 8. The rubber rollers in the printer mechanism are engaged correctly showing no signs of wear. 9. Initialize the NVRAM on the C635 main board (reset the user-defined panel settings to their factory default) if necessary. Execute the DEFAULT PANEL in the Maintenance mode. Revision A W A R N IN G When handling the lithium battery used for backup of the RTC on the main board, strictly follow the safety instructions given in "4.1.1 Precautions" (p86). C A U T IO N „ Before disassembling/reassembling the printer, be sure to turn the power OFF, confirm the panel display disappears, and unplug the power code. „ Be sure to use the specified tools for maintenance/repair. „ To maintain the product's quality, be sure to use the specified lubricant and adhesive. „ Be sure to perform the adjustments as required. 3.1.2 Troubleshooting Procedure Follow the flowchart given below to troubleshoot problems efficiently. Occurrence of Troubles Error message is displayed on the LCD (Page 63) Print Quality Troubles (Page 82) Warning message is displayed (Page 68) Error message is displayed (Page 66) Service Call message is displayed (Page 74) TROUBLE SHOOTING Overview 62
-
 1
1 -
2
-
3
-
4
-
5
-
6
-
7
-
8
-
9
-
10
-
11
-
12
-
13
-
14
-
15
-
16
-
17
-
18
-
19
-
20
-
21
-
22
-
23
-
24
-
25
-
26
-
27
-
28
-
29
-
30
-
31
-
32
-
33
-
34
-
35
-
36
-
37
-
38
-
39
-
40
-
41
-
42
-
43
-
44
-
45
-
46
-
47
-
48
-
49
-
50
-
51
-
52
-
53
-
54
-
55
-
56
-
 57
57 -
 58
58 -
 59
59 -
 60
60 -
 61
61 -
 62
62 -
 63
63 -
 64
64 -
 65
65 -
 66
66 -
 67
67 -
68
-
69
-
70
-
71
-
72
-
73
-
74
-
75
-
76
-
77
-
78
-
79
-
80
-
81
-
82
-
83
-
84
-
85
-
86
-
87
-
88
-
89
-
90
-
91
-
92
-
93
-
94
-
95
-
96
-
97
-
98
-
99
-
100
-
101
-
102
-
103
-
104
-
105
-
106
-
107
-
108
-
109
-
110
-
111
-
112
-
113
-
114
-
115
-
116
-
117
-
118
-
119
-
120
-
121
-
122
-
123
-
124
-
125
-
126
-
127
-
128
-
129
-
130
-
131
-
132
-
133
-
134
-
135
-
136
-
137
-
138
-
139
-
140
-
141
-
142
-
143
-
144
-
145
-
146
-
147
-
148
-
149
-
150
-
151
-
152
-
153
-
154
-
155
-
156
-
157
-
158
-
159
-
160
-
161
-
162
-
163
-
164
-
165
-
166
-
167
-
168
-
169
-
170
-
171
-
172
-
173
-
174
-
175
-
176
-
177
-
178
-
179
-
180
-
181
-
182
-
183
-
184
-
185
-
186
-
187
-
188
-
189
-
190
-
191
-
192
-
193
-
194
-
195
-
196
-
197
-
198
-
199
-
200
-
201
-
202
-
203
-
204
-
205
-
206
-
207
-
208
-
209
-
210
-
211
-
212
-
213
-
214
-
215
-
216
-
217
-
218
-
219
-
220
-
221
-
222
-
223
-
224
-
225
-
226
-
227
-
228
-
229
-
230
-
231
-
232
-
233
-
234
-
235
-
236
-
237
-
238
-
239
-
240
-
241
-
242
-
243
-
244
-
245
-
246
-
247
-
248
-
249
-
250
-
251
-
252
-
253
-
254
-
255
-
256
-
257
-
258
-
259
-
260
-
261
-
262
-
263
-
264
-
265
-
266
-
267
-
268
-
269
-
270
-
271
-
272
-
273
-
274
-
275
-
276
-
277
-
278
-
279
-
280
-
281
-
282
-
283
-
284
-
285
-
286
 |
 |
