Epson 4900 Users Guide - Page 153
Media Type, STANDARD, NARROW, High Speed, WIDER, return the setting to standard
 |
View all Epson 4900 manuals
Add to My Manuals
Save this manual to your list of manuals |
Page 153 highlights
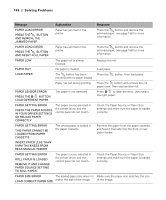
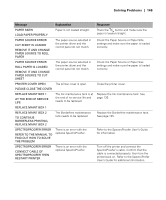
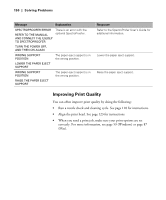
Solving Problems | 153 Problem Your print has gaps or appears faint. Your print appears blurry or smeared. Solution ◗ Check the expiration date printed on each of the ink cartridges. If the cartridge is too old, replace it as described on page 124. ◗ Make sure the Media Type setting in the printer software is correct. ◗ Run a nozzle check and cleaning cycle (see page 118). ◗ Check the ink indicators and light and replace ink cartridges if your ink supply is low, as described on page 124. (If you replace ink cartridges with the printer turned off, the ink indicators will not be accurate.) ◗ The paper thickness setting is not correct for your paper. Use your printer software (page 95 for OS X or page 75 for Windows) to choose the correct setting. When you're done printing with a custom paper configuration, be sure to return the setting to standard (STD). ◗ The PLATEN GAP setting is too wide. Use the menu system to change the setting to STANDARD, or to NARROW if printing on very thin paper. See page 55 for instructions. ◗ Make sure the Media Type setting in the printer software is correct. ◗ If you're printing on non-Epson media, you may need to adjust the paper thickness setting, drying time, or color density. Use your printer software (page 95 for OS X or page 75 for Windows) to choose the correct setting. When you're done printing with a custom paper configuration, be sure to return the setting to standard (STD). ◗ Your paper doesn't meet the required specifications or wasn't stored in a dry, humidity-free environment. Load new paper. ◗ If you're using cut sheet media, make sure the printable side is face-up. ◗ Ink has leaked into the paper path. Wipe the paper path area of the printer with a soft, clean cloth. See page 139 for cleaning instructions. ◗ Turn off the High Speed setting. See page 84 for instructions. ◗ The PLATEN GAP setting is too narrow. Use the control panel to change the setting to WIDE or WIDER. See page 55 for instructions. ◗ Run a nozzle check and cleaning cycle (see page 118). ◗ You may need to uninstall and reinstall the printer driver (see page 161). ◗ If ink is smeared on the back of your print, make sure PAPER SIZE CHECK is ON in the control panel menu. This prevents printing beyond the edge of the paper and soiling the inside of the printer. 153
-
 1
1 -
2
-
3
-
4
-
5
-
6
-
7
-
8
-
9
-
10
-
11
-
12
-
13
-
14
-
15
-
16
-
17
-
18
-
19
-
20
-
21
-
22
-
23
-
24
-
25
-
26
-
27
-
28
-
29
-
30
-
31
-
32
-
33
-
34
-
35
-
36
-
37
-
38
-
39
-
40
-
41
-
42
-
43
-
44
-
45
-
46
-
47
-
48
-
49
-
50
-
51
-
52
-
53
-
54
-
55
-
56
-
57
-
58
-
59
-
60
-
61
-
62
-
63
-
64
-
65
-
66
-
67
-
68
-
69
-
70
-
71
-
72
-
73
-
74
-
75
-
76
-
77
-
78
-
79
-
80
-
81
-
82
-
83
-
84
-
85
-
86
-
87
-
88
-
89
-
90
-
91
-
92
-
93
-
94
-
95
-
96
-
97
-
98
-
99
-
100
-
101
-
102
-
103
-
104
-
105
-
106
-
107
-
108
-
109
-
110
-
111
-
112
-
113
-
114
-
115
-
116
-
117
-
118
-
119
-
120
-
121
-
122
-
123
-
124
-
125
-
126
-
127
-
128
-
129
-
130
-
131
-
132
-
133
-
134
-
135
-
136
-
137
-
138
-
139
-
140
-
141
-
142
-
143
-
144
-
145
-
146
-
147
-
 148
148 -
 149
149 -
 150
150 -
 151
151 -
 152
152 -
 153
153 -
 154
154 -
 155
155 -
 156
156 -
 157
157 -
 158
158 -
159
-
160
-
161
-
162
-
163
-
164
-
165
-
166
-
167
-
168
-
169
-
170
-
171
-
172
-
173
-
174
 |
 |
