Epson 4900 Users Guide - Page 50
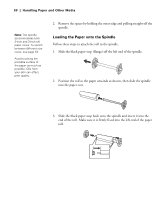
Loading the Paper onto the Spindle
 |
View all Epson 4900 manuals
Add to My Manuals
Save this manual to your list of manuals |
Page 50 highlights
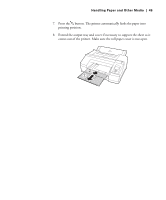
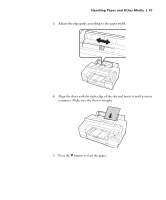
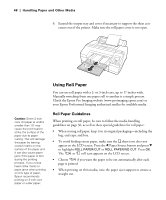
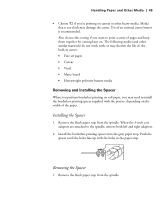
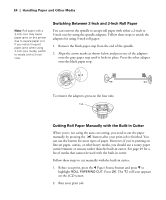
50 | Handling Paper and Other Media Note: The spindle accommodates both 2-inch and 3-inch roll paper cores. To switch between different size cores, see page 54. Avoid touching the printable surface of the paper as much as possible. Oils from your skin can affect print quality. 2. Remove the spacer by holding the outer edge and pulling straight off the spindle. Loading the Paper onto the Spindle Follow these steps to attach the roll to the spindle: 1. Slide the black paper stop (flange) off the left end of the spindle. 2. Position the roll so the paper unwinds as shown, then slide the spindle into the paper core. 3. Slide the black paper stop back onto the spindle and insert it into the end of the roll. Make sure it is firmly fixed into the left end of the paper roll. 50
-
 1
1 -
2
-
3
-
4
-
5
-
6
-
7
-
8
-
9
-
10
-
11
-
12
-
13
-
14
-
15
-
16
-
17
-
18
-
19
-
20
-
21
-
22
-
23
-
24
-
25
-
26
-
27
-
28
-
29
-
30
-
31
-
32
-
33
-
34
-
35
-
36
-
37
-
38
-
39
-
40
-
41
-
42
-
43
-
44
-
 45
45 -
 46
46 -
 47
47 -
 48
48 -
 49
49 -
 50
50 -
 51
51 -
 52
52 -
 53
53 -
 54
54 -
 55
55 -
56
-
57
-
58
-
59
-
60
-
61
-
62
-
63
-
64
-
65
-
66
-
67
-
68
-
69
-
70
-
71
-
72
-
73
-
74
-
75
-
76
-
77
-
78
-
79
-
80
-
81
-
82
-
83
-
84
-
85
-
86
-
87
-
88
-
89
-
90
-
91
-
92
-
93
-
94
-
95
-
96
-
97
-
98
-
99
-
100
-
101
-
102
-
103
-
104
-
105
-
106
-
107
-
108
-
109
-
110
-
111
-
112
-
113
-
114
-
115
-
116
-
117
-
118
-
119
-
120
-
121
-
122
-
123
-
124
-
125
-
126
-
127
-
128
-
129
-
130
-
131
-
132
-
133
-
134
-
135
-
136
-
137
-
138
-
139
-
140
-
141
-
142
-
143
-
144
-
145
-
146
-
147
-
148
-
149
-
150
-
151
-
152
-
153
-
154
-
155
-
156
-
157
-
158
-
159
-
160
-
161
-
162
-
163
-
164
-
165
-
166
-
167
-
168
-
169
-
170
-
171
-
172
-
173
-
174
 |
 |
