Epson 4900 Users Guide - Page 30
Insert the Epson Epson Stylus Pro 4900 software CD in your CD or
 |
View all Epson 4900 manuals
Add to My Manuals
Save this manual to your list of manuals |
Page 30 highlights
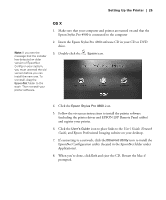
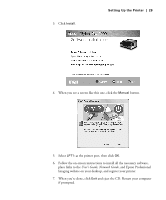
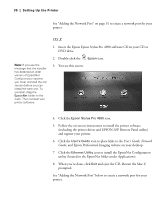
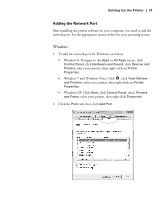
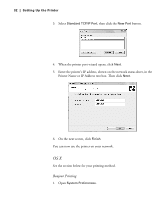
30 | Setting Up the Printer See "Adding the Network Port" on page 31 to create a network port for your printer. Note: If you see the message that the installer has detected an older version of EpsonNet Config on your system, you must uninstall the old version before you can install the new one. To uninstall, drag the EpsonNet folder to the trash. Then reinstall your printer software. OS X 1. Insert the Epson Epson Stylus Pro 4900 software CD in your CD or DVD drive. 2. Double-click the Epson icon. 3. You see this screen: 4. Click the Epson Stylus Pro 4900 icon. 5. Follow the on-screen instructions to install the printer software (including the printer driver and EPSON LFP Remote Panel utility) and register your printer. 6. Click the User's Guide icon to place links to the User's Guide, Network Guide, and Epson Professional Imaging website on your desktop. 7. Click the Ethernet Utility icon to install the EpsonNet Configuration utility (located in the EpsonNet folder under Applications). 8. When you're done, click Exit and eject the CD. Restart the Mac if prompted. See "Adding the Network Port" below to create a network port for your printer. 30
-
 1
1 -
2
-
3
-
4
-
5
-
6
-
7
-
8
-
9
-
10
-
11
-
12
-
13
-
14
-
15
-
16
-
17
-
18
-
19
-
20
-
21
-
22
-
23
-
24
-
 25
25 -
 26
26 -
 27
27 -
 28
28 -
 29
29 -
 30
30 -
 31
31 -
 32
32 -
 33
33 -
 34
34 -
 35
35 -
36
-
37
-
38
-
39
-
40
-
41
-
42
-
43
-
44
-
45
-
46
-
47
-
48
-
49
-
50
-
51
-
52
-
53
-
54
-
55
-
56
-
57
-
58
-
59
-
60
-
61
-
62
-
63
-
64
-
65
-
66
-
67
-
68
-
69
-
70
-
71
-
72
-
73
-
74
-
75
-
76
-
77
-
78
-
79
-
80
-
81
-
82
-
83
-
84
-
85
-
86
-
87
-
88
-
89
-
90
-
91
-
92
-
93
-
94
-
95
-
96
-
97
-
98
-
99
-
100
-
101
-
102
-
103
-
104
-
105
-
106
-
107
-
108
-
109
-
110
-
111
-
112
-
113
-
114
-
115
-
116
-
117
-
118
-
119
-
120
-
121
-
122
-
123
-
124
-
125
-
126
-
127
-
128
-
129
-
130
-
131
-
132
-
133
-
134
-
135
-
136
-
137
-
138
-
139
-
140
-
141
-
142
-
143
-
144
-
145
-
146
-
147
-
148
-
149
-
150
-
151
-
152
-
153
-
154
-
155
-
156
-
157
-
158
-
159
-
160
-
161
-
162
-
163
-
164
-
165
-
166
-
167
-
168
-
169
-
170
-
171
-
172
-
173
-
174
 |
 |
