Epson LX-300II Reference Guide - Page 102
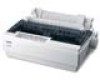
Optional Tractor, Remove the paper tension unit by squeezing its lock tabs
 |
View all Epson LX-300II manuals
Add to My Manuals
Save this manual to your list of manuals |
Page 102 highlights
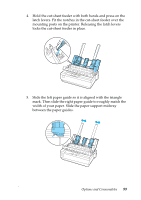
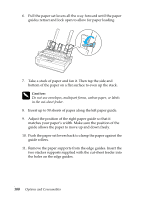
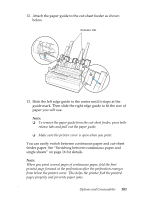
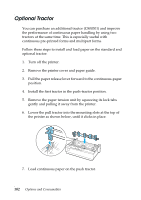
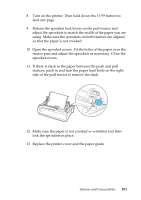
Optional Tractor You can purchase an additional tractor (C800301) and improve the performance of continuous paper handling by using two tractors at the same time. This is especially useful with continuous pre-printed forms and multipart forms. Follow these steps to install and load paper on the standard and optional tractor: 1. Turn off the printer. 2. Remove the printer cover and paper guide. 3. Pull the paper release lever forward to the continuous-paper position. 4. Install the first tractor in the push-tractor position. 5. Remove the paper tension unit by squeezing its lock tabs gently and pulling it away from the printer. 6. Lower the pull tractor into the mounting slots at the top of the printer as shown below, until it clicks in place. 7. Load continuous paper on the push tractor. 102 Options and Consumables
-
 1
1 -
2
-
3
-
4
-
5
-
6
-
7
-
8
-
9
-
10
-
11
-
12
-
13
-
14
-
15
-
16
-
17
-
18
-
19
-
20
-
21
-
22
-
23
-
24
-
25
-
26
-
27
-
28
-
29
-
30
-
31
-
32
-
33
-
34
-
35
-
36
-
37
-
38
-
39
-
40
-
41
-
42
-
43
-
44
-
45
-
46
-
47
-
48
-
49
-
50
-
51
-
52
-
53
-
54
-
55
-
56
-
57
-
58
-
59
-
60
-
61
-
62
-
63
-
64
-
65
-
66
-
67
-
68
-
69
-
70
-
71
-
72
-
73
-
74
-
75
-
76
-
77
-
78
-
79
-
80
-
81
-
82
-
83
-
84
-
85
-
86
-
87
-
88
-
89
-
90
-
91
-
92
-
93
-
94
-
95
-
96
-
 97
97 -
 98
98 -
 99
99 -
 100
100 -
 101
101 -
 102
102 -
 103
103 -
 104
104 -
 105
105 -
 106
106 -
 107
107 -
108
-
109
-
110
-
111
-
112
-
113
-
114
-
115
-
116
-
117
-
118
-
119
-
120
-
121
-
122
-
123
-
124
-
125
-
126
-
127
-
128
-
129
 |
 |