Epson LX-300II Reference Guide - Page 19
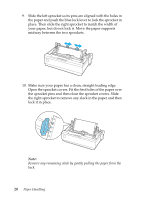
pull it up. Position the paper using the scale on the printer
 |
View all Epson LX-300II manuals
Add to My Manuals
Save this manual to your list of manuals |
Page 19 highlights
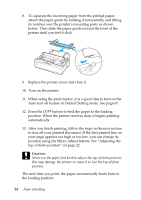
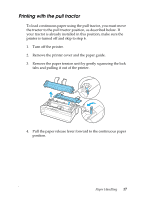
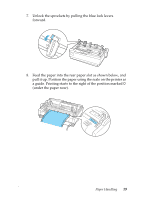
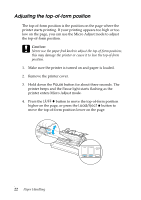
7. Unlock the sprockets by pulling the blue lock levers forward. 8. Feed the paper into the rear paper slot as shown below, and pull it up. Position the paper using the scale on the printer as a guide. Printing starts to the right of the position marked 0 (under the paper now). Paper Handling 19
-
 1
1 -
2
-
3
-
4
-
5
-
6
-
7
-
8
-
9
-
10
-
11
-
12
-
13
-
 14
14 -
 15
15 -
 16
16 -
 17
17 -
 18
18 -
 19
19 -
 20
20 -
 21
21 -
 22
22 -
 23
23 -
 24
24 -
25
-
26
-
27
-
28
-
29
-
30
-
31
-
32
-
33
-
34
-
35
-
36
-
37
-
38
-
39
-
40
-
41
-
42
-
43
-
44
-
45
-
46
-
47
-
48
-
49
-
50
-
51
-
52
-
53
-
54
-
55
-
56
-
57
-
58
-
59
-
60
-
61
-
62
-
63
-
64
-
65
-
66
-
67
-
68
-
69
-
70
-
71
-
72
-
73
-
74
-
75
-
76
-
77
-
78
-
79
-
80
-
81
-
82
-
83
-
84
-
85
-
86
-
87
-
88
-
89
-
90
-
91
-
92
-
93
-
94
-
95
-
96
-
97
-
98
-
99
-
100
-
101
-
102
-
103
-
104
-
105
-
106
-
107
-
108
-
109
-
110
-
111
-
112
-
113
-
114
-
115
-
116
-
117
-
118
-
119
-
120
-
121
-
122
-
123
-
124
-
125
-
126
-
127
-
128
-
129
 |
 |

Paper Handling
19
7.
Unlock the sprockets by pulling the blue lock levers
forward.
8.
Feed the paper into the rear paper slot as shown below, and
pull it up. Position the paper using the scale on the printer as
a guide. Printing starts to the right of the position marked
0
(under the paper now).