Epson LX-300II Reference Guide - Page 50
Start, Settings, Printers, Add Printer, Network printer, Browse. - driver installer
 |
View all Epson LX-300II manuals
Add to My Manuals
Save this manual to your list of manuals |
Page 50 highlights
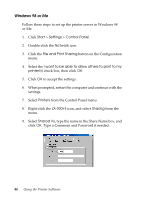
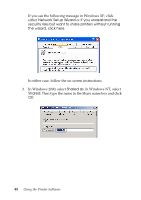
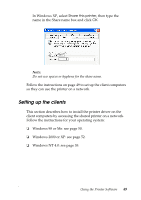
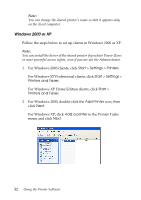
Note: ❏ This section describes how to access the shared printer on a standard network system using the server (Microsoft workgroup). If you cannot access the shared printer due to the network system, ask your network administrator for assistance. ❏ This section describes how to install the printer driver by accessing the shared printer from the Printers folder. You can also access the shared printer from Network Neighborhood or My Network on the Windows desktop. ❏ If you want to be able to use Status Monitor 3 on the clients, you need to install both the printer driver and Status Monitor 3 on each client from the CD-ROM. Windows 98 or Me Follow these steps to set up Windows 98 or Me clients: 1. Click Start > Settings > Printers. 2. Double-click the Add Printer icon, then click Next. 3. Select Network printer, then click Next. 4. Click Browse. Note: You can also type "\\(the name of the computer that is locally connected to the shared printer)\(the shared printer's name)" in the Network path or queue name. 50 Using the Printer Software
-
 1
1 -
2
-
3
-
4
-
5
-
6
-
7
-
8
-
9
-
10
-
11
-
12
-
13
-
14
-
15
-
16
-
17
-
18
-
19
-
20
-
21
-
22
-
23
-
24
-
25
-
26
-
27
-
28
-
29
-
30
-
31
-
32
-
33
-
34
-
35
-
36
-
37
-
38
-
39
-
40
-
41
-
42
-
43
-
44
-
 45
45 -
 46
46 -
 47
47 -
 48
48 -
 49
49 -
 50
50 -
 51
51 -
 52
52 -
 53
53 -
 54
54 -
 55
55 -
56
-
57
-
58
-
59
-
60
-
61
-
62
-
63
-
64
-
65
-
66
-
67
-
68
-
69
-
70
-
71
-
72
-
73
-
74
-
75
-
76
-
77
-
78
-
79
-
80
-
81
-
82
-
83
-
84
-
85
-
86
-
87
-
88
-
89
-
90
-
91
-
92
-
93
-
94
-
95
-
96
-
97
-
98
-
99
-
100
-
101
-
102
-
103
-
104
-
105
-
106
-
107
-
108
-
109
-
110
-
111
-
112
-
113
-
114
-
115
-
116
-
117
-
118
-
119
-
120
-
121
-
122
-
123
-
124
-
125
-
126
-
127
-
128
-
129
 |
 |
