Epson PictureMate Flash - PM 280 Basics - Page 17
Getting Help, Choosing a Layout, Setup, Layout
 |
View all Epson PictureMate Flash - PM 280 manuals
Add to My Manuals
Save this manual to your list of manuals |
Page 17 highlights
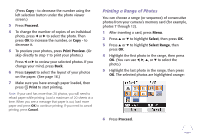
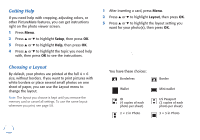
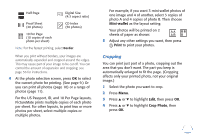
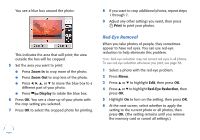
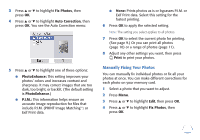
Getting Help If you need help with cropping, adjusting colors, or other PictureMate features, you can get instructions right on the photo viewer screen. 1 Press Menu. 2 Press u or d to highlight Setup, then press OK. 3 Press u or d to highlight Help, then press OK. 4 Press u or d to highlight the topic you need help with, then press OK to see the instructions. Choosing a Layout By default, your photos are printed at the full 4 × 6 size, without borders. If you want to print pictures with white borders or place several small photos on one sheet of paper, you can use the Layout menu to change the layout. Note: The layout you choose is kept until you remove the memory card or cancel all settings. To use the same layout whenever you print, see page 58. 1 After inserting a card, press Menu. 2 Press u or d to highlight Layout, then press OK. 3 Press u or d to highlight the layout setting you want for your photo(s), then press OK. You have these choices: Borderless Wallet ID (4 copies of each photo per sheet) 2 × 2 in Photo Border Mini-wallet US Passport (2 copies of each photo per sheet) 3 × 3 in Photo 16
-
 1
1 -
2
-
3
-
4
-
5
-
6
-
7
-
8
-
9
-
10
-
11
-
 12
12 -
 13
13 -
 14
14 -
 15
15 -
 16
16 -
 17
17 -
 18
18 -
 19
19 -
 20
20 -
 21
21 -
 22
22 -
23
-
24
-
25
-
26
-
27
-
28
-
29
-
30
-
31
-
32
-
33
-
34
-
35
-
36
-
37
-
38
-
39
-
40
-
41
-
42
-
43
-
44
-
45
-
46
-
47
-
48
-
49
-
50
-
51
-
52
-
53
-
54
-
55
-
56
-
57
-
58
-
59
-
60
-
61
-
62
-
63
-
64
-
65
-
66
-
67
-
68
-
69
-
70
-
71
-
72
-
73
-
74
-
75
-
76
-
77
-
78
-
79
-
80
-
81
-
82
-
83
-
84
-
85
-
86
-
87
-
88
-
89
-
90
-
91
 |
 |