Epson PictureMate Flash - PM 280 Basics - Page 54
Using the Optional Battery, Installing the Battery
 |
View all Epson PictureMate Flash - PM 280 manuals
Add to My Manuals
Save this manual to your list of manuals |
Page 54 highlights
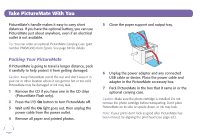
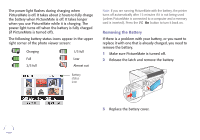
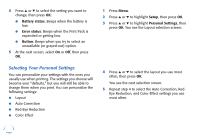
Using the Optional Battery To buy the optional battery, check with your PictureMate retailer or go to www.MyPictureMate.com. See page 68 for more information on purchasing PictureMate supplies and accessories. With a fully charged battery, you can print about 100 photos (or 60 photos when printing from PictureMate Flash's built-in CD drive). Installing the Battery 1 Make sure PictureMate is turned off. 2 Unplug the AC adapter from PictureMate. 3 Release the latch and remove the battery cover from the back of the printer. 4 Insert the battery as shown until it clicks into place. Charging the Battery After you install the battery, you need to charge it by connecting the AC adapter and plugging in the printer. 53
-
 1
1 -
2
-
3
-
4
-
5
-
6
-
7
-
8
-
9
-
10
-
11
-
12
-
13
-
14
-
15
-
16
-
17
-
18
-
19
-
20
-
21
-
22
-
23
-
24
-
25
-
26
-
27
-
28
-
29
-
30
-
31
-
32
-
33
-
34
-
35
-
36
-
37
-
38
-
39
-
40
-
41
-
42
-
43
-
44
-
45
-
46
-
47
-
48
-
 49
49 -
 50
50 -
 51
51 -
 52
52 -
 53
53 -
 54
54 -
 55
55 -
 56
56 -
 57
57 -
 58
58 -
 59
59 -
60
-
61
-
62
-
63
-
64
-
65
-
66
-
67
-
68
-
69
-
70
-
71
-
72
-
73
-
74
-
75
-
76
-
77
-
78
-
79
-
80
-
81
-
82
-
83
-
84
-
85
-
86
-
87
-
88
-
89
-
90
-
91
 |
 |

53
Using the Optional Battery
To buy the optional battery, check with your
PictureMate retailer or go to www.MyPictureMate.com.
See page 68 for more information on purchasing
PictureMate supplies and accessories.
With a fully charged battery, you can print about 100
photos (or 60 photos when printing from PictureMate
Flash’s built-in CD drive).
Installing the Battery
1
Make sure PictureMate is turned off.
2
Unplug the AC adapter from PictureMate.
3
Release the latch and remove the battery cover
from the back of the printer.
4
Insert the battery as shown until it clicks into
place.
Charging the Battery
After you install the battery, you need to charge it by
connecting the AC adapter and plugging in the printer.