Epson PictureMate Flash - PM 280 Basics - Page 66
Software Installation Problems, Print Quality Problems, User's Guide, User's, Guide
 |
View all Epson PictureMate Flash - PM 280 manuals
Add to My Manuals
Save this manual to your list of manuals |
Page 66 highlights
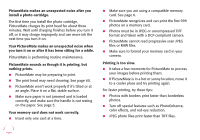
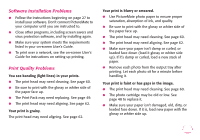
Software Installation Problems ● Follow the instructions beginning on page 27 to install your software. Don't connect PictureMate to your computer until you are instructed to. ● Close other programs, including screen savers and virus protection software, and try installing again. ● Make sure your system meets the requirements listed in your on-screen User's Guide. ● To print over a network, see the on-screen User's Guide for instructions on setting up printing. Print Quality Problems You see banding (light lines) in your prints. ● The print head may need cleaning. See page 60. ● Be sure to print with the glossy or whiter side of the paper face up. ● The Print Pack may need replacing. See page 49. ● The print head may need aligning. See page 62. Your print is grainy. The print head may need aligning. See page 62. Your print is blurry or smeared. ● Use PictureMate photo paper to ensure proper saturation, absorption of ink, and quality. ● Be sure to print with the glossy or whiter side of the paper face up. ● The print head may need cleaning. See page 60. ● The print head may need aligning. See page 62. ● Make sure your paper isn't damp or curled, or loaded face down (load it glossy or whiter side up). If it's damp or curled, load a new stack of paper. ● Remove each photo from the output tray after printing. Let each photo sit for a minute before handling it. Your print is faint or has gaps in the image. ● The print head may need cleaning. See page 60. ● The photo cartridge may be old or low. See page 48 to replace it. ● Make sure your paper isn't damaged, old, dirty, or loaded face down. If it is, load new paper with the glossy or whiter side up. 65
-
 1
1 -
2
-
3
-
4
-
5
-
6
-
7
-
8
-
9
-
10
-
11
-
12
-
13
-
14
-
15
-
16
-
17
-
18
-
19
-
20
-
21
-
22
-
23
-
24
-
25
-
26
-
27
-
28
-
29
-
30
-
31
-
32
-
33
-
34
-
35
-
36
-
37
-
38
-
39
-
40
-
41
-
42
-
43
-
44
-
45
-
46
-
47
-
48
-
49
-
50
-
51
-
52
-
53
-
54
-
55
-
56
-
57
-
58
-
59
-
60
-
 61
61 -
 62
62 -
 63
63 -
 64
64 -
 65
65 -
 66
66 -
 67
67 -
 68
68 -
 69
69 -
 70
70 -
 71
71 -
72
-
73
-
74
-
75
-
76
-
77
-
78
-
79
-
80
-
81
-
82
-
83
-
84
-
85
-
86
-
87
-
88
-
89
-
90
-
91
 |
 |