Epson WF-M1560 Users Guide - Page 114
Faxing, Power Off Notices, Connecting a Telephone or Answering Machine
 |
View all Epson WF-M1560 manuals
Add to My Manuals
Save this manual to your list of manuals |
Page 114 highlights
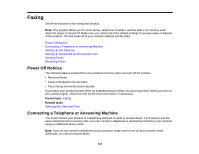
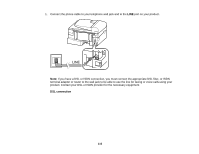
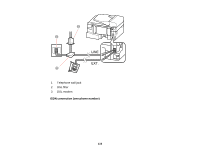
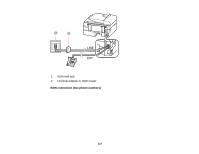
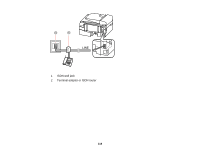
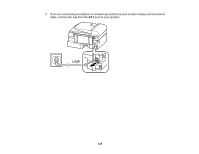
Faxing See these sections to fax using your product. Note: This product allows you to store names, telephone numbers, and fax data in its memory even when the power is turned off. Make sure you restore all of the default settings if you give away or dispose of the product. This will erase all of your network settings and fax data. Power Off Notices Connecting a Telephone or Answering Machine Setting Up Fax Features Setting Up Speed Dial and Group Dial Lists Sending Faxes Receiving Faxes Power Off Notices The following data is erased from your product's memory when you turn off the product: • Received faxes • Faxes scheduled to be sent later • Faxes being transmitted automatically If you leave your product turned off for an extended period of time, its clock may reset. When you turn on your product again, check the time on the clock and reset it, if necessary. Parent topic: Faxing Related tasks Selecting the Date and Time Connecting a Telephone or Answering Machine You must connect your product to a telephone wall jack to send or receive faxes. If you want to use the same telephone line to receive calls, you can connect a telephone or answering machine to your product using an additional phone cable. Note: If you do not connect a telephone to your product, make sure to turn on Auto Answer mode. Otherwise, you cannot receive faxes. 114
-
 1
1 -
2
-
3
-
4
-
5
-
6
-
7
-
8
-
9
-
10
-
11
-
12
-
13
-
14
-
15
-
16
-
17
-
18
-
19
-
20
-
21
-
22
-
23
-
24
-
25
-
26
-
27
-
28
-
29
-
30
-
31
-
32
-
33
-
34
-
35
-
36
-
37
-
38
-
39
-
40
-
41
-
42
-
43
-
44
-
45
-
46
-
47
-
48
-
49
-
50
-
51
-
52
-
53
-
54
-
55
-
56
-
57
-
58
-
59
-
60
-
61
-
62
-
63
-
64
-
65
-
66
-
67
-
68
-
69
-
70
-
71
-
72
-
73
-
74
-
75
-
76
-
77
-
78
-
79
-
80
-
81
-
82
-
83
-
84
-
85
-
86
-
87
-
88
-
89
-
90
-
91
-
92
-
93
-
94
-
95
-
96
-
97
-
98
-
99
-
100
-
101
-
102
-
103
-
104
-
105
-
106
-
107
-
108
-
 109
109 -
 110
110 -
 111
111 -
 112
112 -
 113
113 -
 114
114 -
 115
115 -
 116
116 -
 117
117 -
 118
118 -
 119
119 -
120
-
121
-
122
-
123
-
124
-
125
-
126
-
127
-
128
-
129
-
130
-
131
-
132
-
133
-
134
-
135
-
136
-
137
-
138
-
139
-
140
-
141
-
142
-
143
-
144
-
145
-
146
-
147
-
148
-
149
-
150
-
151
-
152
-
153
-
154
-
155
-
156
-
157
-
158
-
159
-
160
-
161
-
162
-
163
-
164
-
165
-
166
-
167
-
168
-
169
-
170
-
171
-
172
-
173
-
174
-
175
-
176
-
177
-
178
-
179
-
180
-
181
-
182
-
183
-
184
-
185
-
186
-
187
-
188
-
189
-
190
-
191
-
192
-
193
-
194
-
195
-
196
-
197
-
198
-
199
-
200
-
201
-
202
-
203
-
204
-
205
-
206
-
207
-
208
-
209
-
210
-
211
-
212
-
213
-
214
-
215
-
216
-
217
-
218
-
219
-
220
-
221
-
222
-
223
-
224
-
225
-
226
-
227
-
228
-
229
-
230
-
231
-
232
-
233
-
234
-
235
-
236
-
237
-
238
-
239
-
240
-
241
-
242
-
243
-
244
-
245
-
246
-
247
 |
 |